OpenStreetMap

mvexel's Diary

Recent diary entries

In the early days of OSM, when the map was formless and empty, mappers in the United States conducted data imports without much discussion, because there were just not a lot of people to discuss with.

One example is a series of imports of USGS GNIS data. This is point data from the United States Geological Survey’s Geographic Names Information System. Some of this data was very useful, for example to populate the map with place nodes for smaller towns. But there’s also a lot of data that was not very good, and a lot of it is still on the map today.

One example is the mines layer, imported with the tag gnis:feature_type=Mine. For starters, a lot of these nodes represent historic mines, of which the United States has many, especially in the West. But they were imported as landuse=quarry, a tag that should be used for nodes in the first place.

historic imported mines in JOSM

Fortunately, a lot of them are easy to fix, because in many cases nobody has touched these features since they were imported, and because they are nodes, so they stand on their own as individual features.

I created a MapRoulette Challenge a while ago to clean up these old nodes in my home state of Utah. There were almost 600 nodes that met the criteria I described above. This is a so-called ‘tag fix’ challenge, meaning that alternative tags are suggested by MapRoulette, in this case to remove landuse=quarry and add historic=mine. You just need to review the situation using the available aerial imagery. When the proposed tags look good to you, you can make the change in OSM from within MapRoulette just by accepting the tag change.

If you are interested in doing a challenge like this for your state, you can clone this one.

historic mines in JOSM

As a bonus, many of these old mine nodes have a lot of old road ways from the TIGER database, imported around the same time, see example above. If you want to spend extra time, you can clean those up while you’re in the area!

I organize the OpenStreetMap Salt Lake City monthly meetups. I don’t usually write reports on the individual meetups, but I had even more fun than usual last night so I thought I would write a quick report!

We had a great evening (as always) and with a good turnout too! We talked about SOTM US 2024, to be hosted in our fine city next June, and everyone signed up as a candidate volunteer for the event!

people signing up as volunteers

We also shared some knowledge about drones and related software; I know next to nothing about drones and haven’t kept up with the technology, so that was really interesting to me. We may pursue a small grant to acquire one for our OSM group. I am not sure from where yet.

As usual, we discussed recent business openings and closings to keep the map up to date. We have good resources like Gastronomic SLC (a weekly newsletter and website with news about restaurants and bars in the area) and City Weekly, a local newspaper, and of course our own observations.

We talked about what parts of the map would need to be improved to give our SOTM guests a mappy welcome next year. There’s plenty of time but also plenty of work. I think we already have some of the best and most up-to-date POI coverage, and to help keep us up-to-date, we have a MapRoulette challenge to review older POIs. One attendee is doing a lot of work on local bus routes, tedious work that I personally don’t have the stomach for.

We lamented the departure of two food vendors at the food hall that has become our regular meeting spot. They were already removed from OSM, so it should not have been a surprise. On my way out, I did notice a new food vendor that somehow all of us had overlooked so I had to put it on OSM on my way out, using Every Door.

We meet monthly, so if this sounds fun to you and you are in the area, please join us! The Meetup page will always have the latest details about our next meeting!

Location: Granary District, Salt Lake City, Salt Lake County, Utah, 84101, United States

Rapid v2.0 launching this week

Posted by mvexel on 3 April 2023 in English.

Rapid 2.0 launches this week. The Rapid team will host webcasts on April 4 (tomorrow at the time of writing), April 5, and April 6 for Europe / Africa, the Americas, and Asia / Pacific timezones respectively. You can sign up here. You can expect an overview of what’s new, and a live demo. You will also be able to ask the Rapid team questions.

Rapid webcasts promo

What’s new

I wrote about the public beta of Rapid 2.0 before, and covered what’s new there.

One additional thing I wanted to call out is the ever-growing amount of external datasets available to mappers for efficient mapping of addresses, buildings and other features available as open data. There is a page on the OSM wiki that lists them all, and Esri has an interactive map with all the data sources available and considered as Rapid layers.

image alt

You can of course access, search and add the available layers within Rapid itself.

My favorite data layers are still the buildings. Buildings are nice, useful and important to have on the map, and drawing them can be pretty tedious if you care about precise outlines:

building with many nodes

Contributing

I’ve started making very small contributions to the Rapid code, mainly to improve on the styling of OSM features on the map. If you see something you would like to see fixed or improved, look over the existing issues and open a new one if you don’t see what you are after. The Rapid team looks at the new issues very frequently and we’re eager to make Rapid the most mapper-friendly editor.

I’m posting this diary as part of my professional work with the Rapid team.

Location: Rapid City, Pennington County, South Dakota, United States

This is a cross-post from my blog.

This post is a follow-up on my series on GoPro Max panoramic imagery capture for Mapillary. Find part 1 here and part 2 here.

To capture true 360 degree images with a camera that has just two lenses, compromises are unavoidable. Optics dictate that a lens that captures a 180 degree field of view will have some image sharpness falloff at the edges of the field of view. I hadn’t considered this when I first started capturing with the GoPro MAX. I just mounted it the way I would a regular GoPro and didn’t give it another thought:

cam on helmet, pointing forward

Until I started looking at the result more closely. Here’s a detail of a recent capture:

blurry detail

I can’t read what’s on this sign at all. And I was biking right past it. We must be able to do better that that! That’s when I considered what I knew about the optics of extreme wide angle lenses. (I’ve been an amateur photographer for a long time and used to love to shoot with 16-24 mm lenses.)

So what if I flipped the camera 90 degrees? Another dig through my old GoPro accessories gave me just what I needed for that:

GoPro 90 degree mount adapter

With that in place, I now look like this:

me with sideways mounted GoPro on helmet

I immediately went out for a test ride and captured two sequences:

  1. Classic (Camera facing forward)
  2. New! (Camera facing sideways)

Here’s a detail from the “Classic” sequence, with the camera facing forward:

front facing GoPro camera - image detail

Here’s the same detail, but captured with the camera facing sideways:

side facing GoPro camera - image detail

These captures were made only minutes apart, so the conditions are pretty much identical, and I made sure to bike at an even speed for both capture sessions. I’d have to do more comparisons to really draw a solid conclusion, but it looks like it really does make a meaningful difference!

Arguably, sharpness and detail matter most not in front of you when you’re driving / walking / biking, where most of the interesting features are relatively large (like crosswalks or traffic lights), but to your left and right, where you would encounter store fronts, house numbers and other small details that are valuable for mapping. With that in mind, this way of mounting the camera makes a lot of sense.

I will continue using the GoPro MAX mounted different ways for a while and see if this conclusion holds up!

If you are interested in purchasing everything that is necessary to mount a GoPro on a bike helmet and mount it sideways, this accessory kit1 contains everyting you need. It costs USD 20 at the time I write this.

  1. This is a link to the kit on the official GoPro web shop. It’s not an affiliate / sponsored link. 

Location: 9th & 9th, Salt Lake City, Salt Lake County, Utah, 84102, United States

Mapillary 360° capture part 2: bike

Posted by mvexel on 27 February 2023 in English.

This is a cross-post from my blog

I posted a couple of days ago about my first captures with the GoPro MAX camera I have on loan and uploading to Mapillary. This all went pretty smooth, so I wanted to capture while biking. I bike around town a fair amount and you can cover more ground in the same amount of time compared to walking, so I was eager to try it.

Years ago, I captured Mapillary imagery with my regular GoPro HERO 3+ camera mounted on my bike:

bike capture image example

I remember from back then (2014) that the uploading process was not super straightforward, but Mapillary was only 1 year old then, so that was to be expected.

I still have some of the accessories from my HERO 3+, like a helmet attachment and a quick-release adapter. The accessory interface on the cameras hasn’t changed, so those things work even with the most recent GoPro cameras. Here’s the helmet attachment with quick-release shoe:

helmet attachment

Here’s the quick-release adapter attached to the GoPro MAX:

quick release adapter on gopro max

And here is the camera mounted on my helmet:

camera on helmet

Time to get going! I set the camera to 360° time lapse mode with 2 second interval. 2 seconds is the shortest interval you can set with 360 degree images. (If you use only the front camera you can set the time lapse interval to as low as 0.5 seconds.)

Riding around

As a test, I rode around between my house and downtown Salt Lake City for about an hour:

my route

Being used to a normal forward-facing camera or phone for capturing, I was worried that I would have to keep my head straight and I would mess up my captures by looking up / left / right / down. But with this being a panoramic camera, that doesn’t matter. Important, because I need to be able to look around to be safe.

I uploaded by dragging the entire folder of images straight from the MicroSD card to the Desktop Uploader, and that just worked.

Less than a day later, my sequences are on the Mapillary website. (I couldn’t see them in the JOSM plugin yet, I think there must be some additional delay before the API exposes new sequences?

my images, live!

Findings and what next

App: sucks

I decided to give the GoPro mobile app a try. From what I remembered, you can connect to the camera using wifi or bluetooth and use it as a remote control of sorts. It would be nice to be able to quickly check the status of the camera without having to stop and take my helmet off.

The app is called “Quik” now and my experience was not good. The app will connect to the camera only about half the time and it nags you constantly to take out a subscription to upload everything you do to the cloud.

Fortunately, another accessory from the HERO 3 days I still had was a physical remote control!

Remote: win!

After a bit of rummaging through my GoPro accessory bag, I found the remote.

remote in pile

The remote is a simple but nicely made piece of equipment. The model number is ARMTE-001. I guess this is the first remote they ever made?

GoPro ARMTE-001 remote

Again, I bought this at the same time I bought my HERO 3+, back in 2014. So I was ready to be disappointed in a multitude of ways: I might not be able to charge it, it may be dead altogether, or just not work with a 2022 GoPro camera.

Imagine my surprise when it … just kind of worked! I did still have the charging cable, which has perhaps the strangest connector I have ever seen:

gopro remote charging cable

It still takes and holds a charge, and instructions on how to put it in pairing mode are printed right on the device!

pairing mode instructions

Now I can check the status of the camera, pause and resume recording, and turn it on and off without having to take off my helmet. Neat! I will definitely use that on my next ride.

Battery Life

After riding around for 1 hour and continuously recording, I still had about 60% battery left. So I should be able to ride for 3 hours at least without running out of juice. Remember that it is winter here, the temperatures are around freezing, so I expect this to be a bit better in the summer. No need to go out and buy an extra battery just yet!

Image quality

At first glance, the images look pretty nice, but that’s not really what we’re after. I want to be able to get details for mapping. Business names on stores are usually clear enough:

business store front names

But I find that most of the time, the images are not good enough to read, for example, house numbers:

an unreadable house number

Even store signs with low contrast and / or thin lettering can become illegible. Here’s my capture + a reference from Google streetview:

my capture

gsv capture

I don’t know what GoPro or Mapillary settings I might try and change to improve image quality. Perhaps I’m just expecting too much from a consumer grade pano camera :) The images are definitely good enough to map and confirm a lot of detail.

The next frontier is mounting this camera safely on the roof of my car. That will be for another post! Happy Mapping!

Location: The Avenues, Salt Lake City, Salt Lake County, Utah, 84103, United States

This is a cross-post from my blog

I have always been excited about the opportunities open street level imagery (SLI) offers to OSM. I helped launch OpenStreetView (now Kartaview) back when I worked at Telenav and was an early contributor to Mapillary as well. Recently, I’ve had the opportunity to work more closely with the great folks at Mapillary. This re-kindled my excitement for SLI & OSM! Good things are rolling out and will continue to roll out in 2023, so stay tuned! The Mapillary blog is the best source for announcements.

Most recently, Mapillary added support for 360° video upload to their desktop uploader and the CLI tools! This is great news for anyone with a supported camera, like the GoPro MAX. I happen to have one of those so time to try it out!

The Mapillary help pages include great and authoritative guides on using 360° cameras including specific instructions for using the GoPro MAX. This post is just me summarizing my own experience.

Preparing

You only need to do these steps once.

  1. Get the latest version of the Mapillary Desktop Uploader available for Windows, Linux and MacOS.
  2. Install the Uploader onto your computer.
  3. Open the Uploader and log into your Mapillary account.

Capturing

  1. Make sure your GoPro MAX is fully charged and set to 360° video. I used 5.6k and 30fps1.

gopro settings

  1. Head outside, push the record button and start walking / riding! I use and recommend a telescopic pole with a standard GoPro mount to hold the camera, those are easily and cheaply available on Amazon or other retailers.
  2. When you’re back, push the record button again to end your recording session.

Uploading

  1. Pull the SD card out of the GoPro MAX
  2. Insert the card into your computer
  3. Open the DCIM/100GOPRO folder2
  4. Open the Mapillary Desktop Uploader
  5. Drag the video file3 onto the Uploader window. After a little while, the Uploader will show a map with your route:

uploader window

  1. Hit Upload!

It takes about a day for the sequence to become available on Mapillary and in your OSM editor.

This is my original ❄️☃️ footage, and this is the resulting Mapillary sequence.

Things to consider

  • Make sure GPS is enabled….I didn’t get my camera new so I don’t know if it’s enabled by default out of the box. Mapillary can’t do anything with non-GPS-tagged video.
  • Don’t capture more than needed, 30fps 5k video is wild overkill for walking.
  • With a 360° camera, you are going to be in the field of view if you’re walking or biking. Not your face, but still, something to be aware of:

Concluding & What Next

I’m impressed by how easy this was. Just drag and drop and done! I do wish the images would process more quickly. 24h can be a long time to wait when you’re eager to start mapping.

Next up, once the snow melts and it’s safer to bike around again, I’ll try capturing while riding. I found a GoPro helmet mount in my stash of old GoPro accessories:

me with a gopro mounted on a bike helmet

I’m also looking forward to the uploader and command line tools gaining support for more video types. I hear from the Mapillary team that this is in the works. If you have a sample video of an unsupported camera, let me know!

If you’re in the Salt Lake City area, come to one of the local meetups and I’ll be happy to lend you my GoPro so you can try it out for yourself.

  1. The Mapillary blog recommends timelapse pictures rather than video when walking, but I wanted to test the full video support. This produces very large files! My 5 minute walk yielded a 2.2GB file. 

  2. The folder might have a different number like 101GOPRO if you have a large number of captures on the SD card. 

  3. Video files are named like GSxxxxx.360. If you recorded time lapse images instead, they will be named GSxxxx.JPG. In that case, you can select all the images and drag them onto the application. 

Location: Central City / Liberty-Wells, Salt Lake City, Salt Lake County, Utah, 84111, United States

Announcing Rapid 2.0 beta

Posted by mvexel on 14 February 2023 in English.

I’ve been closely involved with the journey Rapid is on. The first version of Rapid was released in 2019 as the first OSM editor that added machine learning-derived layers you could easily add to OSM in one click: roads from Meta and building footprints from Microsoft. This groundbreaking work enabled efficient, but human powered adding of vetted external data to OSM, and continues to be one of the most widely used methods for doing so. Since the original launch, a collaboration with Esri’s community data program added many additional layers of authoritive data available to add to OSM in the same way.

As government agencies continue to make more data available to OSM through Rapid (around 145 as of now, with hundreds of millions of features), work on version 2 started in early 2022. Developers Ben Clark and Bryan Housel presented the early stages at State of the Map US in Tucson last March, and followed up with a more technical talk about the underlying technology changes at FOSS4G in Firenze. Alpha versions of version 2 have been circulating since then. I have been using these extensively, especially in the past two months. I’ve been barraging Ben and Bryan with bugs and feature requests, as have many others who have participated in the alpha testing phase. A ton of issues have been resolved since the first alpha release, and we’re very happy with where we are with Rapid 2.0. Happy enough to launch version 2 beta today! 🎉

What’s new in Rapid 2.0

If you haven’t used Rapid at all yet, this is a great opportunity to try it for the first time. Many things will feel familiar if you’ve used the built-in editor on openstreetmap.org, but you will also notice small conveniences you won’t find there—or anywhere—like a shortcut to quickly cycle through highway types when you have a way selected, “virtual nodes” that are displayed for polygons with POI tags and improved polygon labeling:

polygon labels

The main thing I think you will appreciate is how snappy Rapid feels. The majority of the work on Rapid 2.0 has gone into perfomance improvements. The rendering engine has been completely rewritten from the ground up. The snappiness is especially apparent when panning and zooming the map, especially in areas that are mapped with a lot of detail.

Rapid can now also show more map data at lower zoom levels, so it’s easier to see what is mapped even if you are zoomed out. This has helped me map much more efficiently. And at the rate OSM is growing, editor performance becomes ever more important for any mapper!

oldnewdata

More data shown in new Rapid (left) vs old (right)

Innovations in OSM mapping

Within the last couple of years, we mappers have enjoyed a rapidly (ha-ha) expanding choice in mapping tools: StreetComplete has grown tremendously, Every Door has come on the scene as the first POI focused mobile editor, GoMap! is actively being developed with exciting innovations (magnifying glass, capturing opening hours using phone camera). On the desktop, MapComplete shows us a new way of topic- and task-based editing. My expectation is that Rapid will bring more unique capabilities to the landscape of OSM editors, and I can’t wait to see what’s next.

Try Rapid 2.0 beta

Happy Mapping!

Location: 9th & 9th, Salt Lake City, Salt Lake County, Utah, 84102, United States

RapiD bookmarklets

Posted by mvexel on 21 January 2023 in English.

This is a crosspost from my blog.

I’ve been testing the latest alpha version of the RapiD editor. RapiD is a web-based editing environment for OpenStreetMap that incorporates special layers with map features from other sources you can easily copy over to OSM. Examples include Microsoft’s building footprint data, missing roads generated with machine learning, and open data from government GIS sources.

Because RapiD is not included in the dropdown menu where you can select an editor on the OpenStreetMap website, I created a few bookmarklets1 for myself that I hope come in handy for mappers who want to have quick access to RapiD. They are self-contained and don’t read any content from your browser other than the current URL. If you’re not currently on openstreetmap.org or actively editing in the default OSM web editor iD, the bookmarklets will simply do nothing at all.

I tested these bookmarklets in Firefox and Chrome. You can find the source code here. When a new version of RapiD comes out, I’ll do my best to update the bookmarklets.

  1. The bookmarklets are on a separate page, because this blog’s markdown parser has trouble with the javascript: links. 

Viofo A129 time-lapse mode

Posted by mvexel on 6 January 2023 in English.

After tinkering a bit but finally successfully processing videos from my Viofo A129 dash cam and uploading them to Mapillary, there is one last thing I wanted to try: using the A129 time lapse mode to be able to collect more imagery before the storage space on my camera runs out…

This does not seem to be possible without recording your GPS breadcrumbs using a separate device, because the location information written into the movie stream by the camera is sparser than the video frames. Using

exiftool -m -p gpx.fmt -ee -ext mp4 -w! %f.gpx time-lapse-movie.MP4

I get 4 trackpoints for a movie that contains about 300 frames.

This could also be a result of limitations in the way exiftool parses the MP4 file, but looking at the relevant documentation section I don’t see a way to tweak this.

What I think I will do instead is:

  • Buy a larger micro-SD card (they are getting cheaper all the time)
  • Reducing the video quality

In order to be able to capture more of my longer trips. I’m about to make [this drive] and I’ll test it then!

Location: Ballpark, Salt Lake City, Salt Lake County, Utah, 84115, United States

A few days ago I wrote about extracting GPX location data from the raw videos coming out of my A129 dashcam, and uploading to Mapillary. I was doing this one video at a time. A typical drive yields a lot of short videos, each 1, 5 or 10 minutes long depending on the settings. Some automation would be nice!

Mapper n76 suggested in the comments to my previous post to concatenate the short videos first and then process the resulting single video. I tried this following the instructions on the ffmpeg website, but I could not get exiftool to extract location data from the resulting longer video. So what I did instead was write a simple bash script that just loops over all MP4 files in the directory and does the GPX extraction and Mapillary processing / uploading for each file. Here’s the full script I used, which has the gpx.fmt file you need for exiftool baked in for convenience, but the loop itself is simply:

for f in *.MP4; do
    exiftool -m -p gpx.fmt -ee -ext mp4 -w %f.gpx $f
    mapillary_tools video_process_and_upload $f --geotag_source gpx --geotag_source_path ${f%%.*}.gpx --skip_process_errors
done

I found that I need --skip_process_errors because there’s usually one image extracted from the start or end of each video file that cannot be matched with a timestamp from the GPX file. I don’t care enough about one single image out of an entire sequence to try and figure out why, but I’m sure someone more determined than I could fix it :)

Location: 9th & 9th, Salt Lake City, Salt Lake County, Utah, 84102, United States

Viofo A129 Dashcam Video ➡ Mapillary

Posted by mvexel on 13 December 2022 in English.

I purchased a dashcam a while ago because (1) people drive like absolute idiots where I live (seriously, watch that video) and (2) who knows what you might capture? It’s a Viofo A129 Pro Duo, it has a 4k front-facing camera and an additional HD rear-facing camera. It also has built-in GPS.

sample dashcam image

Because it’s always on, I figure it would be nice to use the footage for mapping purposes as well! The process is not completely straightforward, hence this blog post.

Let’s look at what the camera produces:

screenshot of folder

Just movie files, no separate GPX files. That means the location information must be embedded in the video stream somehow. Great..

Some internet sleuthing reveals that the fantastic image / video metadata swiss army knife exiftool (tagline: Metadata R Us 🤣) picked up support for extracting location metadata from video files a few years ago! The command to use is

exiftool -p gpx.fmt -ee -ext mp4 -w %f.gpx ~/tmp/*.MP4

You can read the exiftool documentation to learn more about the various parameters. What’s important is that you need the gpx.fmt file that is basically the template that exitfool uses to write out the raw location data to the familiar GPX format. You can grab it from here.

In the above form, exiftool will iterate over an entire directory of .MP4 files and write one GPX file for each. For this demo, I just copied one movie file from the SD card, so the result is one GPX file with the same name as the movie file but with the .gpx extension.

Now that we have the companion GPX file, we can use mapillary_tools to extract individual images, add location information and upload everything in one step:

mapillary_tools video_process_and_upload 
    ~/tmp/ 
    --skip_process_errors 
    --geotag_source gpx 
    --geotag_source_path ~/tmp/20221209_130755_00330F.gpx

Because the Mapillary CLI tools can only take a single GPX file as the location metadata input, a little scripting to process an entire folder of images would be really nice. I will follow up in another blog with more on that.

I am also experimenting with the camera’s time lapse mode. The video feed for the front camera alone is more than 2GB per 5 minutes, meaning on longer trips you run out of storage and the camera overwrites older files. I will post more on this in the near future as well.

My conclusion is that this definitely could be easier, but it’s also very doable if you’re not afraid of the command line.

Finally, some links for reference:

Location: Central City, Salt Lake City, Salt Lake County, Utah, 84111, United States

I recently wrote about using a Tag-Fix MapRoulette Challenge to update OSM data in an efficient way, no editor required. Tag-Fix is one of two newer Challenge types MapRoulette has available. The other one is called Cooperative. They are called Cooperative because it’s a cooperation between you and the Challenge owner. The Challenge Owner provides the OSM changes, you validate them, tweak them as needed, and commit them to OSM. Cooperative challenges are ideal for when you may be thinking about an import, but you would like to have each feature manually verified by a mapper.

Today, we will look at how to set up a Cooperative Challenge using Microsoft Building Footprints open data. (In a future post we’ll look at how to work with the Challenge as a mapper.) This is not really a beginner’s tutorial; we will be working with PostGIS, QGIS and the command line tools imposm and ogr2ogr. If you have those tools installed and are just a little familiar with them, you should be able to follow along fine!

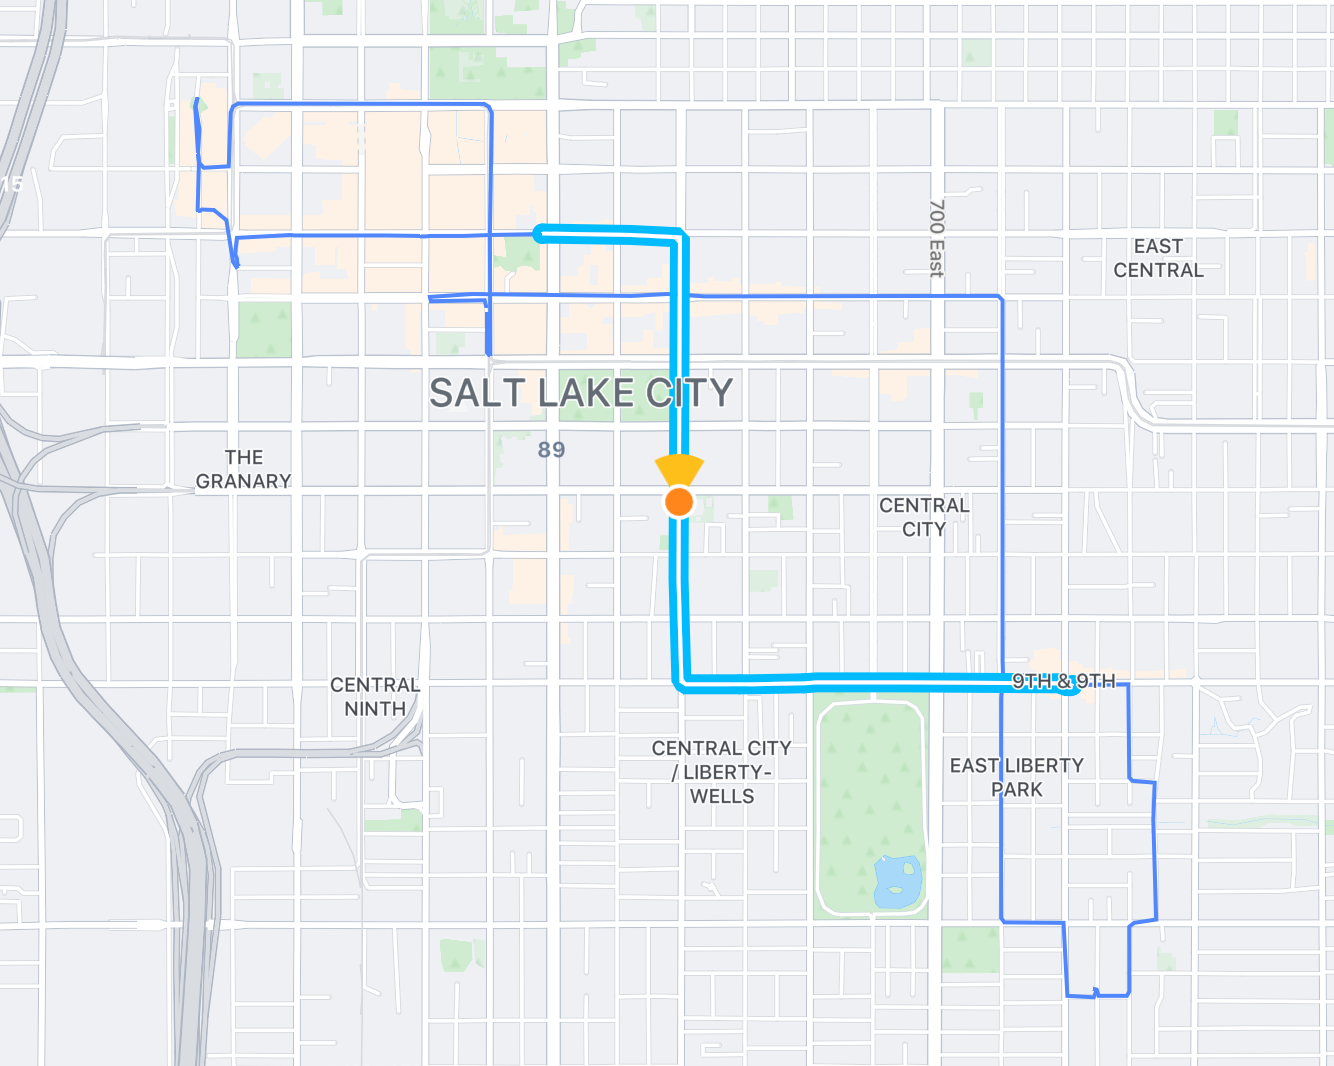
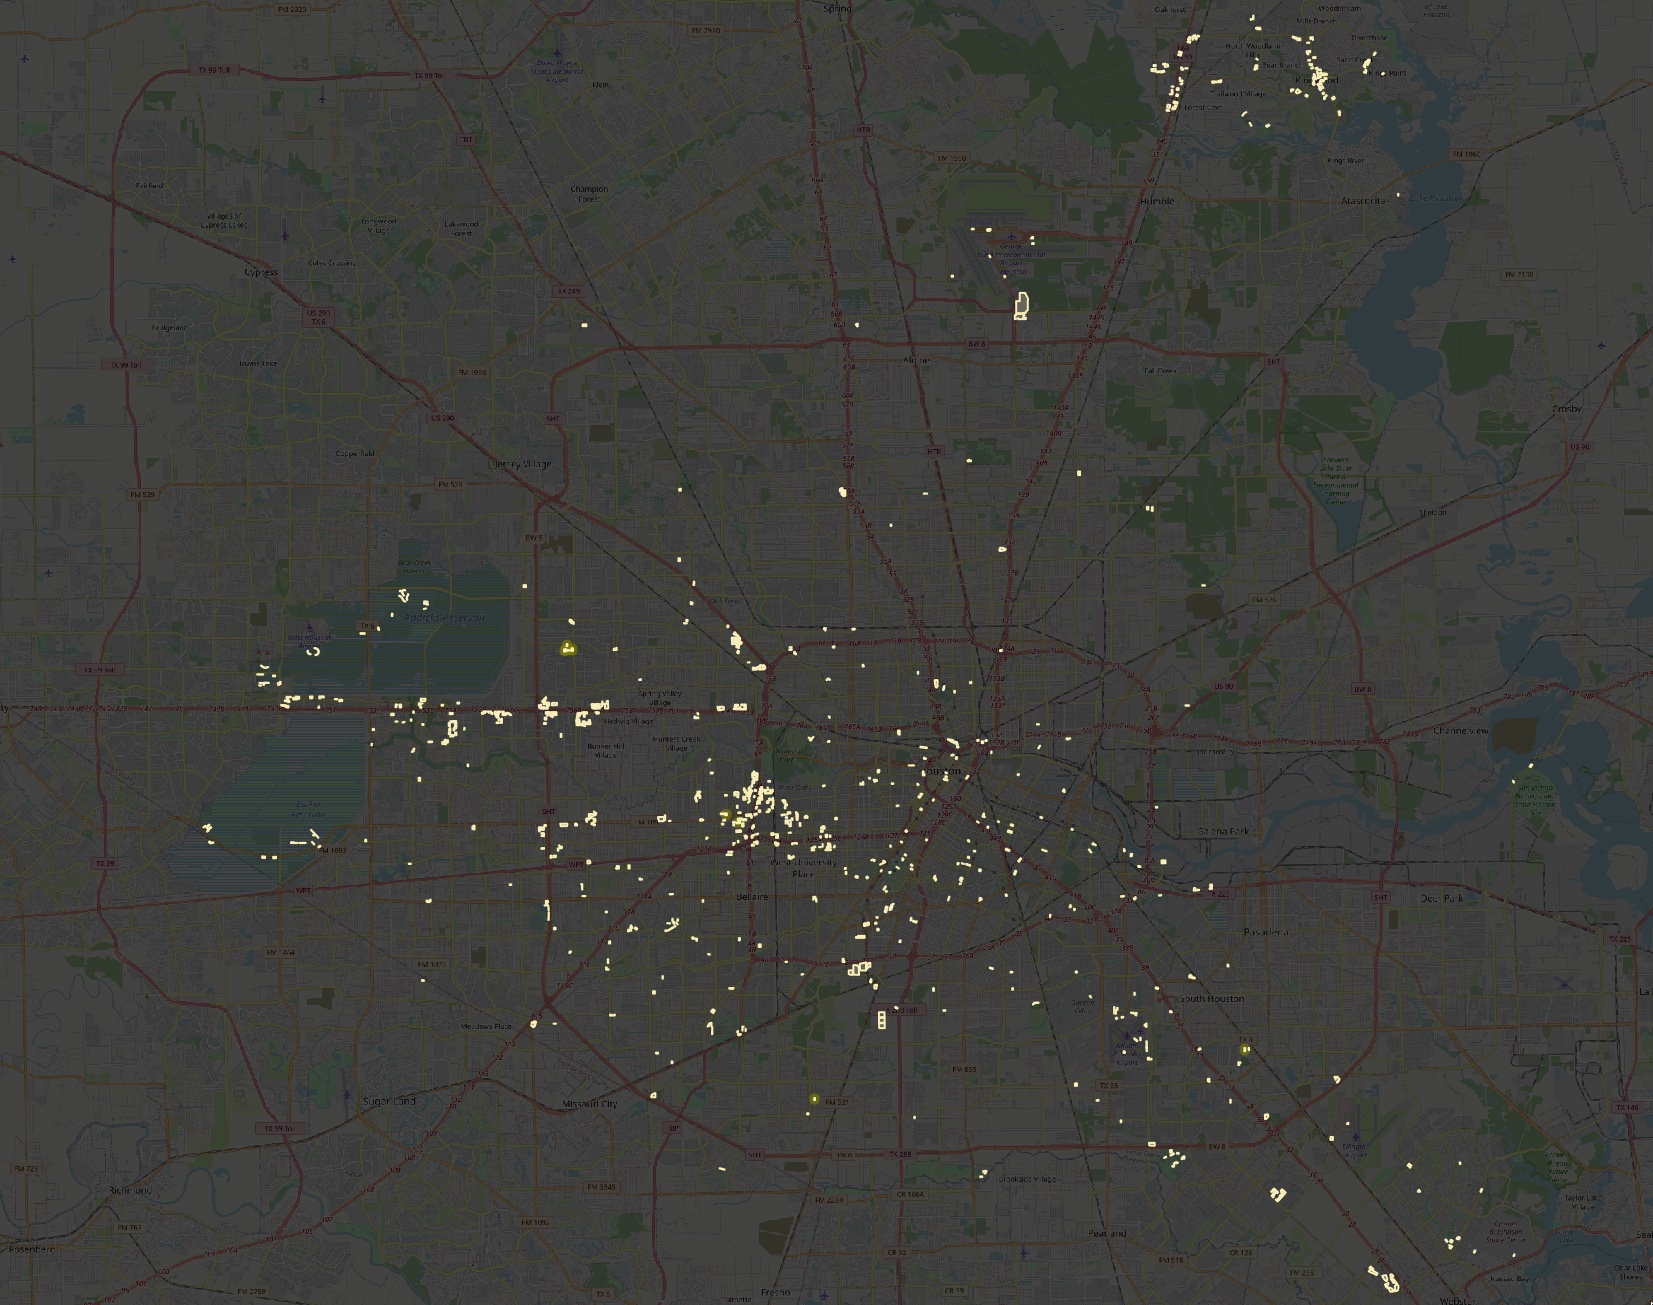
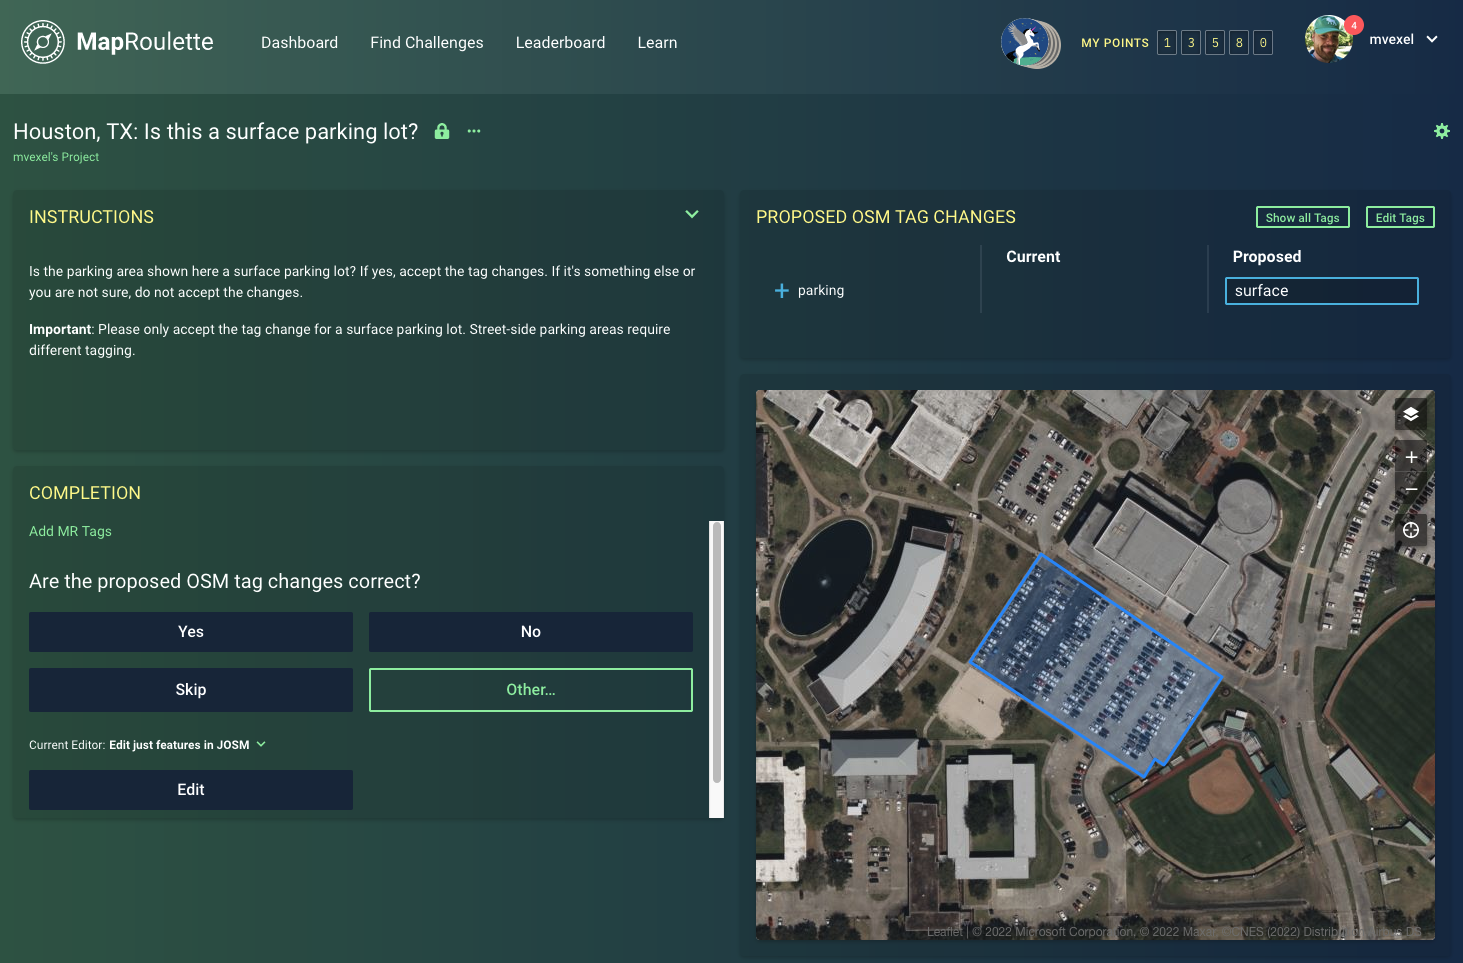
This is what the final result will look like:

maproulette challenge screenshot

maproulette challenge screenshot

These are the steps involved in creating this Challenge:

  1. Download the source data
  2. Data preparation
  3. Challenge Creation

Let’s dive in.

Download the Source Data

We need both existing OSM data and Microsoft buildings data, so we can compare the two and only include MS Buildings in the Challenge where no OSM buildings exist yet. The OSM data is not hard to get a hold of, thanks to Geofabrik who make small areas available on their download website. You can also use a service like BBBike to download a smaller extract created on-demand.

Microsoft makes the data available on their website. You can access the various Github places where you can actually download the data as GeoJSON from there. The files can be quite large: for the United States, they are organized by state. I tend to pick places close to home for my tutorials, so I can more easily spot any weird things in the data or the process, so we will work with the Utah GeoJSON file, which is a little over 320MB when unzipped. For the Challenge, we will select a much smaller size area, which brings us to step 2!

Data Preparation

We’re going to load all the data into a PostGIS database. We will imposm to load the OSM data, and then ogr2ogr to load the MS Buildings data into the same database, in a separate table.

First we create the PostgreSQL database. You can follow the steps described in the imposm tutorial for this. If you’re on a Mac with Postgres.app you can skip the permissions / user / password steps and just do

$ createdb osm $ psql -d osm -c "CREATE EXTENSION postgis;"

(We do not need PostgreSQL’s hstore field type support for our purpose.)

We will use this simple mapping yaml file to tell imposm what to import and how. It will have imposm create one table osm_buildings with the building polygons in it, and another table osm_admin with administrative areas. We will use this table to define the area for our challenge.

With this mapping file and our database set up, we can run imposm to load the data:

$ imposm import -read utah-latest.osm.pbf -mapping building.yml -write -connection postgis://localhost/osm -optimize -deployproduction -overwritecache

See the imposm documentation for the meaning of all the flags; that is beyond the scope of this already long tutorial 😬.

As a final loading step, we use ogr2ogr to load the downloaded MS Buildings GeoJSON data into a table msbuildings in the same database:

$ ogr2ogr -f "PostgreSQL" PG:"dbname=osm" ~/osm/data/Utah.geojson -nln ms_buildings

Phew, that was the hard command-line part. There may very well be newer and / or easier ways to accomplish this. Let me know in the comments.

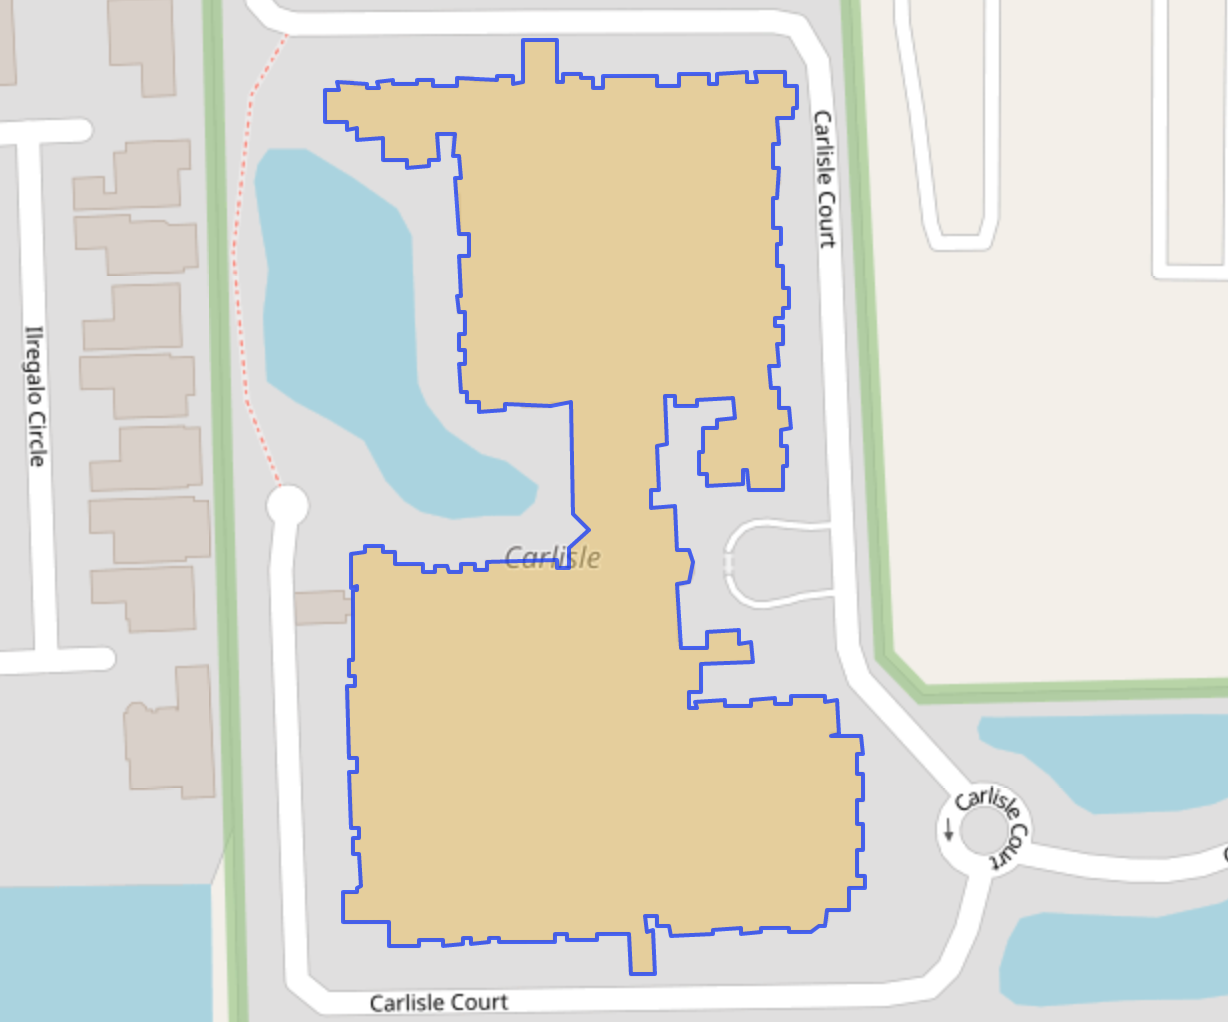
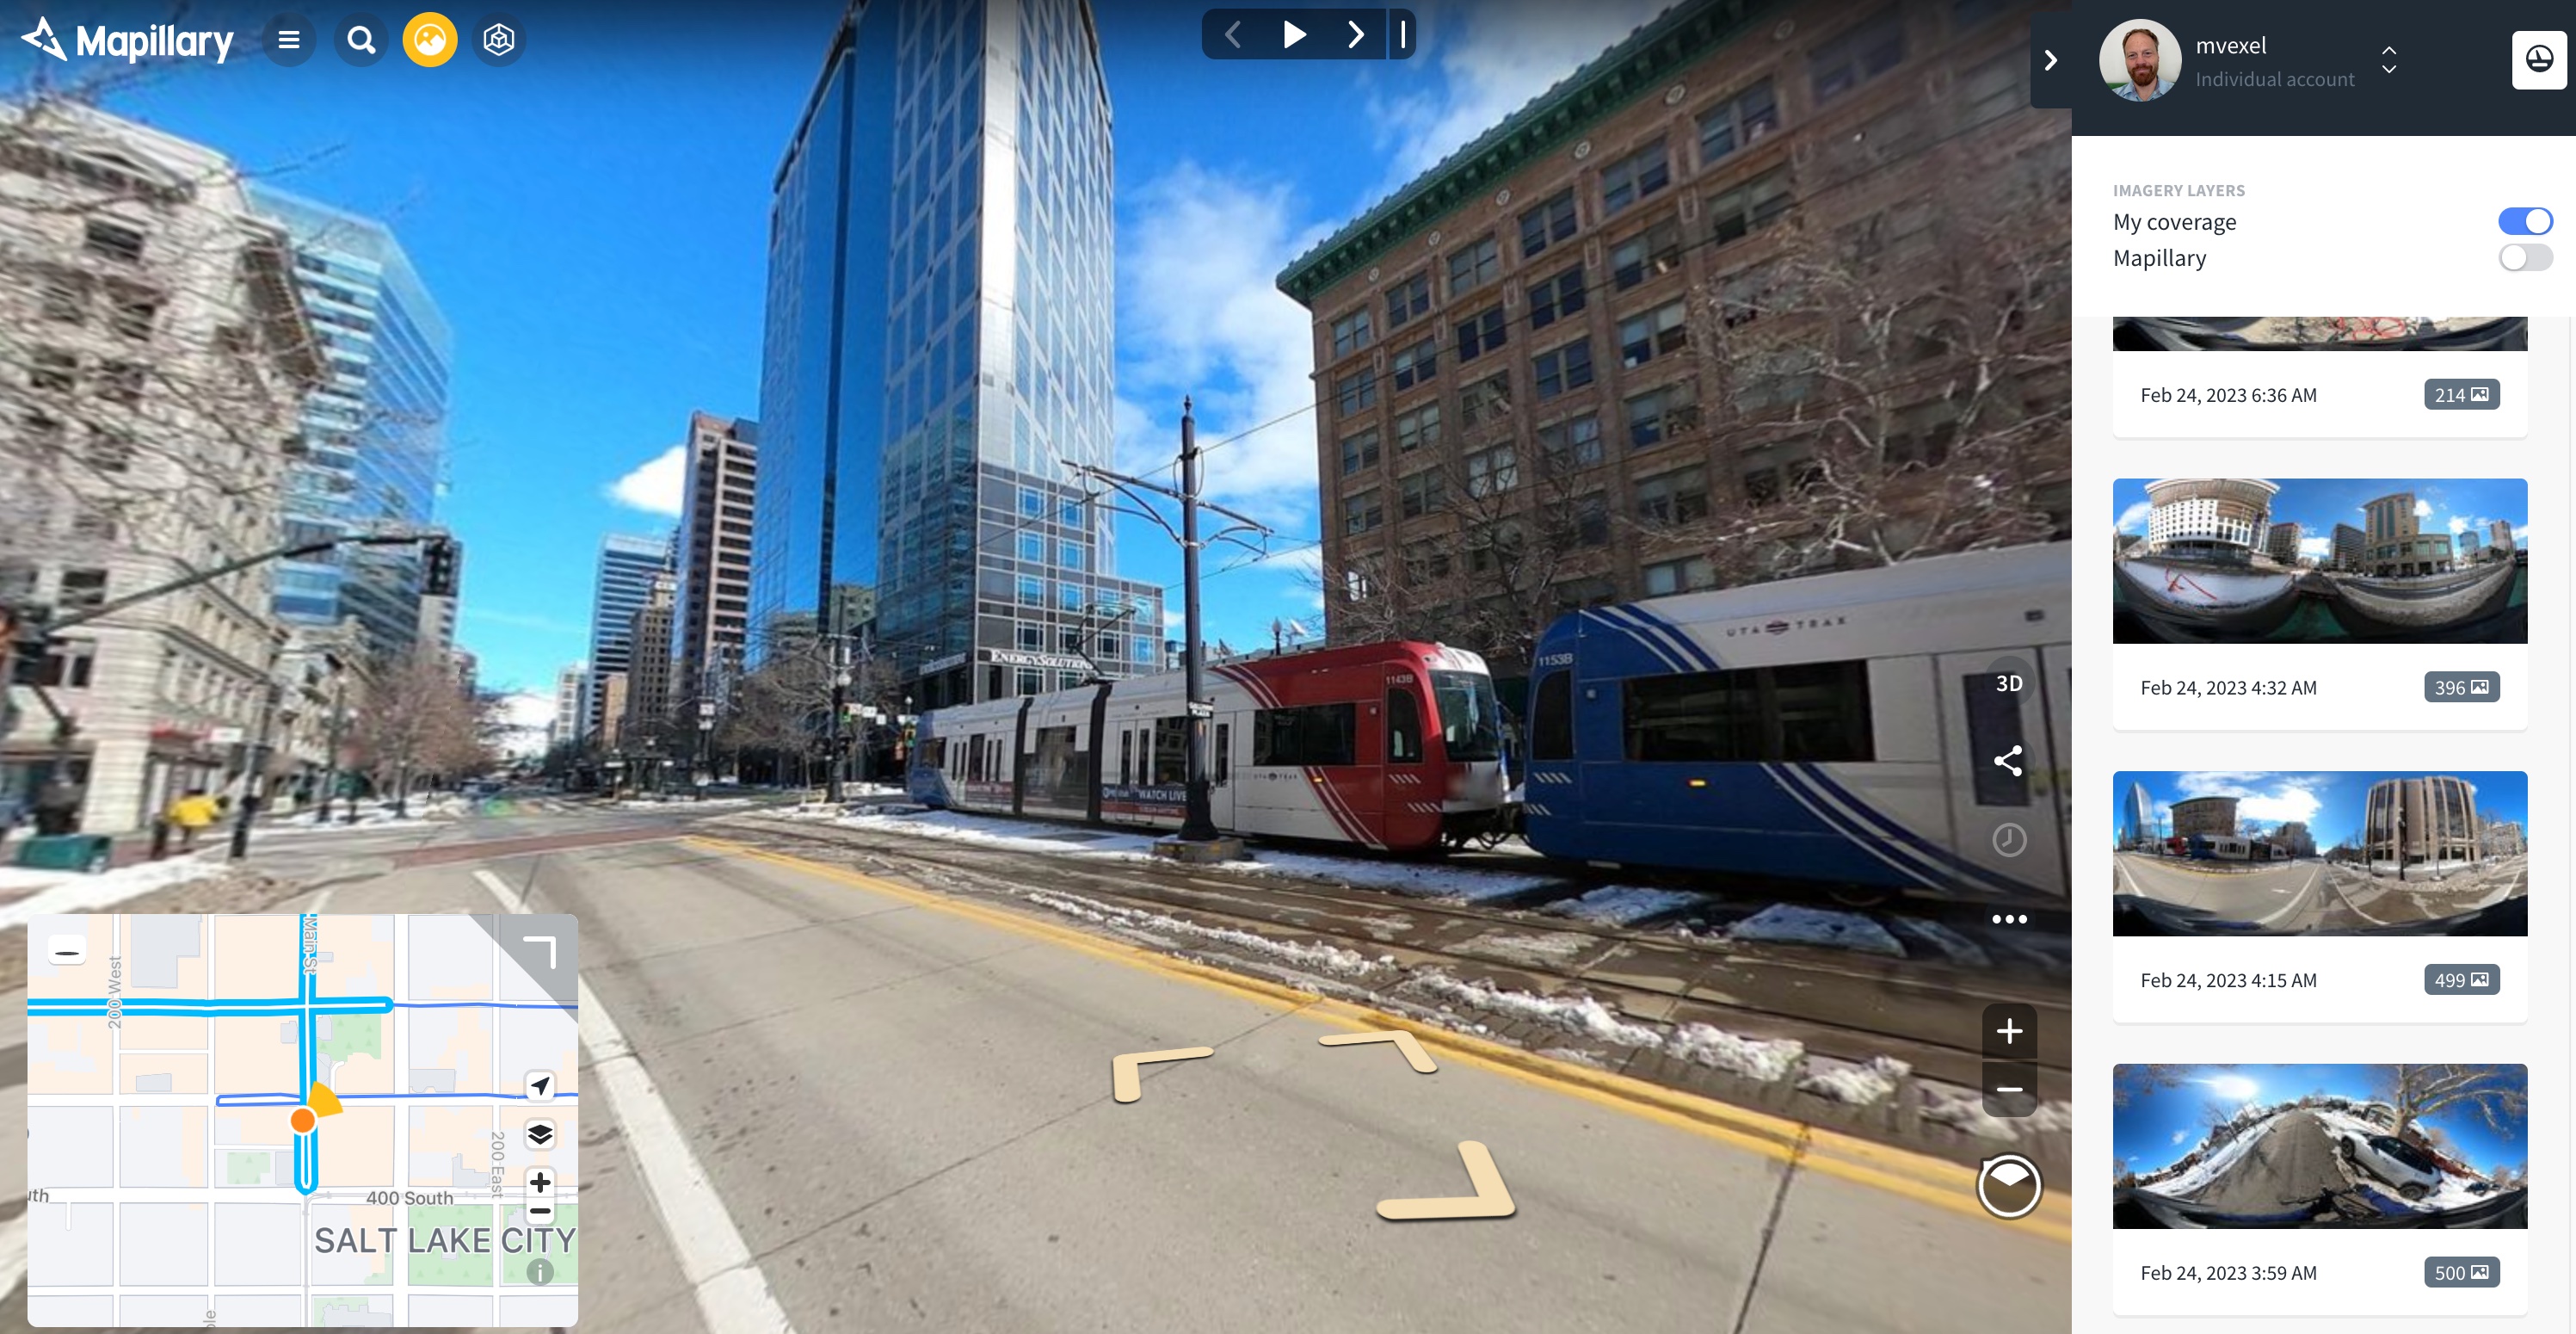
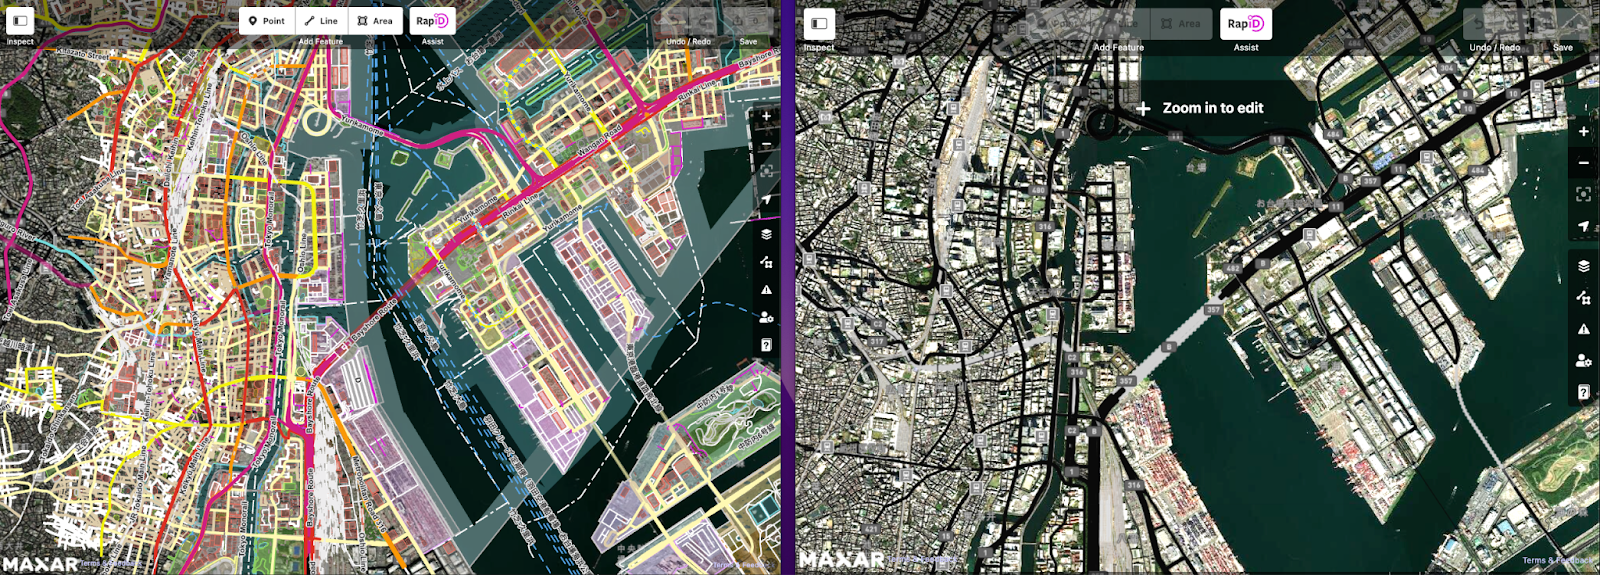
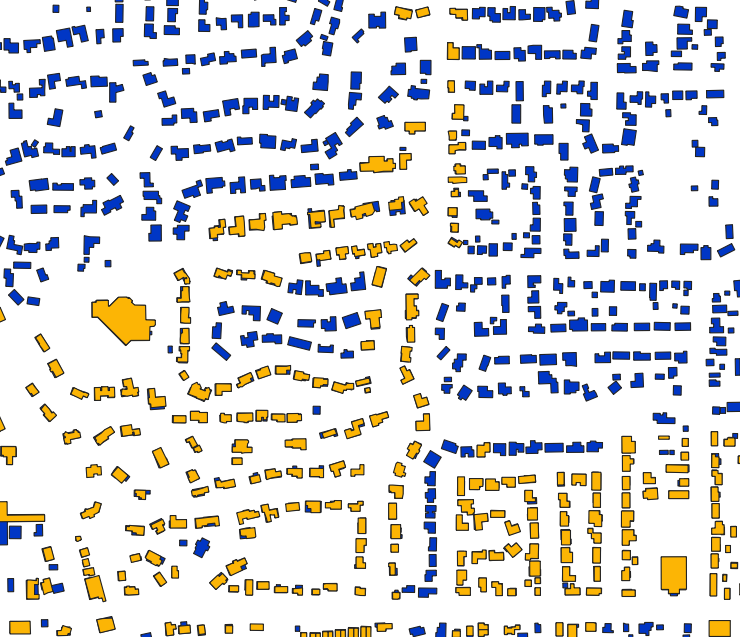
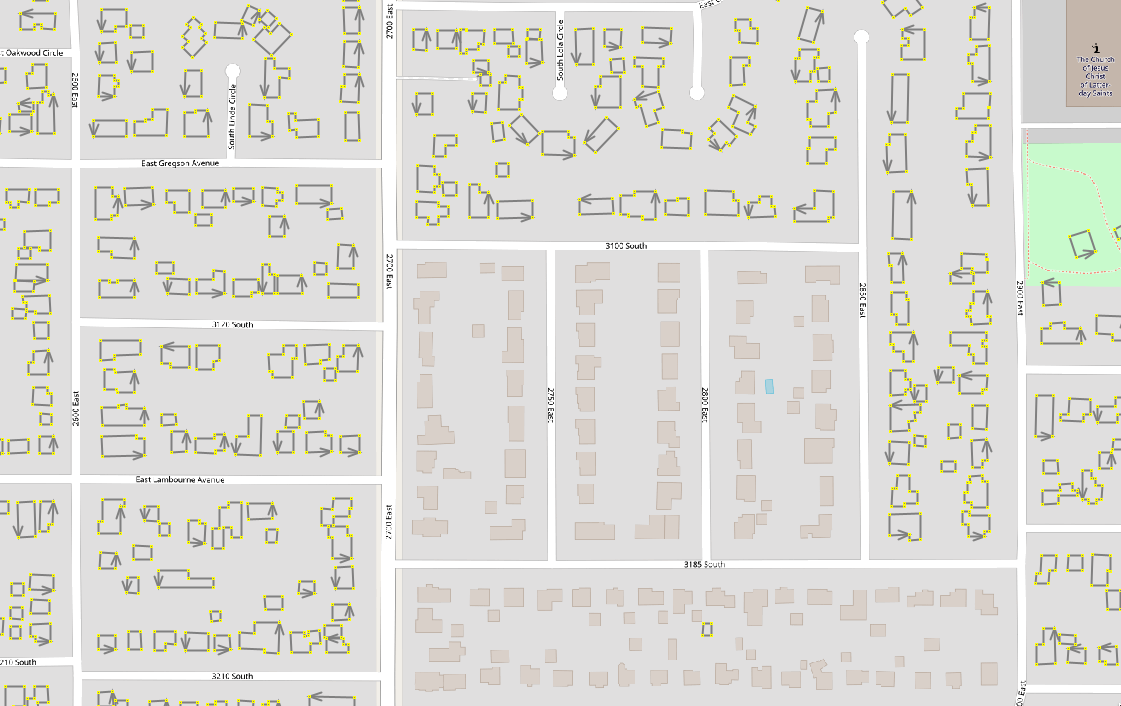
Now we’re ready for the fun part :) Let’s open QGIS and load the data: the osm_buildings and ms_buildings tables. (You may need to establish a connection with your database first.). Here’s a look with MS buildings in blue and OSM buildings in orange overlaid on top:

building layers in QGIS

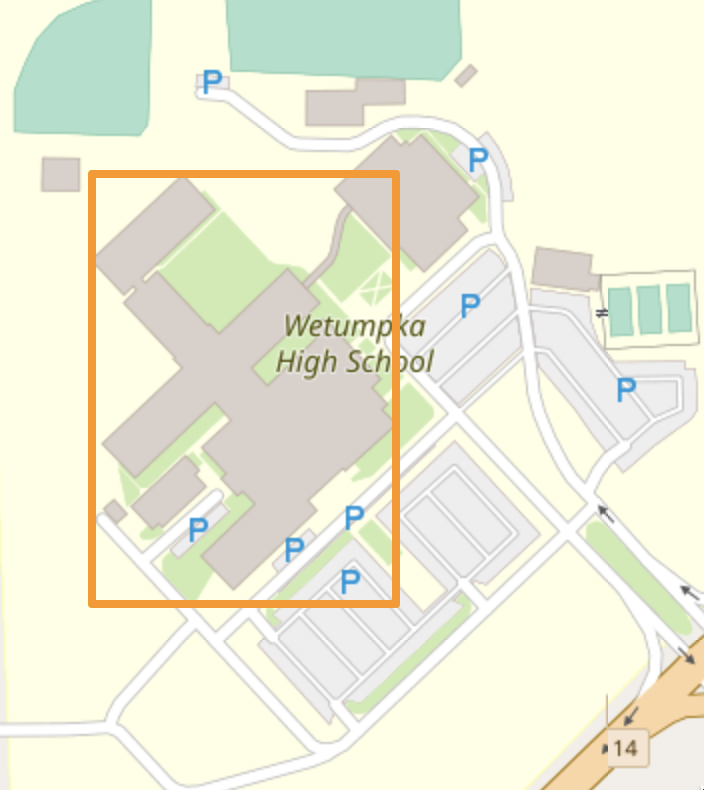
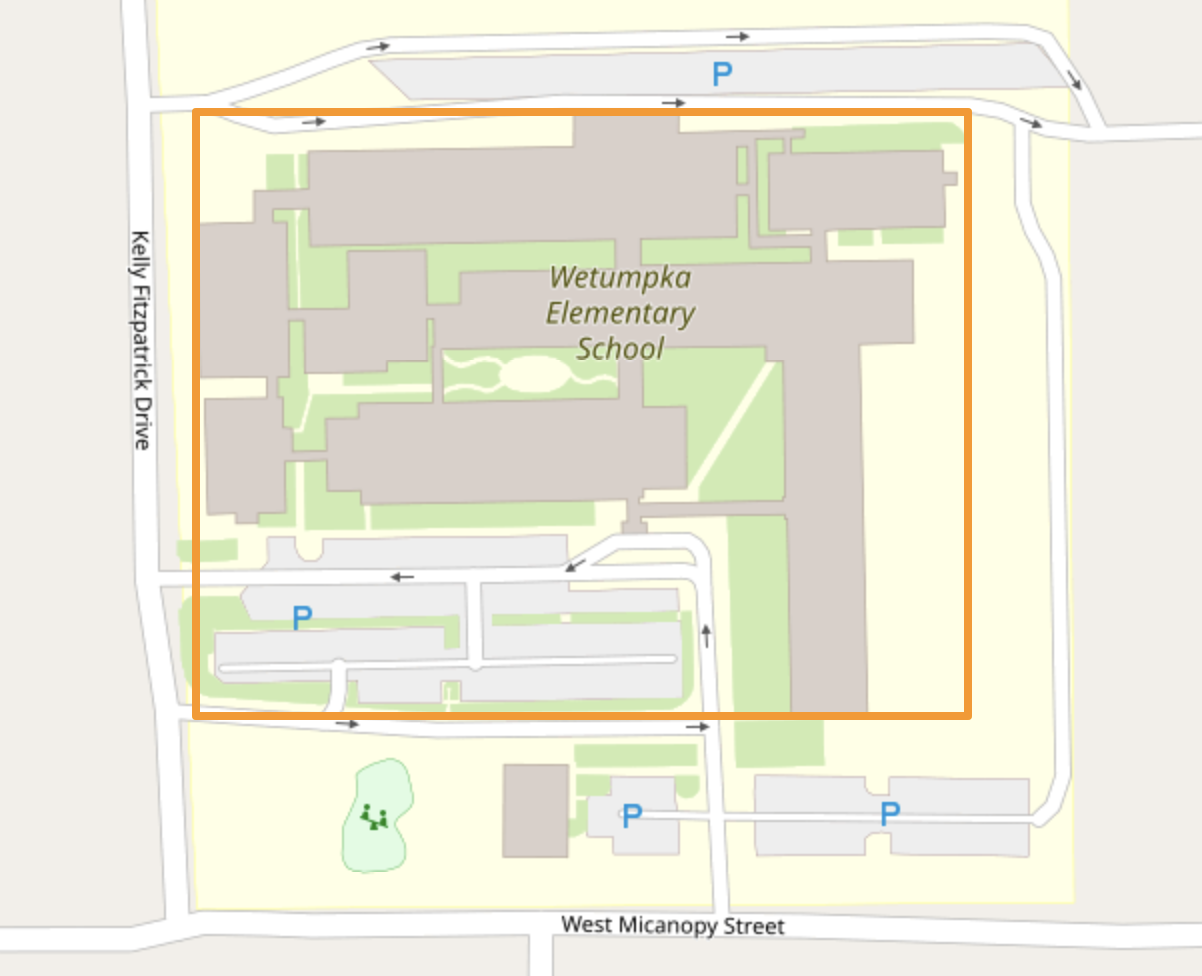
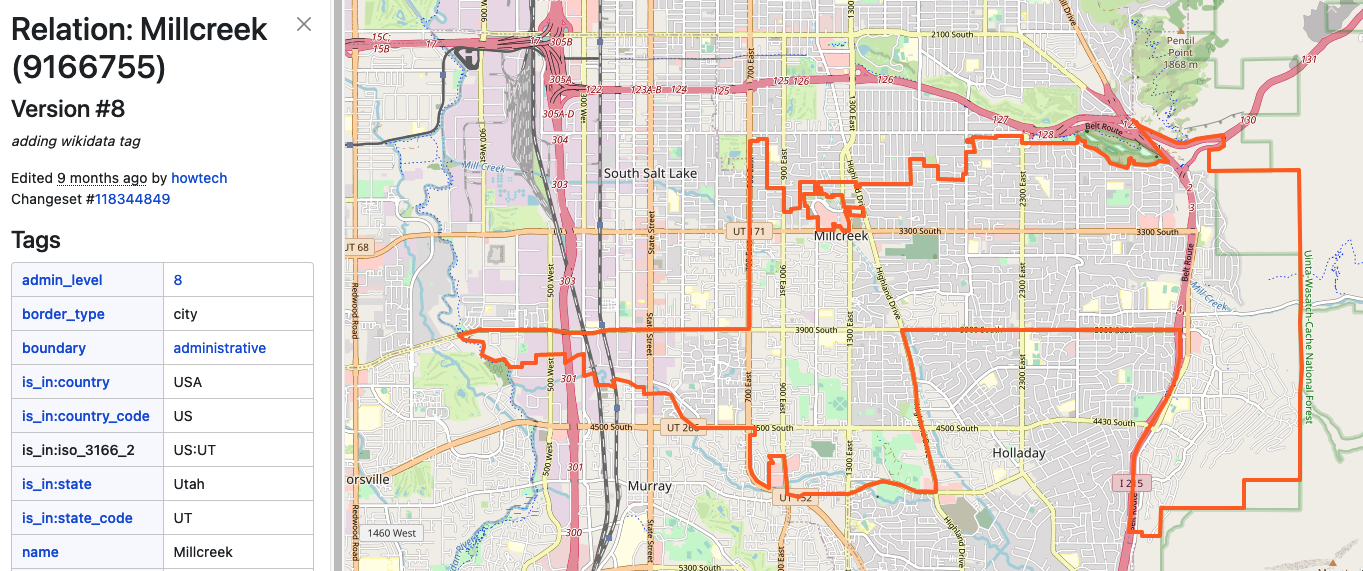
We also add the osm_admin layer that imposm created. I decided that I want to create this challenge for the city of Millcreek:

Millcreek boundary in OSM

So I filter the admin layer by that OSM id:

select in QGIS

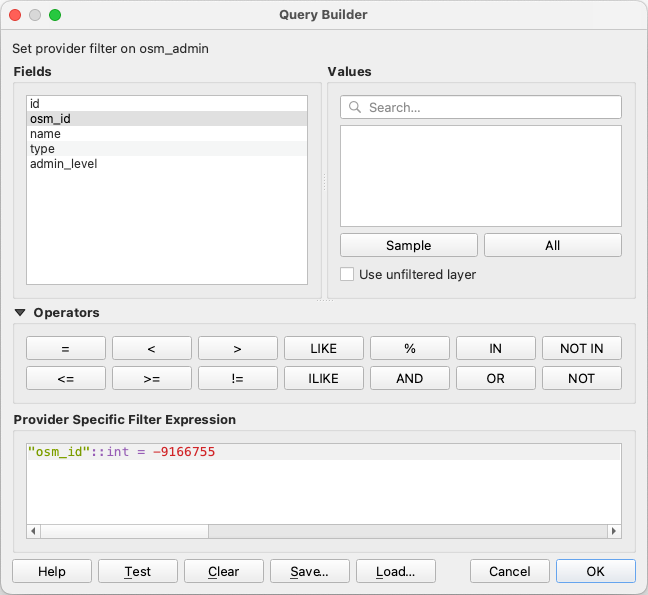
(I don’t know why imposm uses negative ids when importing OSM data, but it does.)

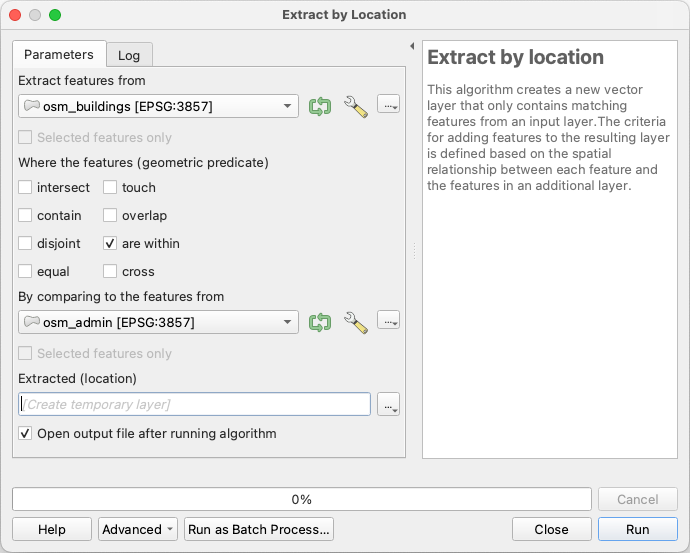
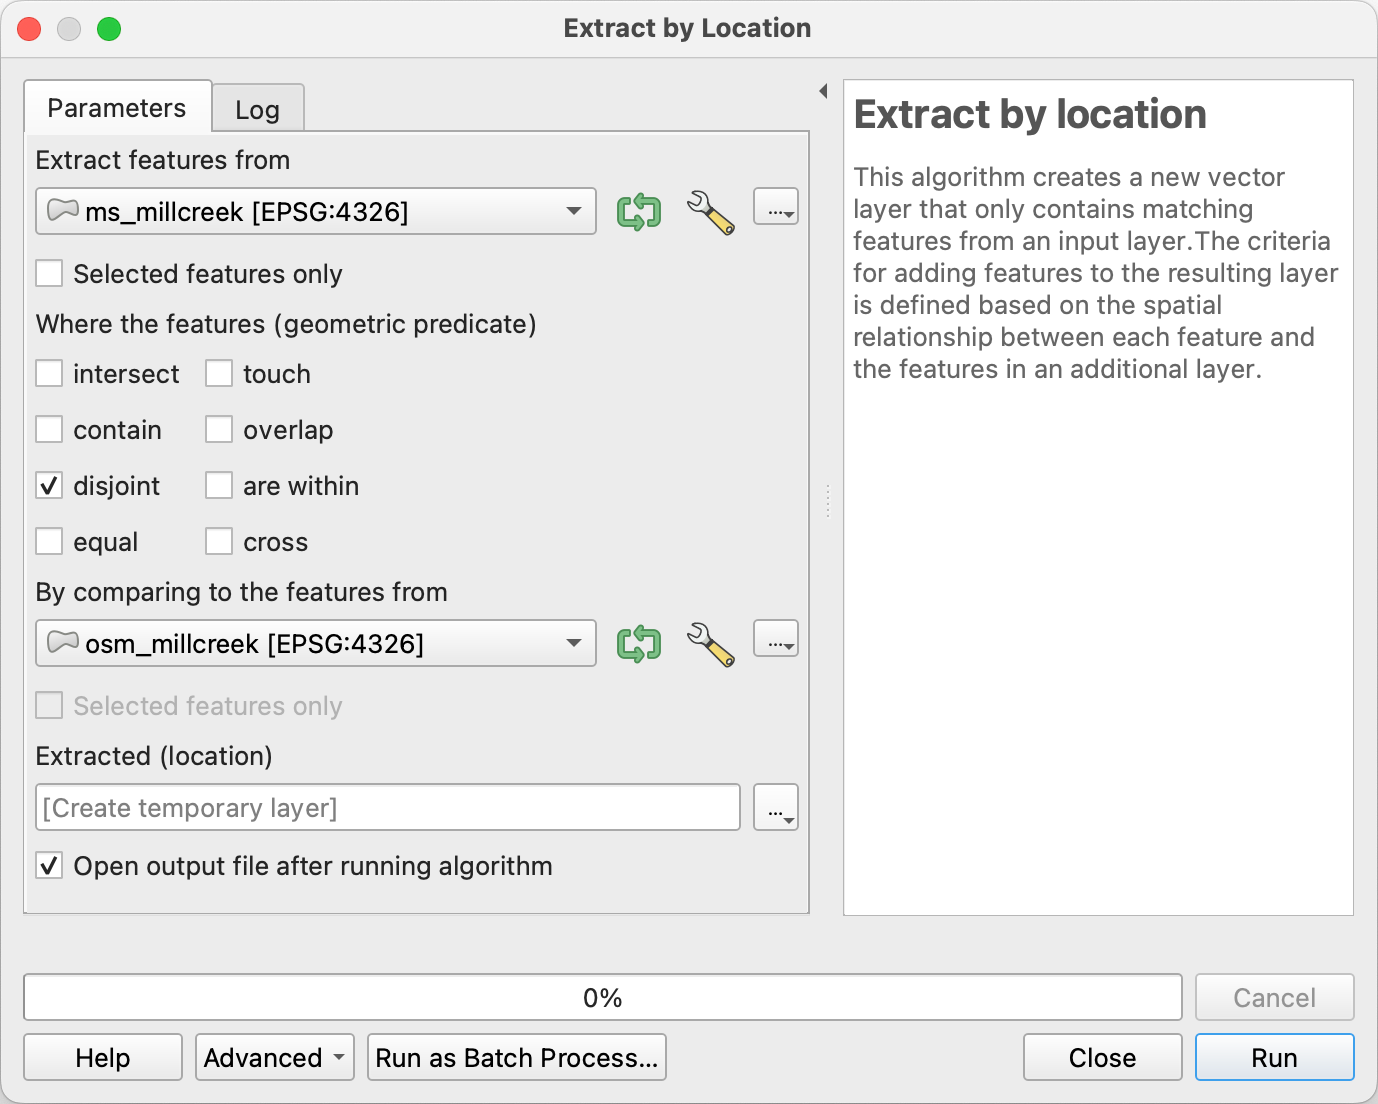
Next, I use QGIS’s Extract by location tool to create new layers for the buildings within Millcreek’s boundaries:

qgis extract by location dialog

Now finally we can extract the buildings from the Microsoft layer that are disjoint from (don’t share any geometry with) the buildings from OSM:

extact by location dialog in QGIS

These are the building features we want to present in the Challenge. We save this layer as a GeoJSON file we can load in JOSM for the final data pre-processing step:

buildings loaded in JOSM

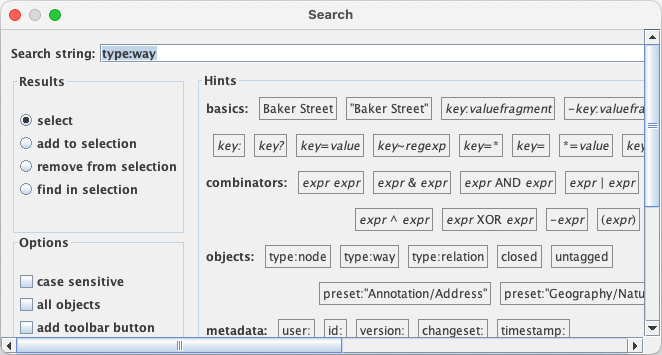
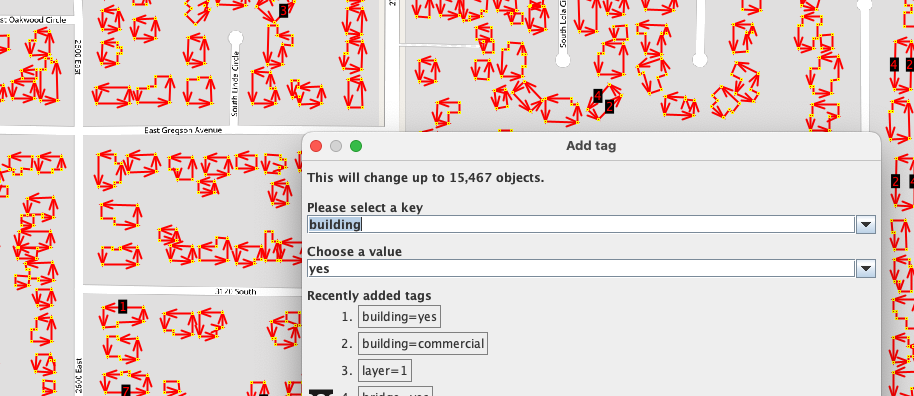
Using the Find dialog in JOSM, we select all the ways and add the building=yes tag to them. Finally, we save the layer as an .osm file.

josm find dialog

adding building tag

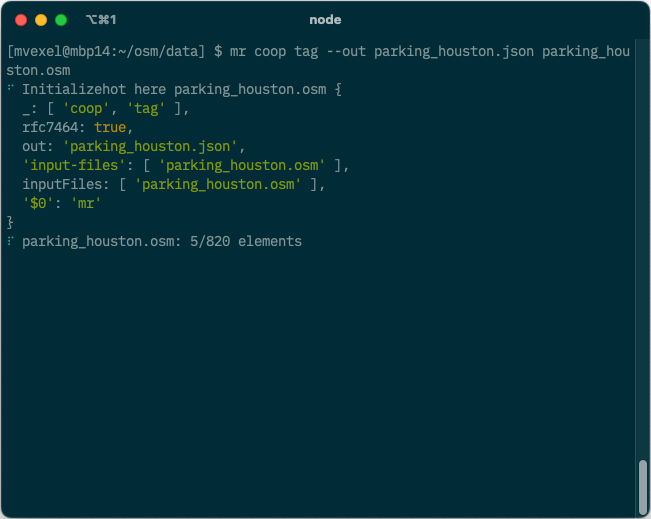
We can use this .osm file as the input for mr-cli. mr-cli is a command line tool to turn .osm or OSM Change files into cooperative or tag-fix challenge JSON data which we can then load into MapRoulette. The tool is documented here. We use the following command to generate the Challenge JSON:

mr coop change --out ms_not_in_osm_millcreek.json ms_not_in_osm_millcreek.osm

This will give us ms_not_in_osm_millcreek.json, a GeoJSON file with specific attributes that MapRoulette recognizes as source data for a Cooperative Challenge. So let’s make the Challenge!

Challenge Creation

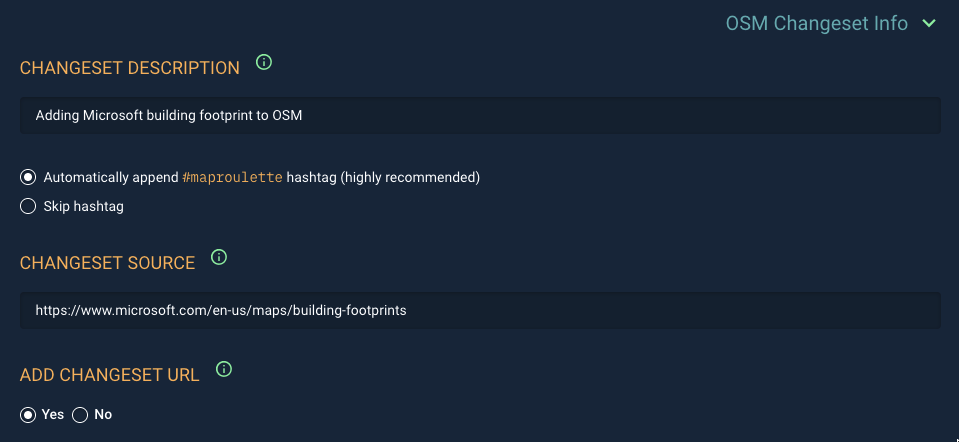
In MapRoulette, we navigate to “Create and Manage” in the user menu on the top right. We choose (or create) a Project that this Challenge will live under and select “Add Challenge” in the Project management screen. This takes us to the Challenge wizard. Here, we can drop or select the GeoJSON file we created and add a Title, Description and Instructions. Also important is to pre-select the most appropriate (most recent) aerial imagery for mappers to use, if you know. Adding a Changeset comment to be pre-filled is also highly recommended:

recommended settings

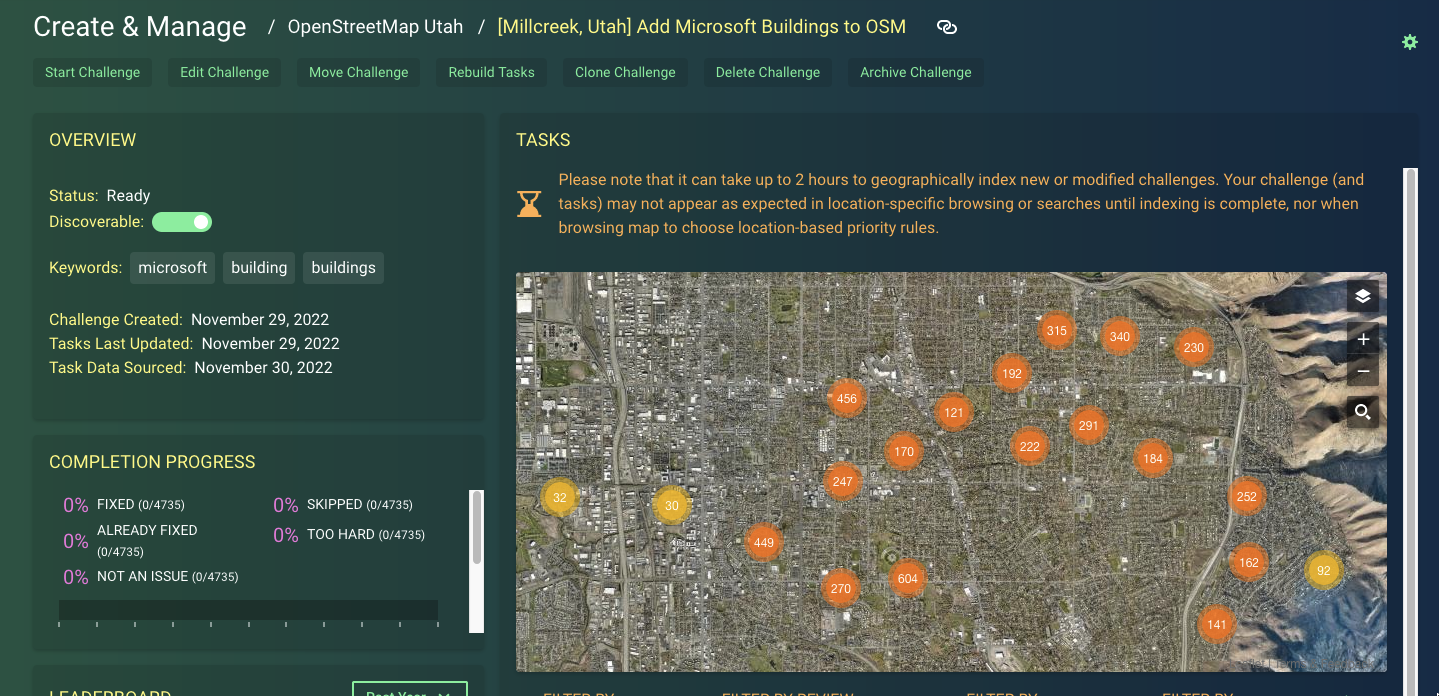
When we’re satisfied that everything looks good, we fire off the Challenge creation. This can take a while to complete, but you can leave the loader screen and start inspecting your work:

challenge management screen

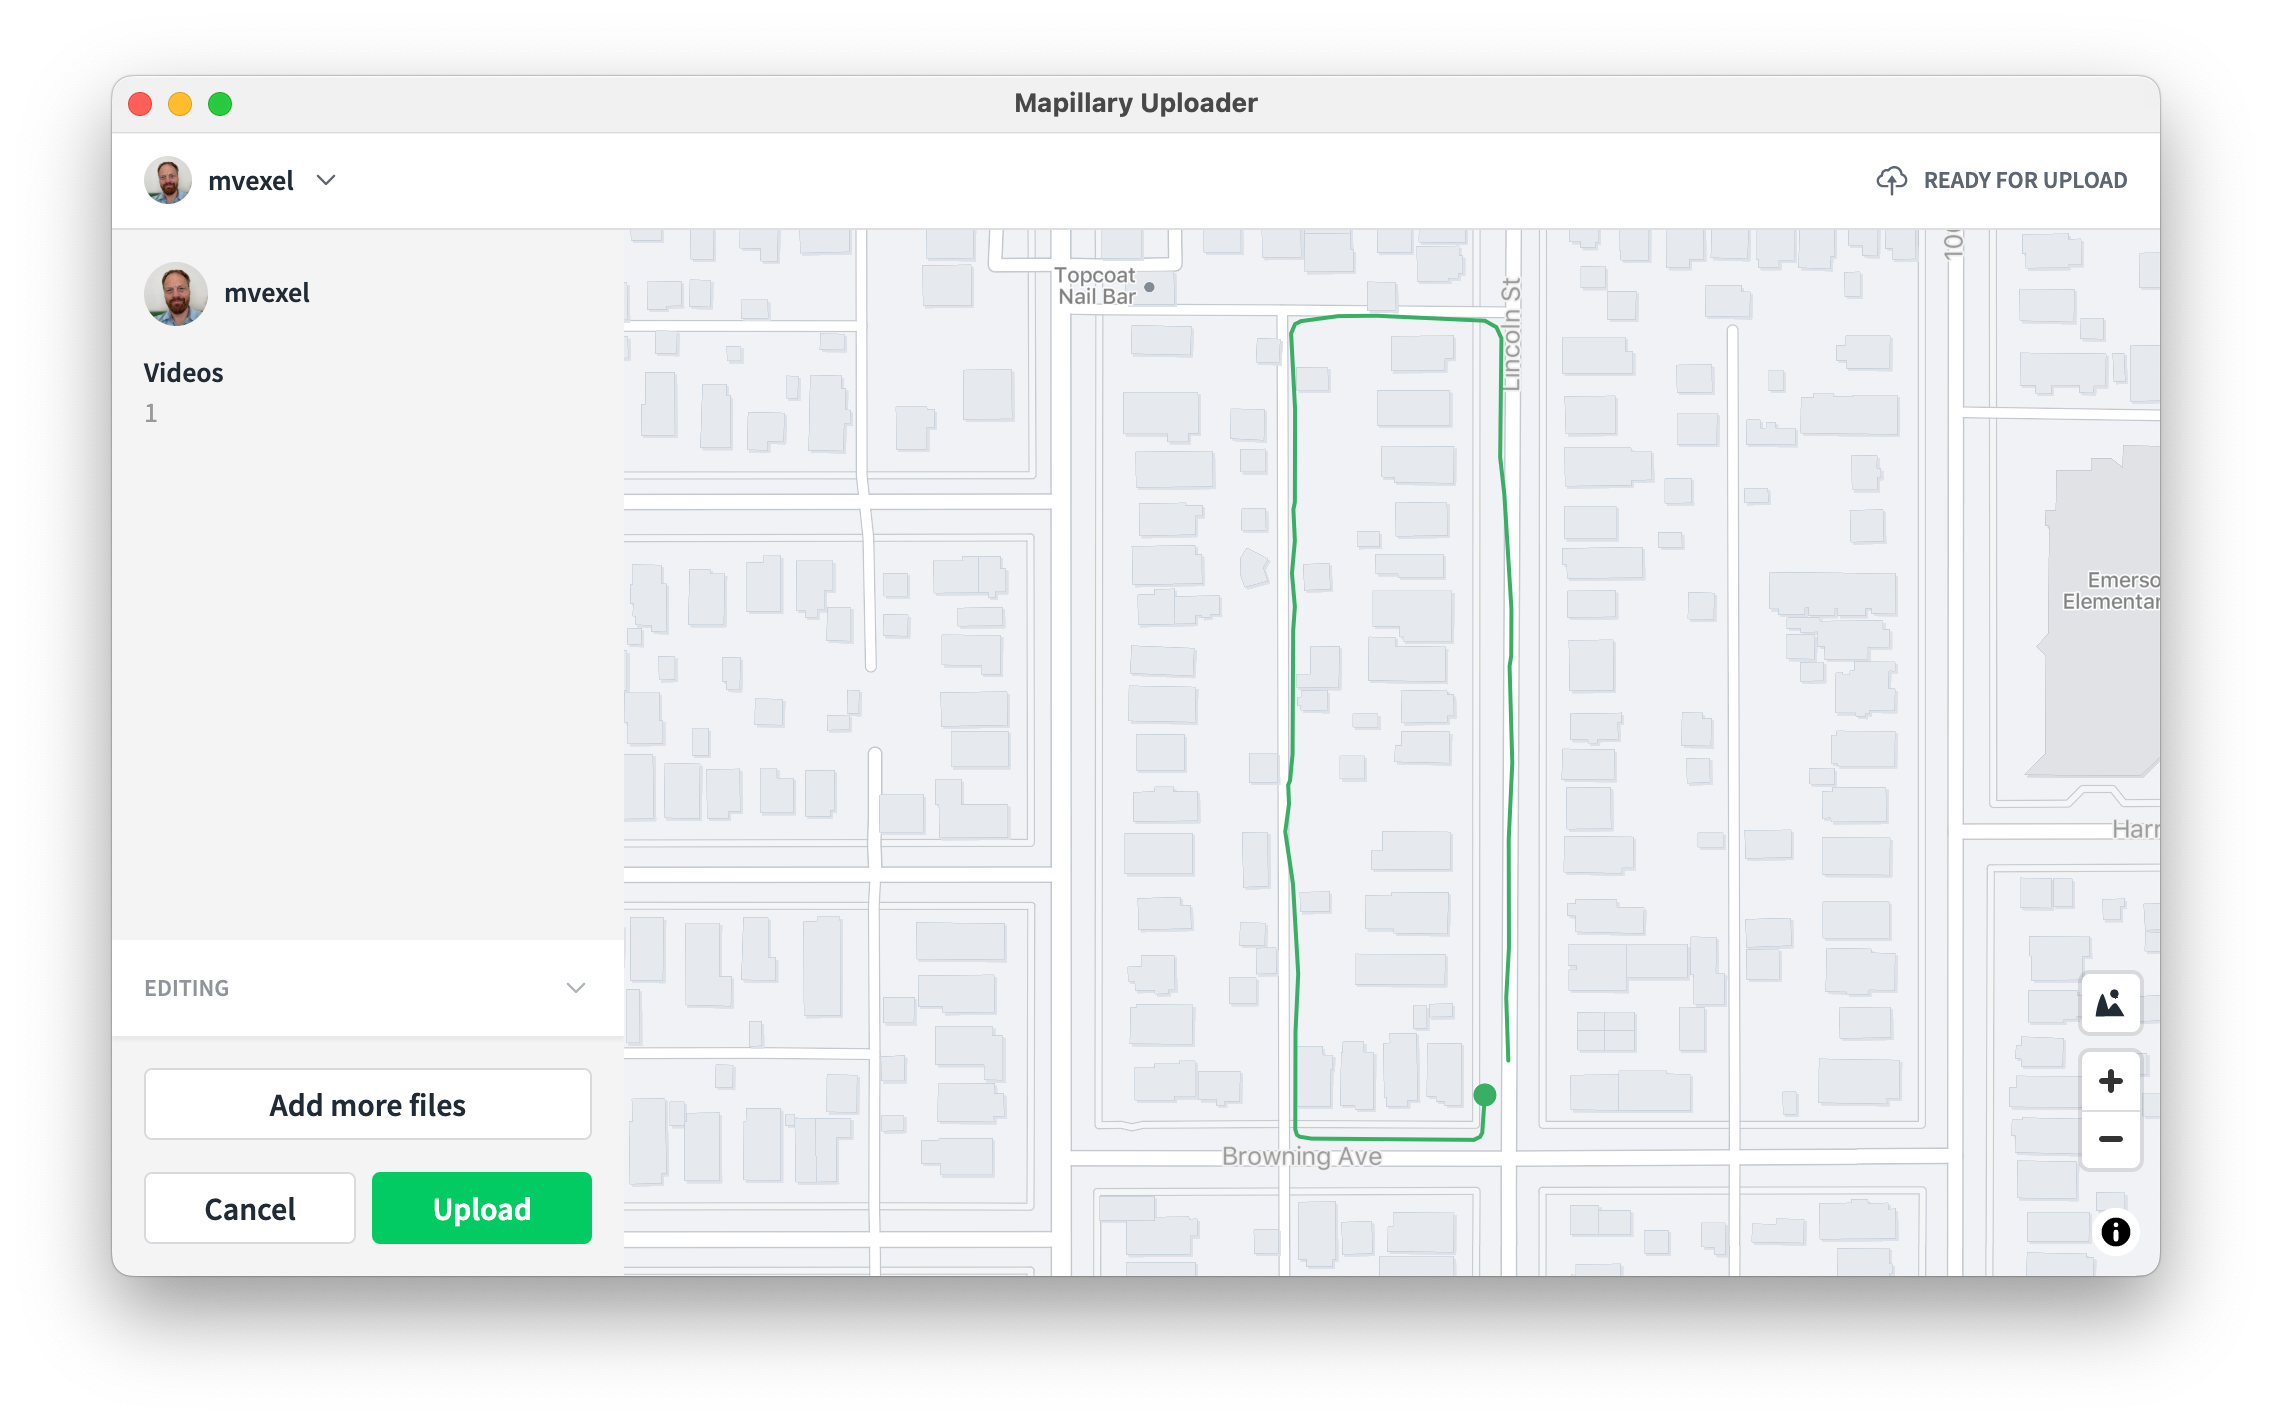
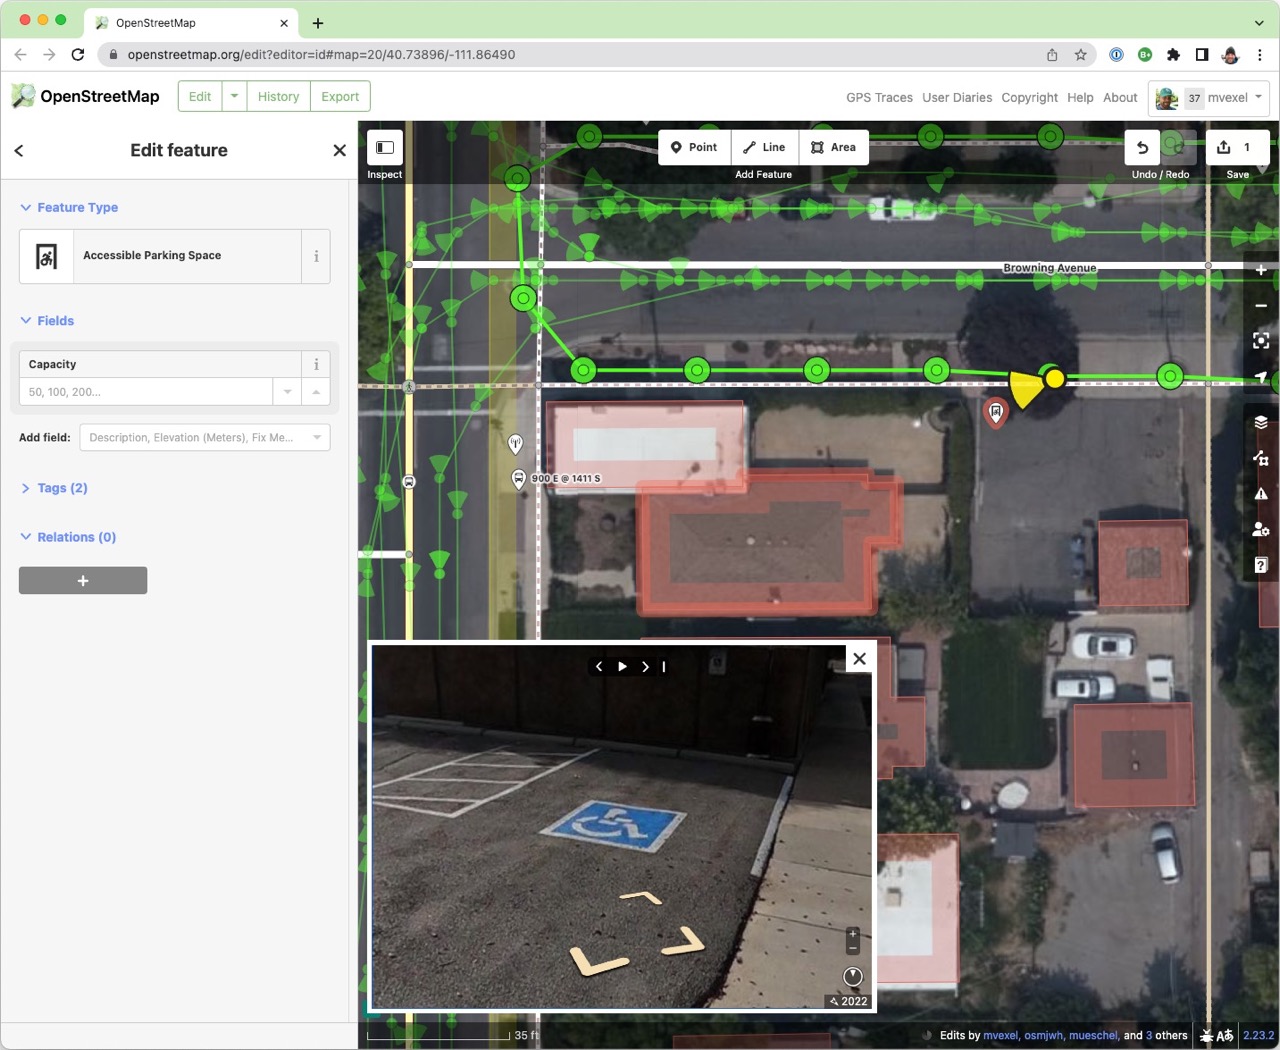
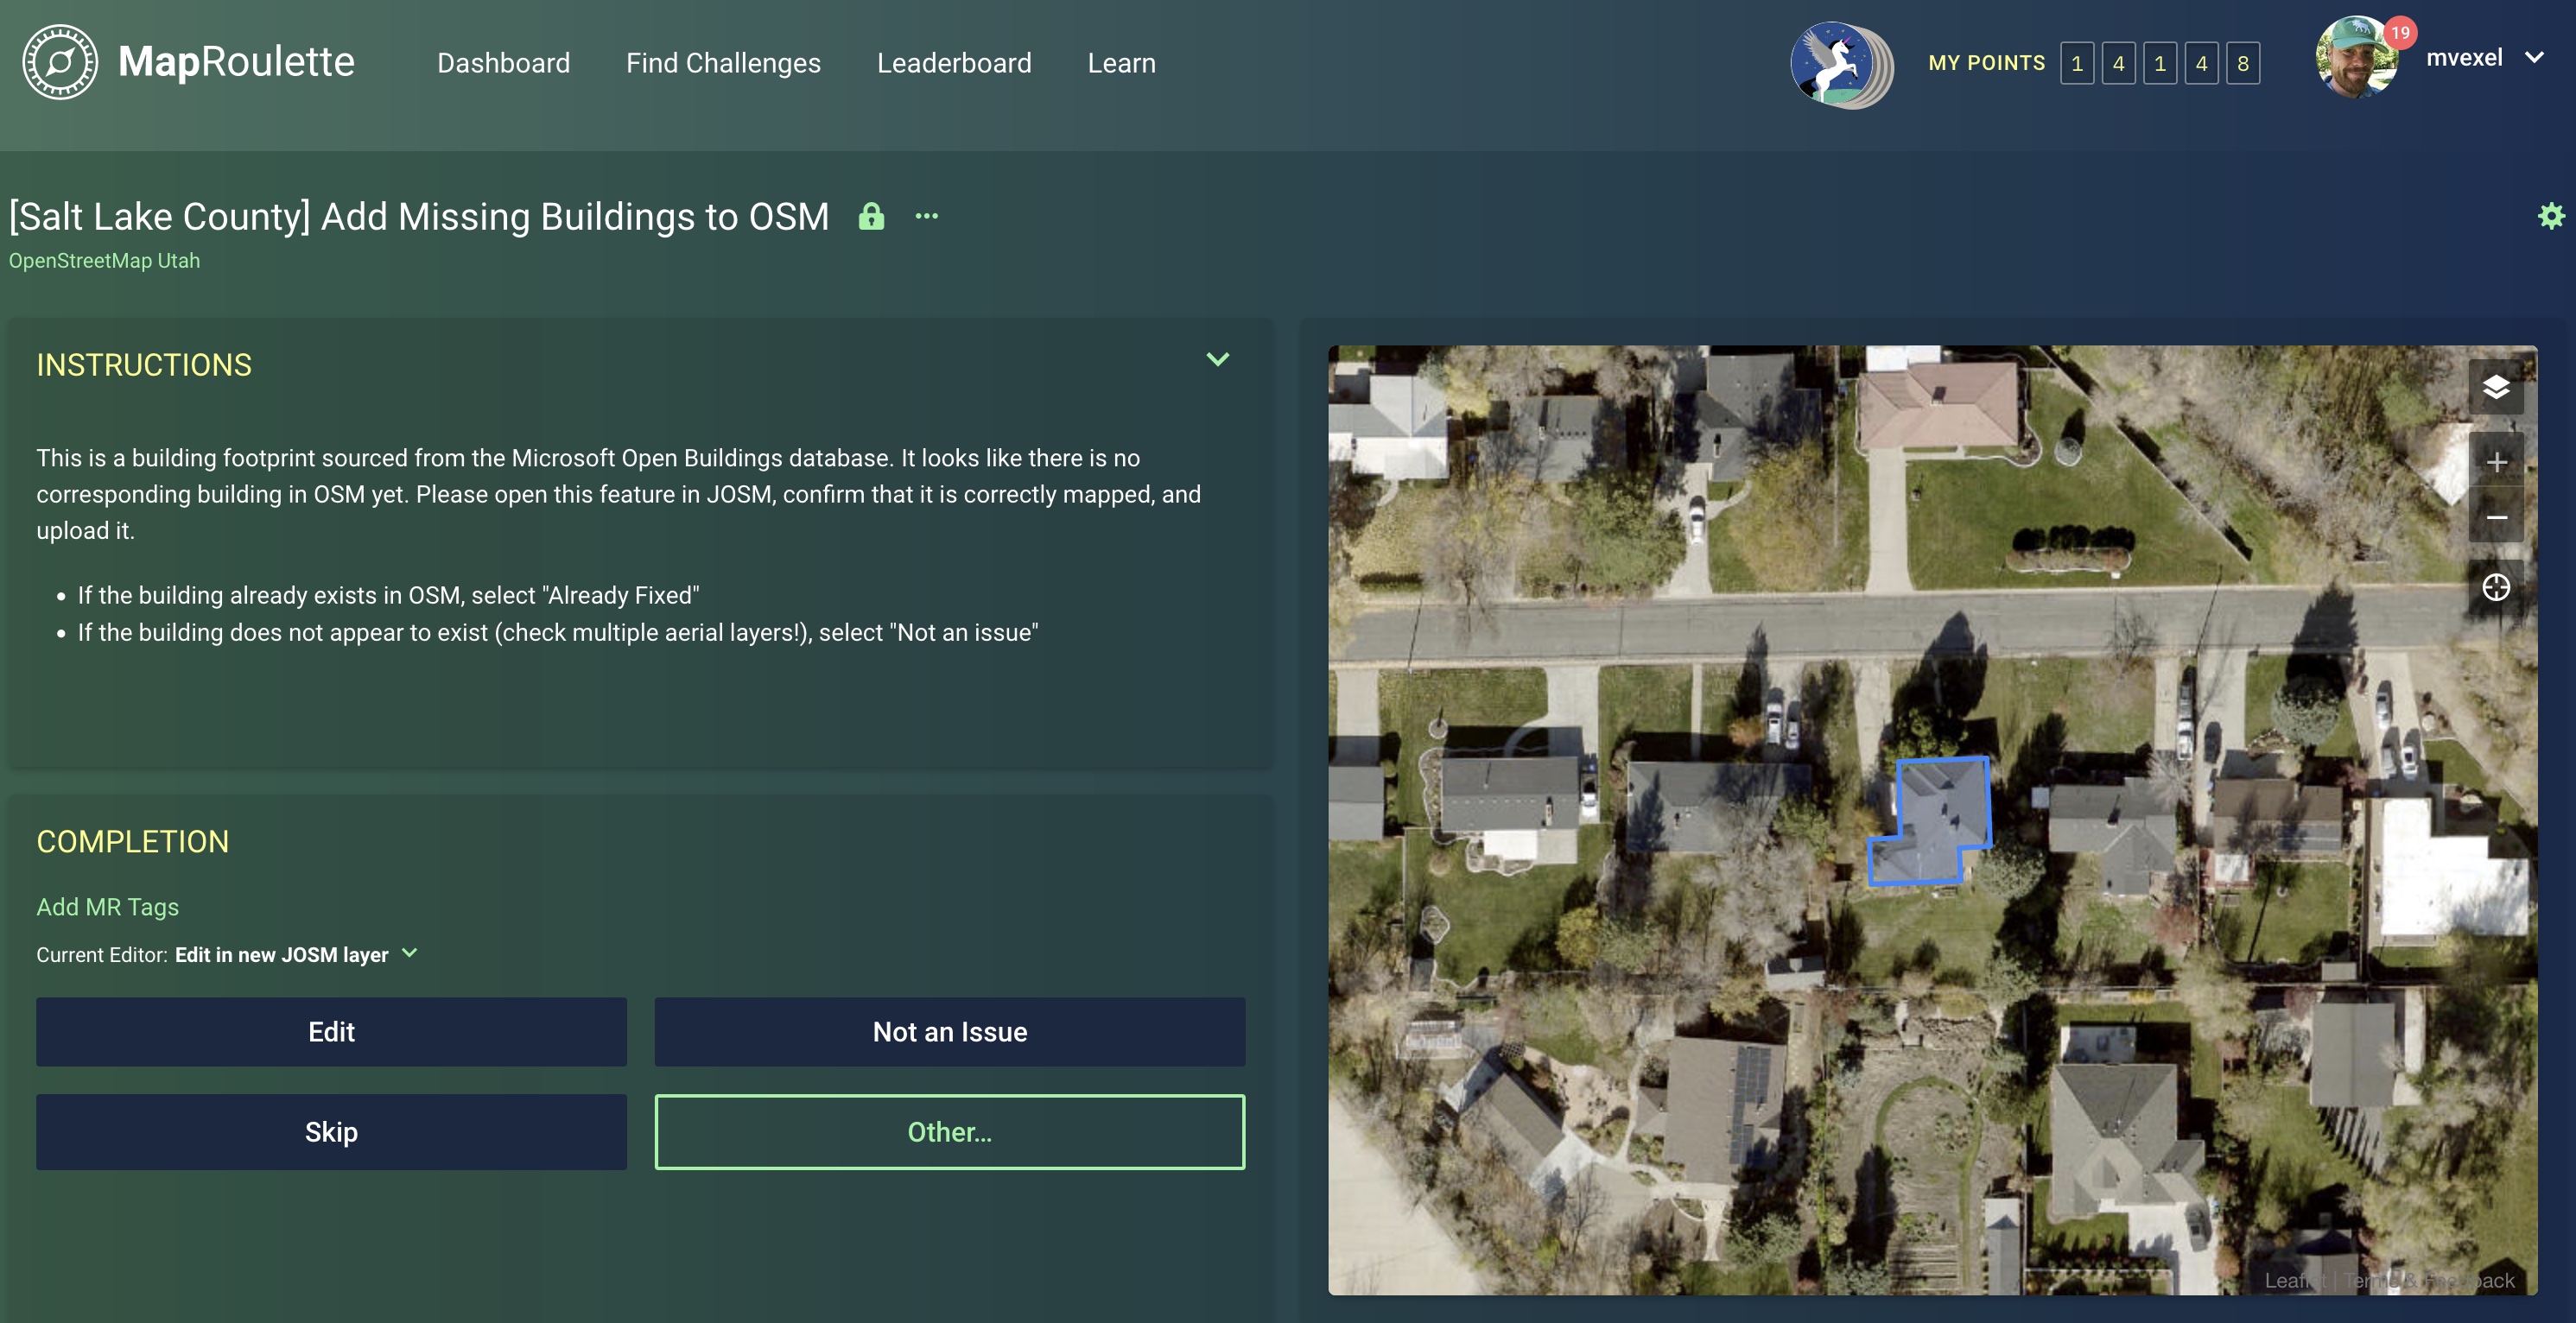
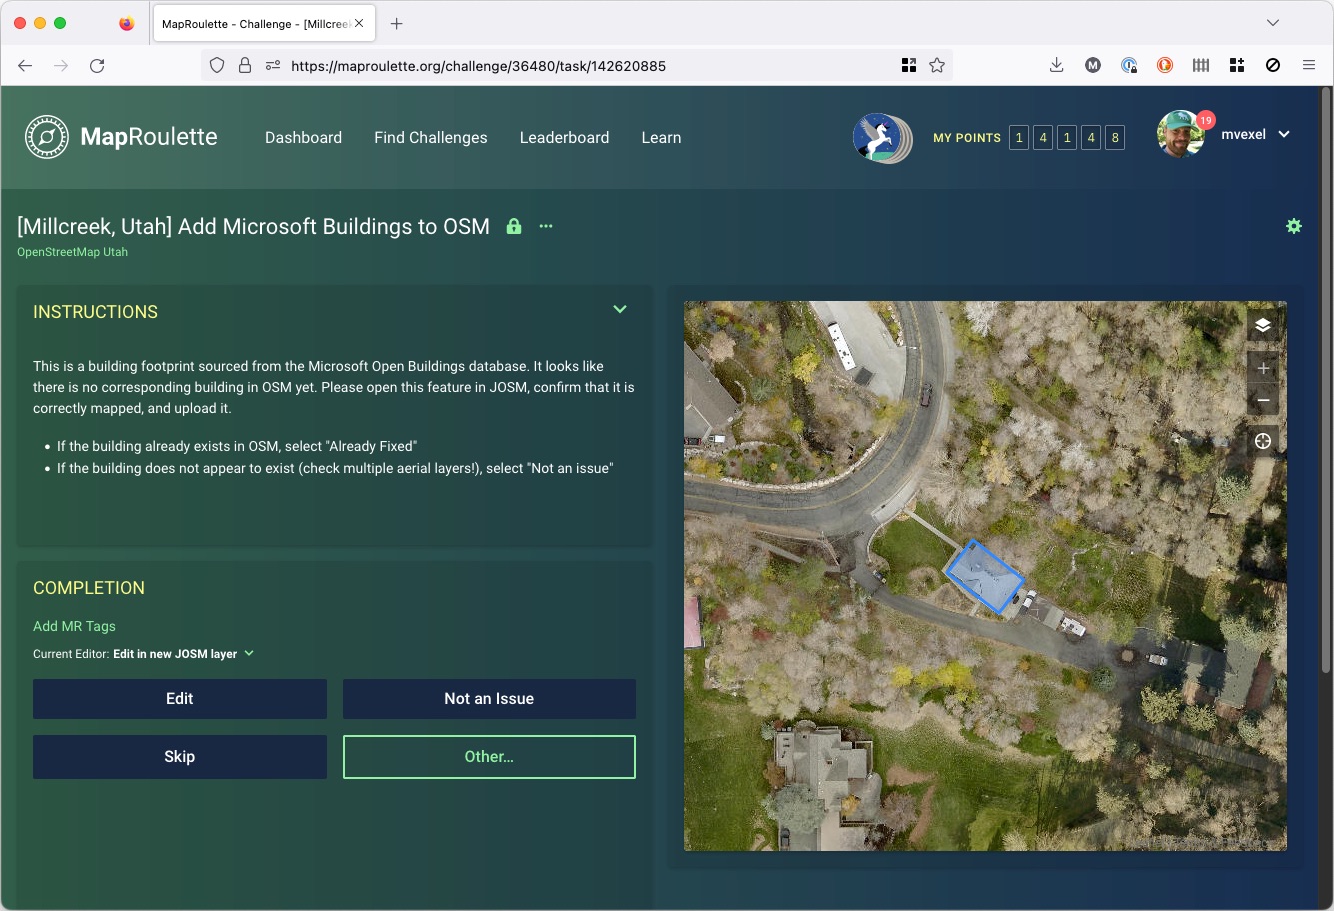
Here’s a sample task!

sample task

I actually created this Challenge, if you want to have a go, here it is.

Conclusion

This was a long tutorial, congrats for making it all the way down here ❤️.

I realize that this is not a super straightforward process. It’s not really meant to be: adding outside data to OSM should be done carefully, and all the steps we have taken here are to ensure that we end up with a Challenge that is correct, meaningful and hopefully fun to do. That said, if you would like to set up a similar Challenge with MS Building Footprints or other external data, ask a question in the OSM community forums and tag it with #maproulette, or join the #maproulette channel in the OSM US Slack.
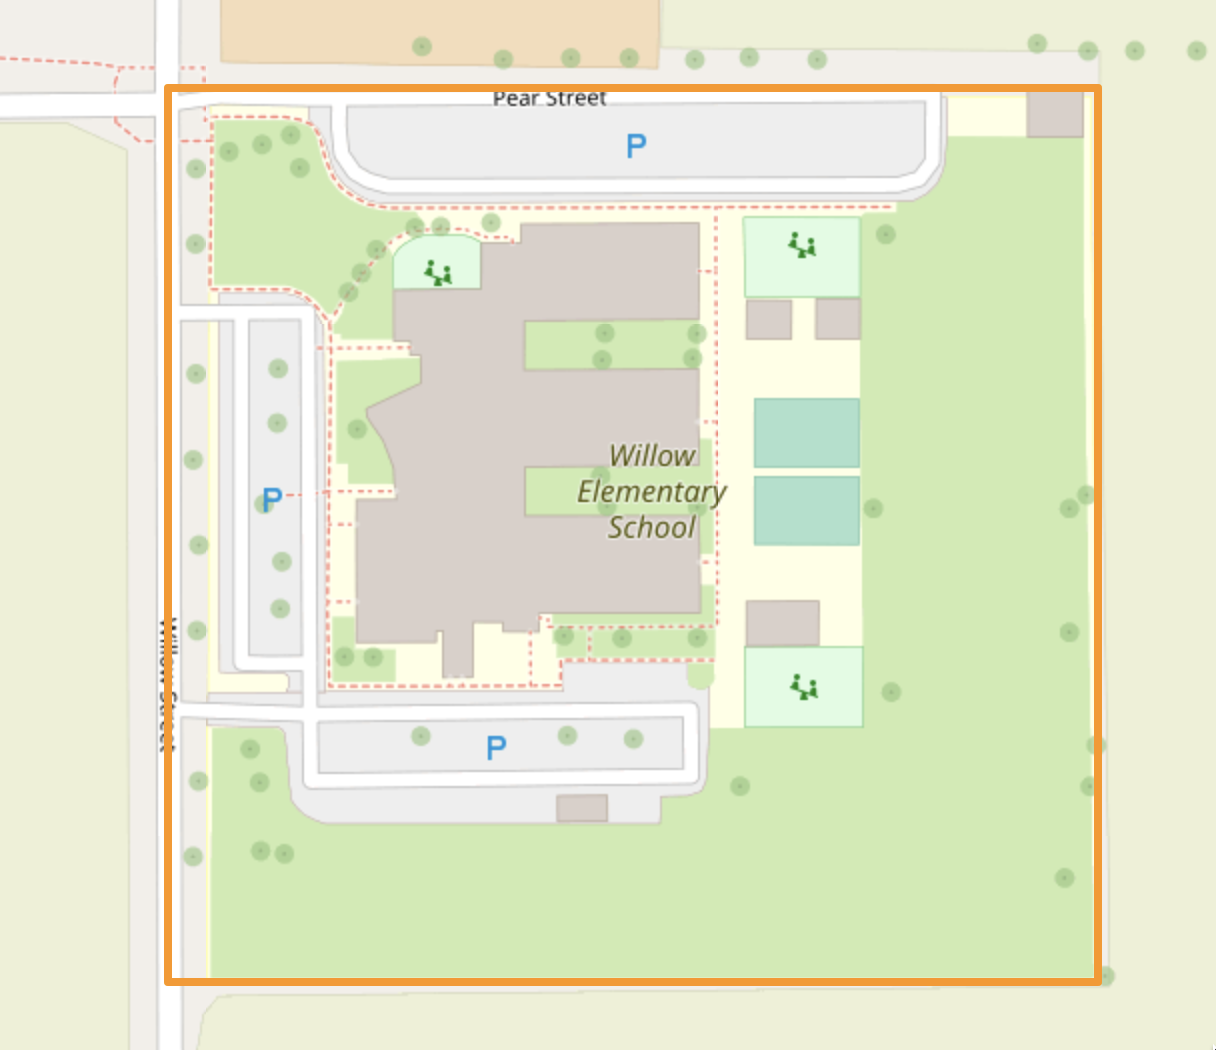
Location: 9th & 9th, Salt Lake City, Salt Lake County, Utah, 84102, United States

I’ve been working with the Mapillary team through my job at Kaart. In the process, I’ve been stepping up my Mapillary contributions quite a bit. Here’s a recent capture on the way back from an afternoon of skiing!

driving down the mountain

source: Mapillary

A recent-ish new feature (on iOS only for now) is Mapillary Missions. Missions focus on specific areas where there’s particular benefit to OSM in capturing new(er) imagery, for example because there’s potentially high POI density, or the existing images are stale. Individual missions are small, usually around 300-400ft along one street. Here’s a few in my area:

screenshot of mapillary images in my area

Missions & United States Challenge + Prizes

For the next few weeks, there’s a challenge you can register for to win prizes for those who complete the most Missions. This blog post explains it in more detail and has a link to register. First prize is a GoPro MAX 360 camera. I have one on loan currently and I can attest to its awesomeness for capturing street-level images:

blurry face

…that you can then use for mapping if oriented correctly :)

mapping with mapillary

Happy Mapping!

Location: East Liberty Park, Salt Lake City, Salt Lake County, Utah, 84105, United States

My Month In OSM, October 2022

Posted by mvexel on 13 November 2022 in English.

I am terrible at keeping journals, and this will probably be no exception, but I have been enjoying some folks’ regular updates about what they have been up to in the OpenStreetMap world. So let’s give this a try! Two weeks late already for October; life got in the way..

Mapping

I’ve had a pretty active mapping month, but also all over the place, more so than usual.

  • I participated in a virtual mapping party at work. We worked on a HOT Tasking Manager project. This is the first time in a while that I had really worked with Tasking Manager. It’s generally easy to use but sometimes the instructions can be clearer. It was good to get out of my mapping ‘comfort zone’.
  • I did my usual surveying while out and about using GoMap!! while the weather is still nice.
  • I read somewhere that Geofabrik’s OSM Inspector had gotten an update with some new categories, so I gave that a new try. I ended up spending quite a bit of time untangling some invalid polygons.
  • Used RapiD to add some government-provided GIS data. I also wrote about this, see below.

Meeting

  • We had our monthly OpenStreetMap Utah meetup and it was a special and fun one! I decided I wanted to try out Every Door, the mobile POI and micromapping app. We went to a local mall and I wrote about it. We will do this again!

micro mapping malls with every door

  • I attended the OSM US Mappy Hour about OpenDroneMap, although I think technically that was still September :) OpenDroneMap is cool, and I wish I had time for another hobby.
  • The second Mappy Hour I attended this month was about Healthy Communities. Jing-Huei Huang and Aaron Hipp from NC State University talked about the using (and mapping!) OSM playspace data in Colorado to understand and improve play equity. I love hearing about interesting uses of OSM data!
  • I participated in the weekly planning meetings for the upcoming Mapping USA conference. It’s coming together nicely!
  • I attended a MapAlong session from TeachOSM. Highly recommend it, always learning something new there.

Publishing

I have been active on the OSM Diaries this month! Perhaps to satisfy my need for sharing now that I am on a Twitter break. My posts this month:

MapRoulette

I guess this needs a header of its own. It’s a project that many people use and follow, and I think about it almost every day.

  • I met with the developer team weekly, as I always do, on Tuesdays. I don’t do any development work on MapRoulette myself anymore, but I am lucky to have some talented people maintaining the code and adding new features.
  • Through work, I had the opportunity to start working with a couple of great students through the Major League Hacking program. They were very quick to get acquainted with the codebase and are now working on a metrics dashboard for MapRoulette.
  • I am organizing an in-person meeting to discuss the next steps for MapRoulette. I am inviting some “heavy users” from various companies, as well as representatives from OSM US and community members. My goal is to come closer to a roadmap for 2023 and perhaps into 2024 that benefits both normal mappers and organizational users of MapRoulette. I also want to discuss project governance.

Developing

I usually don’t have much time to do any actual software development anymore, even though I enjoy it very much. This month, I found some time to dust off osmdiff, a Python module to interact with OSM diffs and Augmented diffs. I released version 0.3.2. Working on that gave me some ideas for the (much more widely used) Overpass API Python interface I maintain. More on that perhaps next month.

That’s all I can remember. I hope to do this again next month!

Americans love cars. More than 90% of households own one, more than 20% of households own 3 or more. Cars stand still most of the time and for that, we need huge amounts of parking.

picture of parked cars

Image source: Flickr Commons

The simplest way to map a parking area in OSM is to draw an area and mark it amenity=parking. It will then show up on the map as a grey area with a blue “P”. In the United States, almost a million areas exist with the amenity=parking tag.

parking in rendered osm map

For more detail, you can add the parking=* tag to indicate what kind of parking area it is. Common values are surface, multi-storey and street_side. However, less than 37% of all parking areas in the United States have a parking=* tag. In this tutorial, I will show you how to create a MapRoulette Challenge for your area that lets mappers confirm that a parking area is surface parking or not. We will do this using the Overpass API, JOSM, the MapRoulette CLI tool, and MapRoulette itself.

Finding your area of interest relation

First, to get the right input for the overpass query, we need an area to work with. You could use a bounding box or an area relation. In this example, I will use the relation for Houston, Texas. I look the relation id up using the OSM website:

Houston relation on osm.org

Note down the relation id, in my case 2688911.

Get parking area data in JOSM

Next we fire up JOSM to load the existing parking areas for Houston. We use the following Overpass query:

rel(2688911);map_to_area->.houston; way[amenity=parking][!parking](area.houston)(if:length()>200); out;(._;>;);out meta;

This gives us all areas that are marked with amenity=parking but don’t have any parking=* tag. We filter out small areas by specifying a minimum perimeter length of 200 meters.

parking areas in JOSM

Make sure you load this data into a new JOSM layer with no other data in it.

Making the tag changes in JOSM

Next, we select all the ways by using the search function in JOSM and specifying type:way as the search parameter. We then add parking=surface to all of these ways. This change will be the tag suggestion in our MapRoulette task later.

tag changes being made in JOSM

Save the layer as a JOSM data file.

Create the MapRoulette JSON with mr-cli

The mr-cli tool is designed to take an OSMChange / JOSM change file and create MapRoulette Tag Fix or Cooperative tasks from it. You can install it with npm. You can find more information about the tool on its github page.

We use the following command to create the tag-fix challenge:

mr coop tag --out parking_houston.json parking_houston.osm

mr-cli processing the osm data

This will take our newly created modified OSM data parking_houston.osm and process all tag changes into a JSON file with MapRoulette tag-fix tasks.

Creating the Challenge

In MapRoulette, we open the “Create and Manage” area to create our new Challenge. We add an appropriate name, description and instructions. We select the JSON we just created as the task source. Also don’t forget to add an appropriate changeset comment, and select a good aerial imagery layer so mappers can see the current reality on the ground and make a decision.

Result

This is the MapRoulette Challenge we just created!

an example task in MapRoulette

If you want to create a similar challenge for your city or area, you can follow these instructions and just replace the relation id with the appropriate one.

Happy Mapping!

Location: East Liberty Park, Salt Lake City, Salt Lake County, Utah, 84105, United States

osmdiff 0.3.2

Posted by mvexel on 13 October 2022 in English.

I’ve spent a few evenings and spare hours this week dusting off and updating osmdiff. If you’re a python developer and you need to interact with replication diffs or augmented diffs, this may just be something of interest to you. osmdiff can retrieve replication diffs as well as augmented diffs from OSM servers, and parse them into native Python Node, Way and Relation objects you can use in your code. This lets you do things like

>>> from osmdiff import OSMChange
>>> o = OSMChange()
>>> o.frequency = "minute"  # the default
>>> o.get_state()  # retrieve current sequence ID
>>> o.sequence_number
2704451
>>> o.retrieve()  # retrieve from API
>>> o
OSMChange (677 created, 204 modified, 14 deleted)

Once you have the data, you can filter and inspect it:

>>> w = [n["new"] for n in a.modify if n["new"].attribs["id"] == "452218081"]
>>> w
[Way 452218081 (10 nodes)]
>>> w[0]
Way 452218081 (10 nodes)
>>> w[0].tags
{'highway': 'residential'}
>>> w[0].attribs
{'id': '452218081', 'version': '2', 'timestamp': '2017-11-10T13:52:01Z', 'changeset': '53667190', 'uid': '2352517', 'user': 'carths81'}
>>> w[0].attribs
{'id': '452218081', 'version': '2', 'timestamp': '2017-11-10T13:52:01Z', 'changeset': '53667190', 'uid': '2352517', 'user': 'carths81'}
>>> w[0].bounds
['12.8932677', '43.3575917', '12.8948117', '43.3585947']

You can also use osmdiffs implementation of Node, Way and Relation objects separately if you need just those, the library is quite small and has few dependencies (just requests and dateutil)

On the list of things in development and slated for the next release are: * Python __geo_interface__ support so you can easily use them in other Python modules that support them like shapely and geojson * Retrieving individual OSM features from the OSM API * Ability to create an AugmentedDiff / OSMChange object with a datetime parameter, which will then calculate the sequence number for you * More tests, always more tests, and CircleCI integration

If you are using osmdiff and find it useful, I would love to hear from you. If you find a bug or find something lacking, please [open an issue].

Mall Mapping with Every Door

Posted by mvexel on 6 October 2022 in English.

After I reconnected with Ilya at SOTM and talked to him about his new app Every Door, I thought it would be nice to organize a mapping party around it back home. I just got back from some Mall Mapping with a small OSM Utah group, and wanted to share my experiences with the app.

every door at the mall

First things first, the app works great. The fact that it’s on Android and iOS and looks and works the same on both platforms is great. The interface is snappy, there’s no annoying crashes or delays, and everything is fairly easy to discover and learn how to use.(However, this is coming from a group of people who have experience with OSM mapping and are at least a little savvy about technology..)

Interface

There were two interface elements that took us a little time to figure out. One was the “modes” at the bottom. The default mode is POIs (the coffee cup icon). It is not immediately clear what the other modes do, but for people with some experience with OSM, you can figure it out in a few minutes.

The other element that we didn’t immediately “get” was the opening hours editor. When you open it up, it shows you a seemingly random set of hours that you can set as the time the shop opens. We struggled with how to enter a different time. There is an icon to enter a custom time but it is quite small. Once we got it, entering opening hours with it was actually very efficient!

Indoor specific challenges

We were mapping in a big indoor mall. This poses a number challenges that affect how well the app works.

Number one is the poor GPS signal indoors. This means that your location on the map in the app drifts quite a bit. Because the app re-sorts the POIs in view based on how far away from them you are, the same POI will be in a different place in the list every time you look, even if you didn’t move. You can temporarily disable the map from following your location by manually dragging it a little bit, but when you tell it to re-center on your location, the changing ordering of the POIs is a little confusing as the GPS keeps changing its mind about where you are.

Secondly, it can be hard to orient yourself in relation to the basemap when you’re indoors, especially if there are not very many places mapped yet and the basemap doesnt’ give you a lot to go on. I think it may be helpful to be able to switch the map to orient to your compass direction as an alternative to the default north-oriented map view. Alternatively, the location symbol could give a direction hint.

Lastly, the aerial imagery is useless indoors, but that is hardly the app’s fault :) Fortunately you can switch to an OSM map background as well.

Density

Malls have lots of shops. Some of them are absolutely huge, but there are many, many small shops. There are a few times when I wished I could zoom in even further to be able to place the POI nodes more precisely, and to distinguish the existing ones. Ilya mentioned to me (and I think in his SOTM talk as well) that the map is not the point and he deliberately made it a small part of the UI, but there were a few times where I wished that I could get everything out of the way and just see the map for a moment.

Caching

The app requires you to manually upload to OSM by tapping the upload button. Once you have done that, you can download the latest from OSM again. In the meantime, you have a local copy of OSM POIs on your device. That is fine if you are by yourself, but if you are mapping in the same location with a group, this can lead to conflicts when uploading changes. We didn’t run into this because we were a small group, but I think this could be an issue. I would like to see uploads be automatic after every edit that you make. If the app would do an immediate upload and then also a download, you could be certain that everyone in your party always have the latest data and you don’t run into conflicts if you both end up editing the same POI.

Non-POI mapping

I played around a little bit with the “tree” mode (I don’t know what the real name is, I just call it tree mode because that is what the icon is..). It lets you freely add and edit any type of point feature, not focused on POIs alone. I used it to add some benches, trash cans and some taxi stands as well. It works well for that purpose and I think I may use GoMap!! a little bit less for that specific type of mapping, where you just want to add or edit a node feature.. (GoMap!! is still great for all kinds of mapping on the go, including POI, and the two can exist side by side happily.)

Conclusion!

We had a lot of fun mapping with Every Door, and I think we were more productive adding and updating POIs than we could have been with any other app! There’s lots of little things that make your life easier. I didn’t write down every single thing I thought about while using the app, but I think I captured the most important findings we had.

I will keep using Every Door for sure. We didn’t even get to do the entire mall so we should probably go back next month :) And more malls to go. I would encourage anyone who likes to get out and survey to try it!! Huge thanks to Ilya for making Every Door available to the community.

mall mapping with every door

Location: Fashion Place Mall, Murray, Salt Lake County, Utah, United States

Specialized mappers

Posted by mvexel on 5 October 2022 in English.

From time to time, I come across mappers that really specialize on a specific mapping topic. I was doing some random mapping in my state when I came across this very well mapped school:

school well mapped

This mapper, Chef7, has mapped lots of schools across the United States in high detail:

school well mapped

school well mapped

school well mapped

school well mapped

school well mapped

school well mapped

I love it when I see mappers who are very specialized in a particular topic! I myself are more of a random mapper, whenever I notice something that needs improving I do it. We need both kinds!

Have you seen any other mappers that are highly specialized? Are you one yourself? Please share your work!

Location: 9th & 9th, Salt Lake City, Salt Lake County, Utah, 84102, United States

Changeset age / ID Confusion

Posted by mvexel on 4 October 2022 in English.

I was visiting my HDYC page today. I always get sentimental looking at my first changeset, a neat feature on HDYC. Here it is with ID 90313. This makes sense to me; I lived in that part of Amsterdam at the time and the timestamp coincides with the day I created my OSM account (while participating in a weekend-long mapping party).

But, when I scroll to the bottom of the changeset page info panel, I see there’s a previous changeset:

previous changeset?!

How is that possible? If I click on the previous changeset until there is no more previous changesets, I end up at this one, with ID 7671. But that changeset was opened and closed 10 months later, in April 2008.

I always assumed that changesets with a higher ID would also be newer, but that’s obviously not always true. My best guess is that the database got reshuffled in the early OSM API days. Perhaps coinciding with the disabling of anonymous edits in late 2007?

Mysterious. How will I be able to sleep now?

Location: Central City, Salt Lake City, Salt Lake County, Utah, 84111, United States