
Camera tripod prototype to capture Mapillary images by bike
Posted by tordans on 27 December 2020 in English.A year ago I started doing a lot of walking and cycling with my stroller. Naturally, I had to look for new ways to contribute to OSM. More on the go mapping – thank you GoMap! – and more passive contributions by providing street level images.
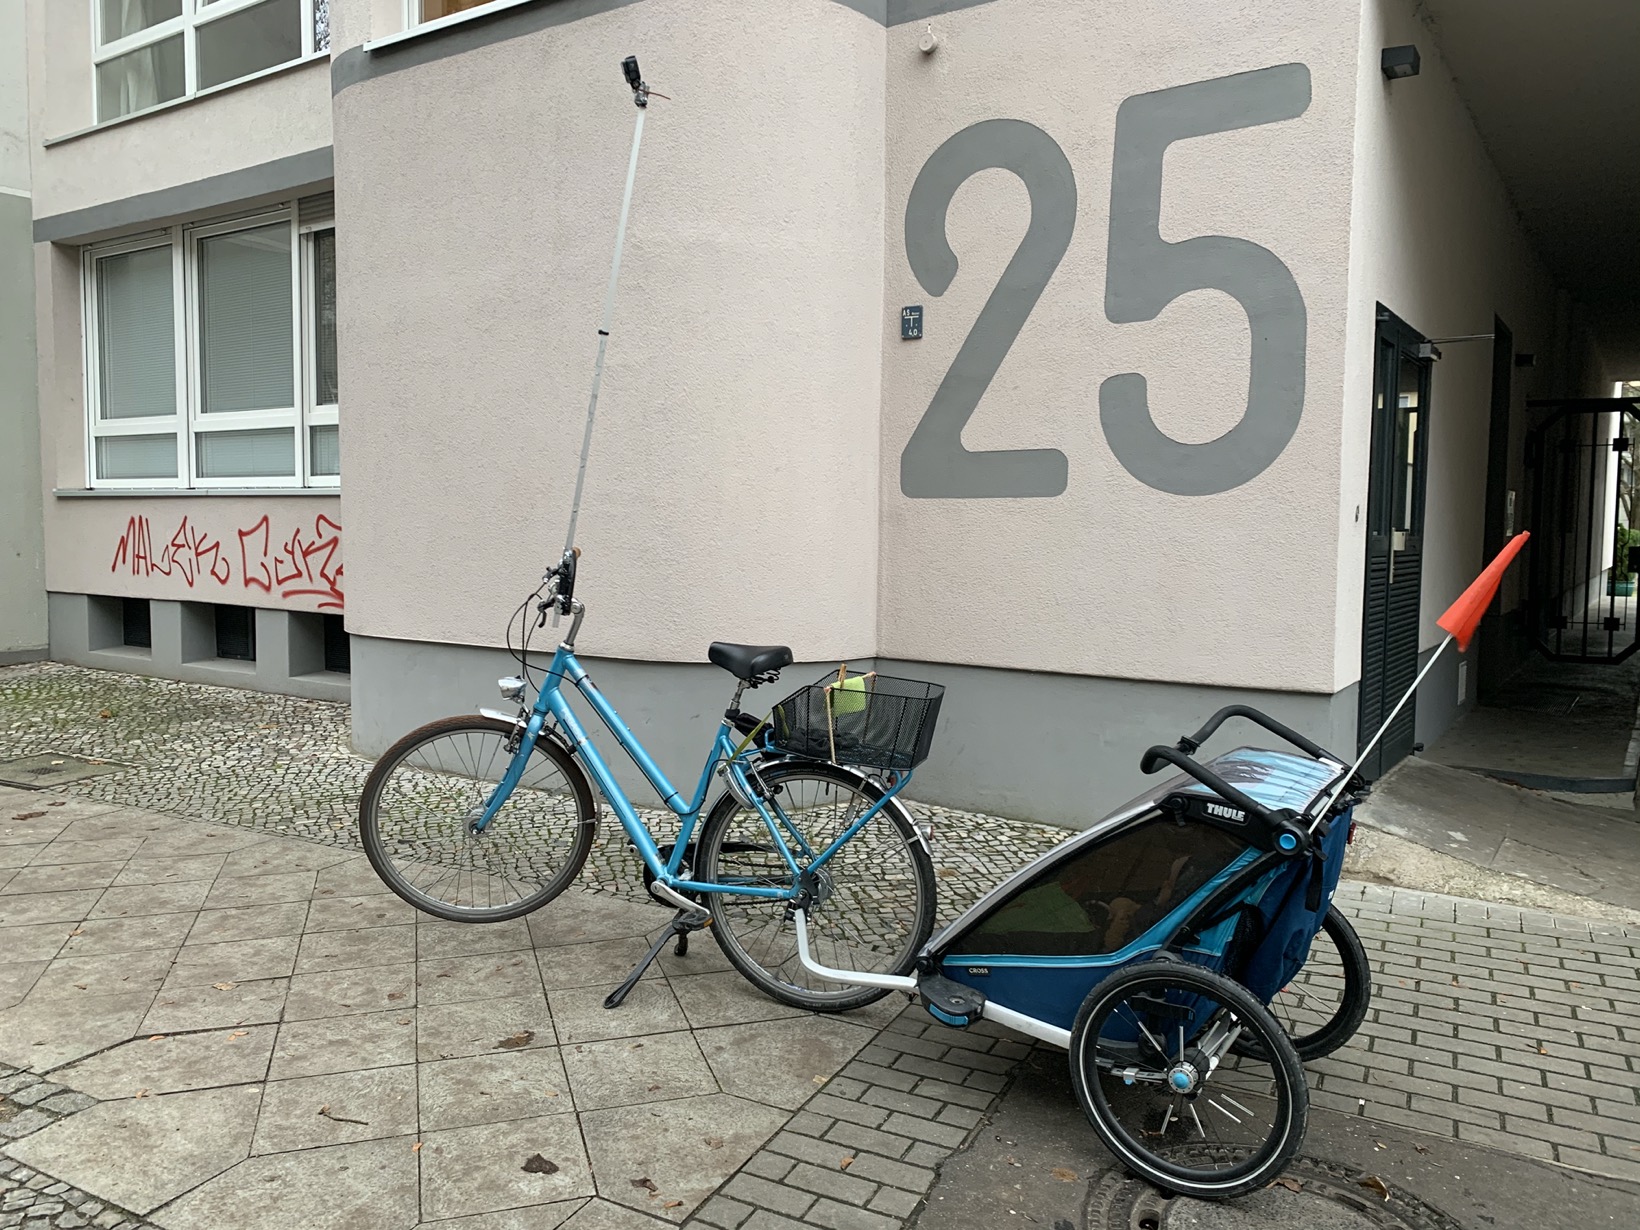
With this post, I want to share my prototype of a bike tripod to take great Mapillary images.
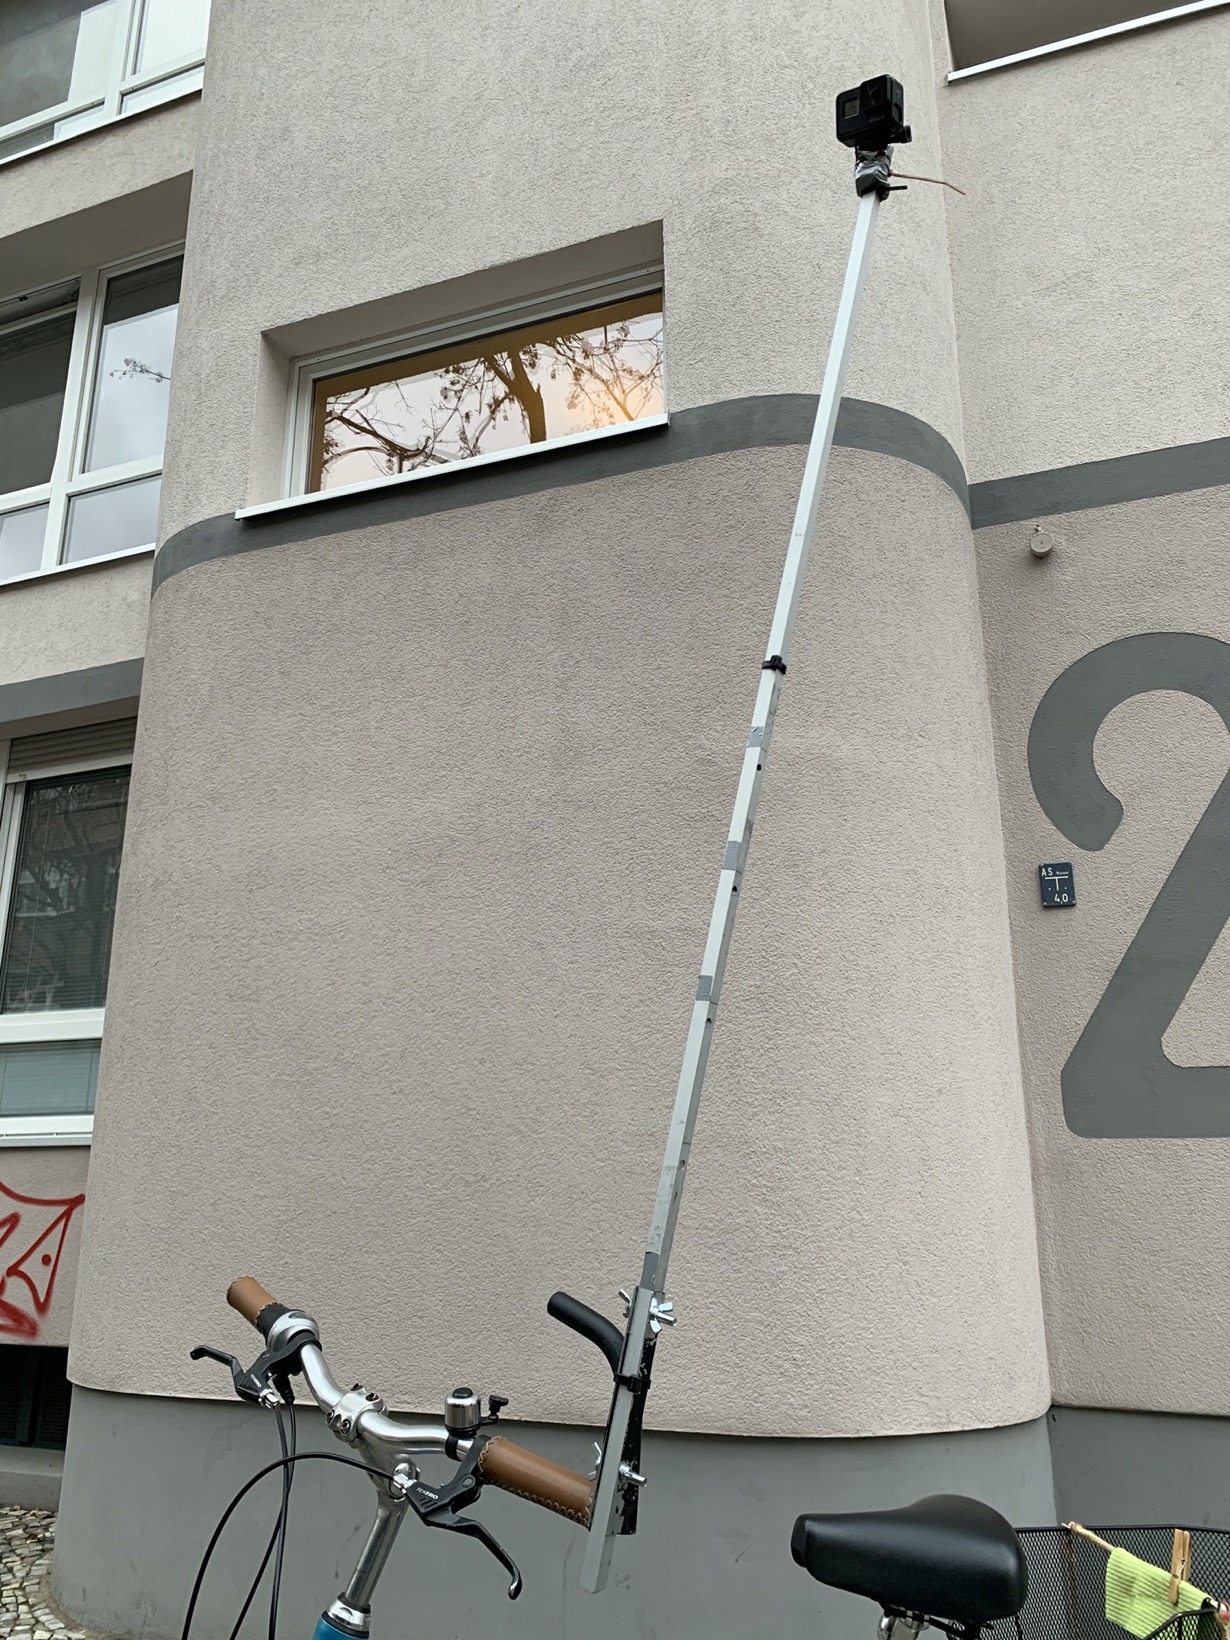
It looks like this:
Goals of my tripod prototype:
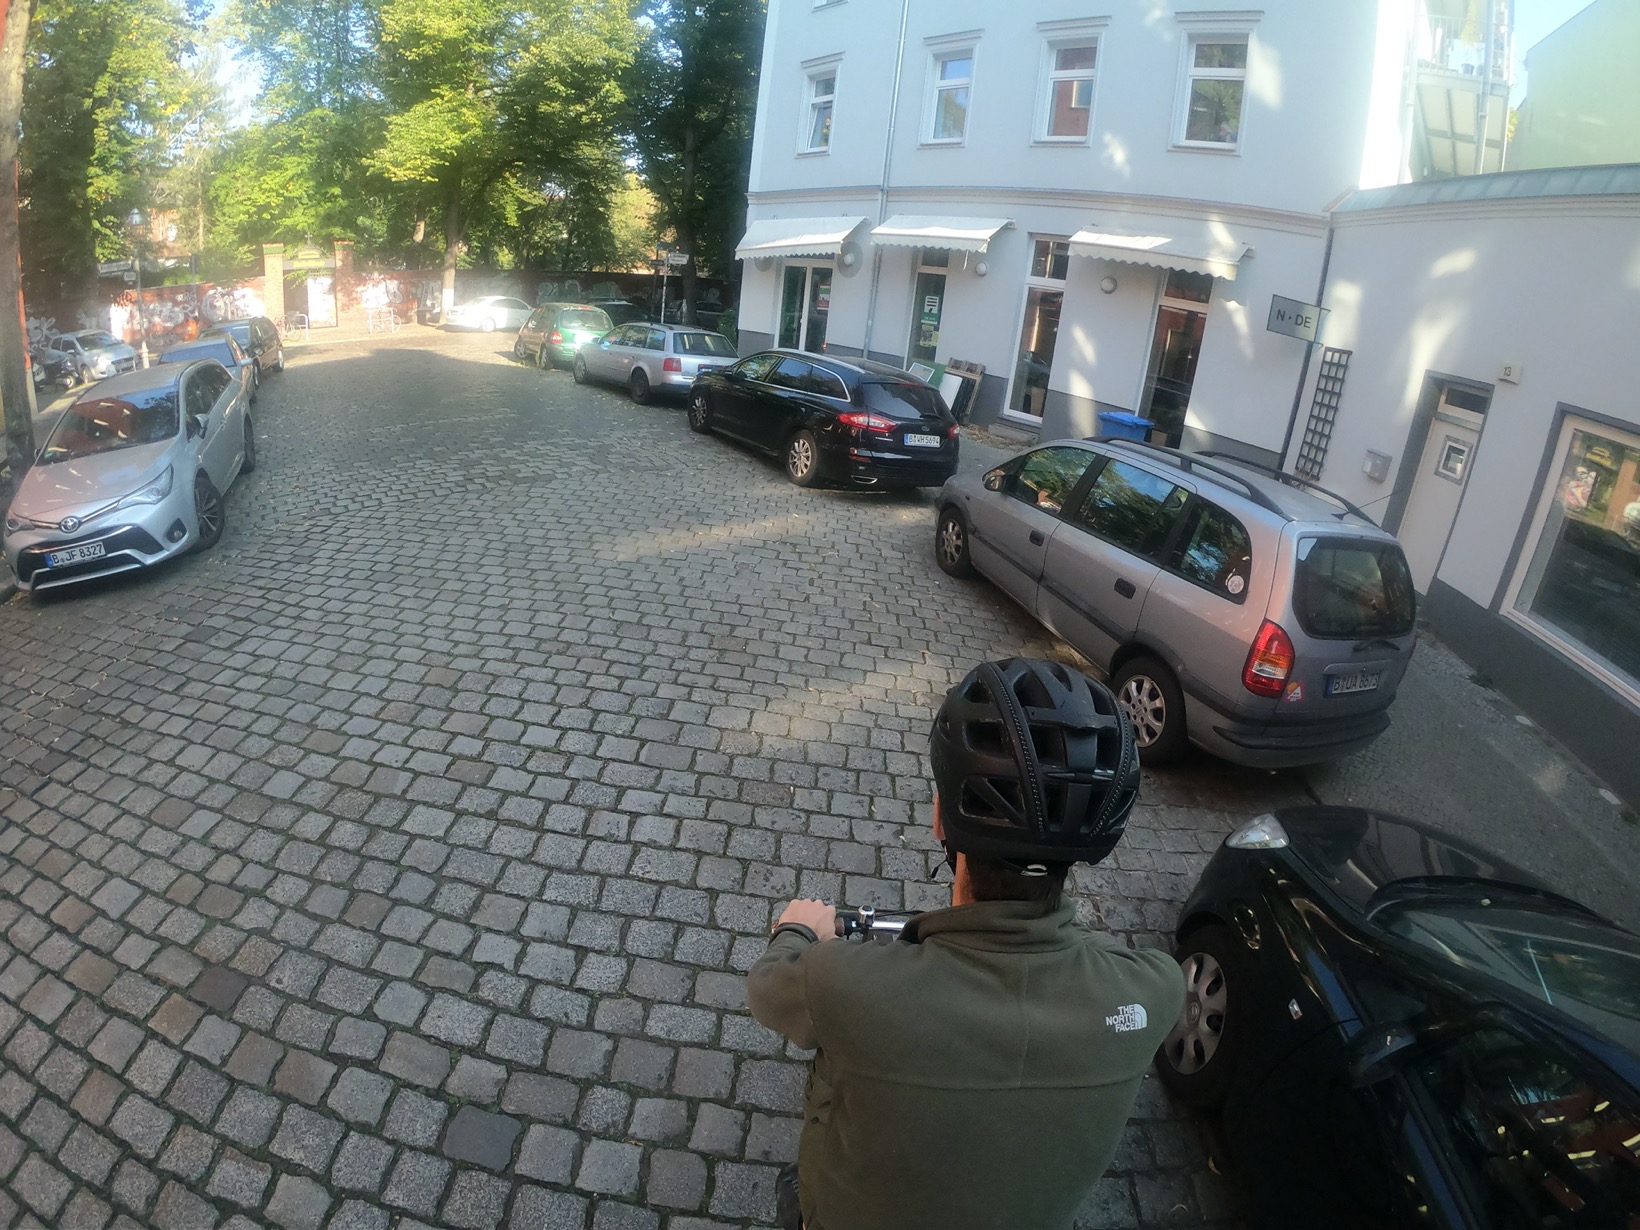
Goal 1: Elevation – Take pictures from as high up as possible
My goal is to create images that allow to map bicycle and pedestrian infrastructure. For Berlin, this requires the pictures to be taken either on the sidewalk itself or from high above on the lane. Otherwise, all you see are parked cars.
Goal 2: Field of view – Look ahead with privacy in mind
No 360°
From a mappers point of view 360° images are perfect. Which is also why Edoardo from Mapillary promoted the recently in https://blog.mapillary.com/update/2020/10/29/the-camera-landscape-2020.html. However, from a privacy point of the of the person taking the pictures, they are not an option for me. I don’t want to be in every picture myself, nor do I want the person next to me be there or my stroller. Mapillary’s face blurring is not enough to solve my privacy concerns; it would need a full body or area blur for that.
No facing backwards
A similar issues arises when facing the camera backwards. It would open up new possibilities to mount the cam; but it also means that potentially someones face and posture is stuck on each pictures, which I don’t want for anyone.
No helmet mount
Having the action cam glued to my helmet looked like a solution at first. But I never even used it as a prototype, since I want to be able to move my head freely without messing up the images or having privacy issues (see above).
My solution
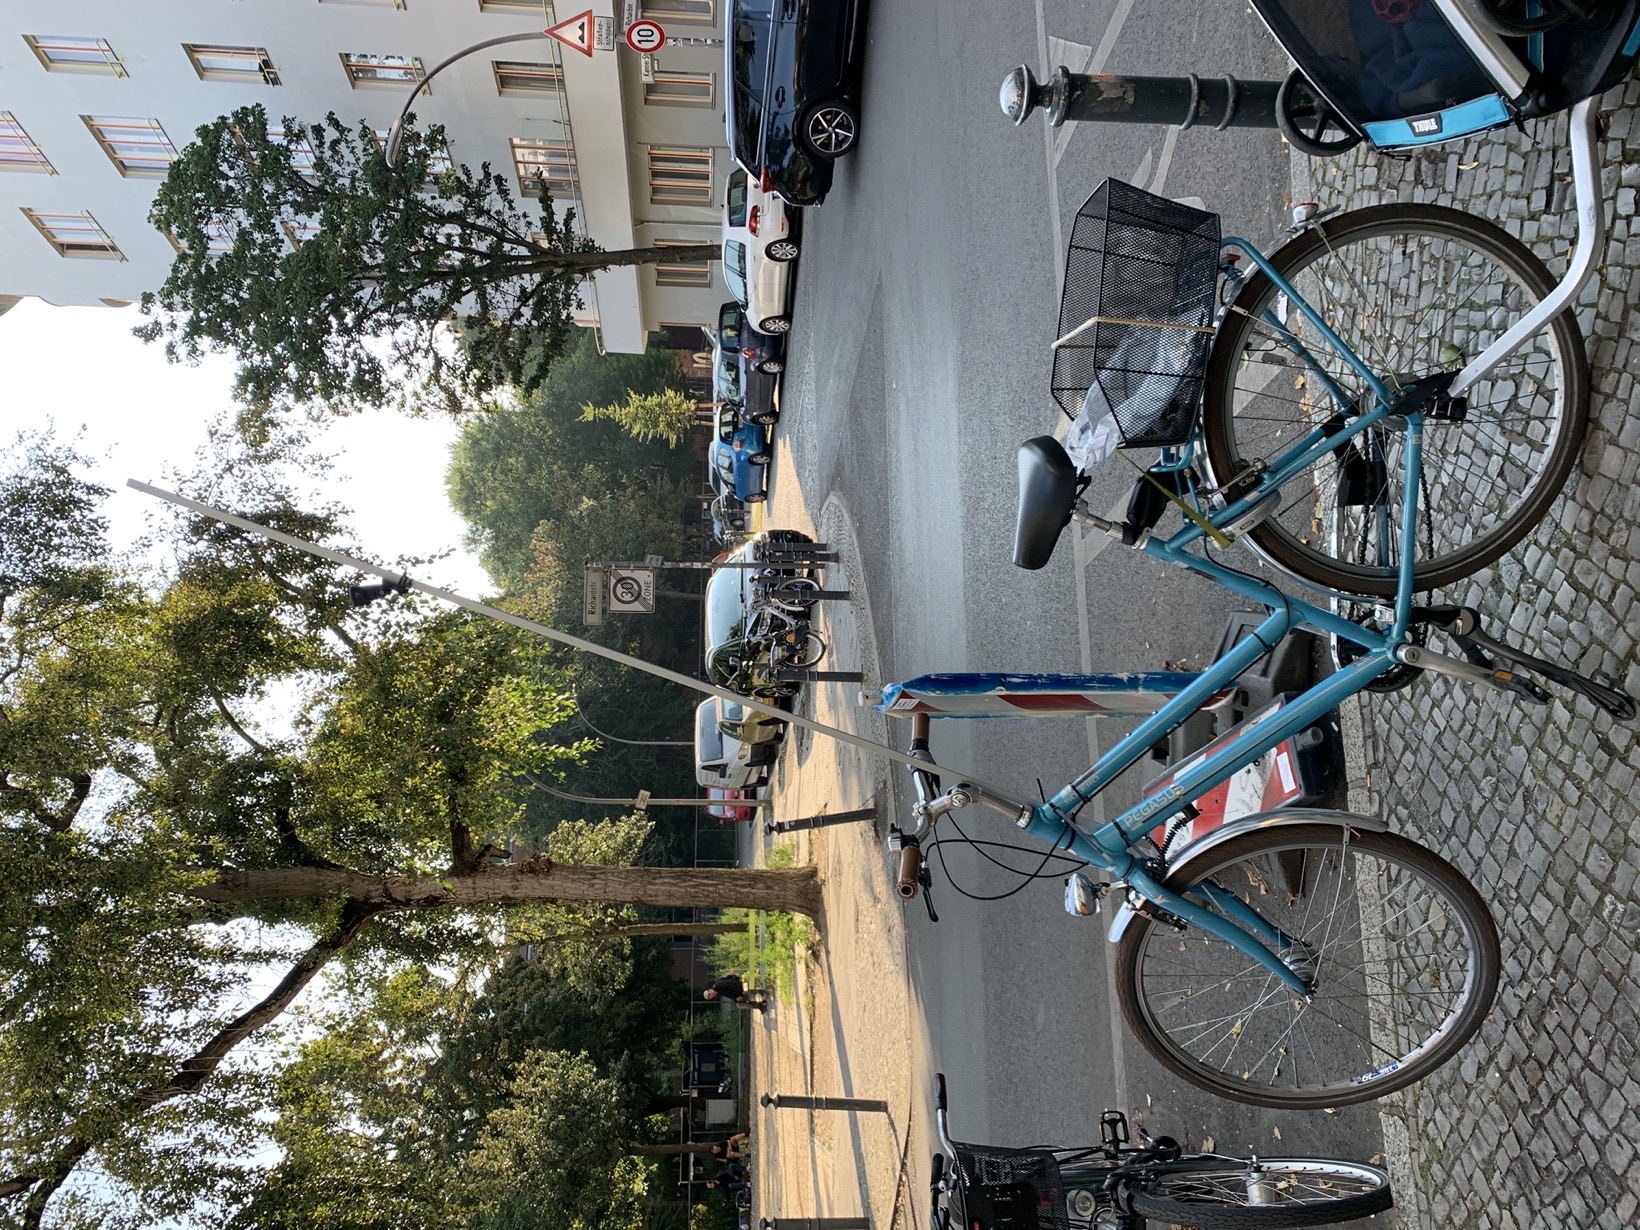
This is why I decided to work with a forward facing GoPro Hero 7 Black.
It was just 230 € in eBay Kleinanzeigen, which is an OK price IMO.
Goal 3: Easy to mount
I wanted the tripod to be easy to mount on my bike and my regular stroller and my bicycle trailer which can be used as a stroller.
Ideally with one hand. Ideally with multiple height-settings. Ideally adjustable while riding the bike.
Not all of this came to live in this prototype :-).
Right now I only have a solution for my bike, which is OK for now. However, for the bicycle trailer in stroller-mode I did some experimentation as well which you can see below.
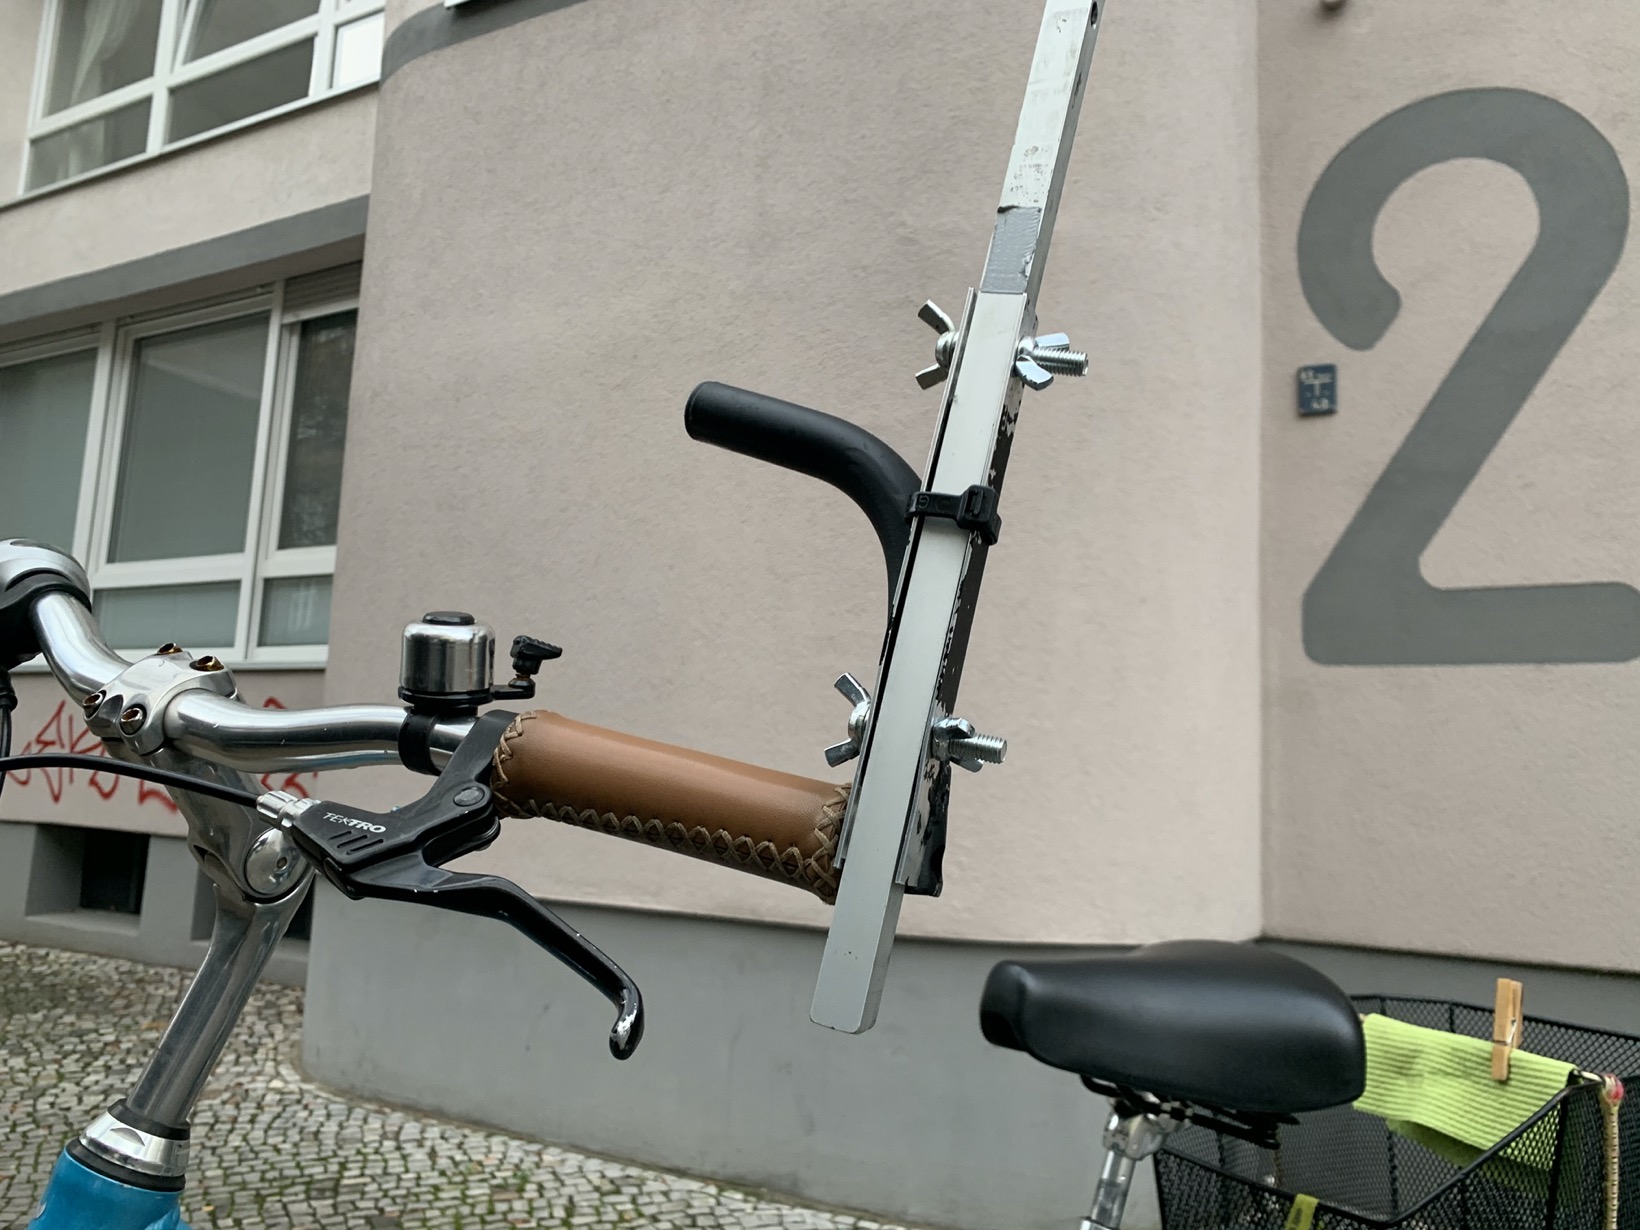
The current prototype status
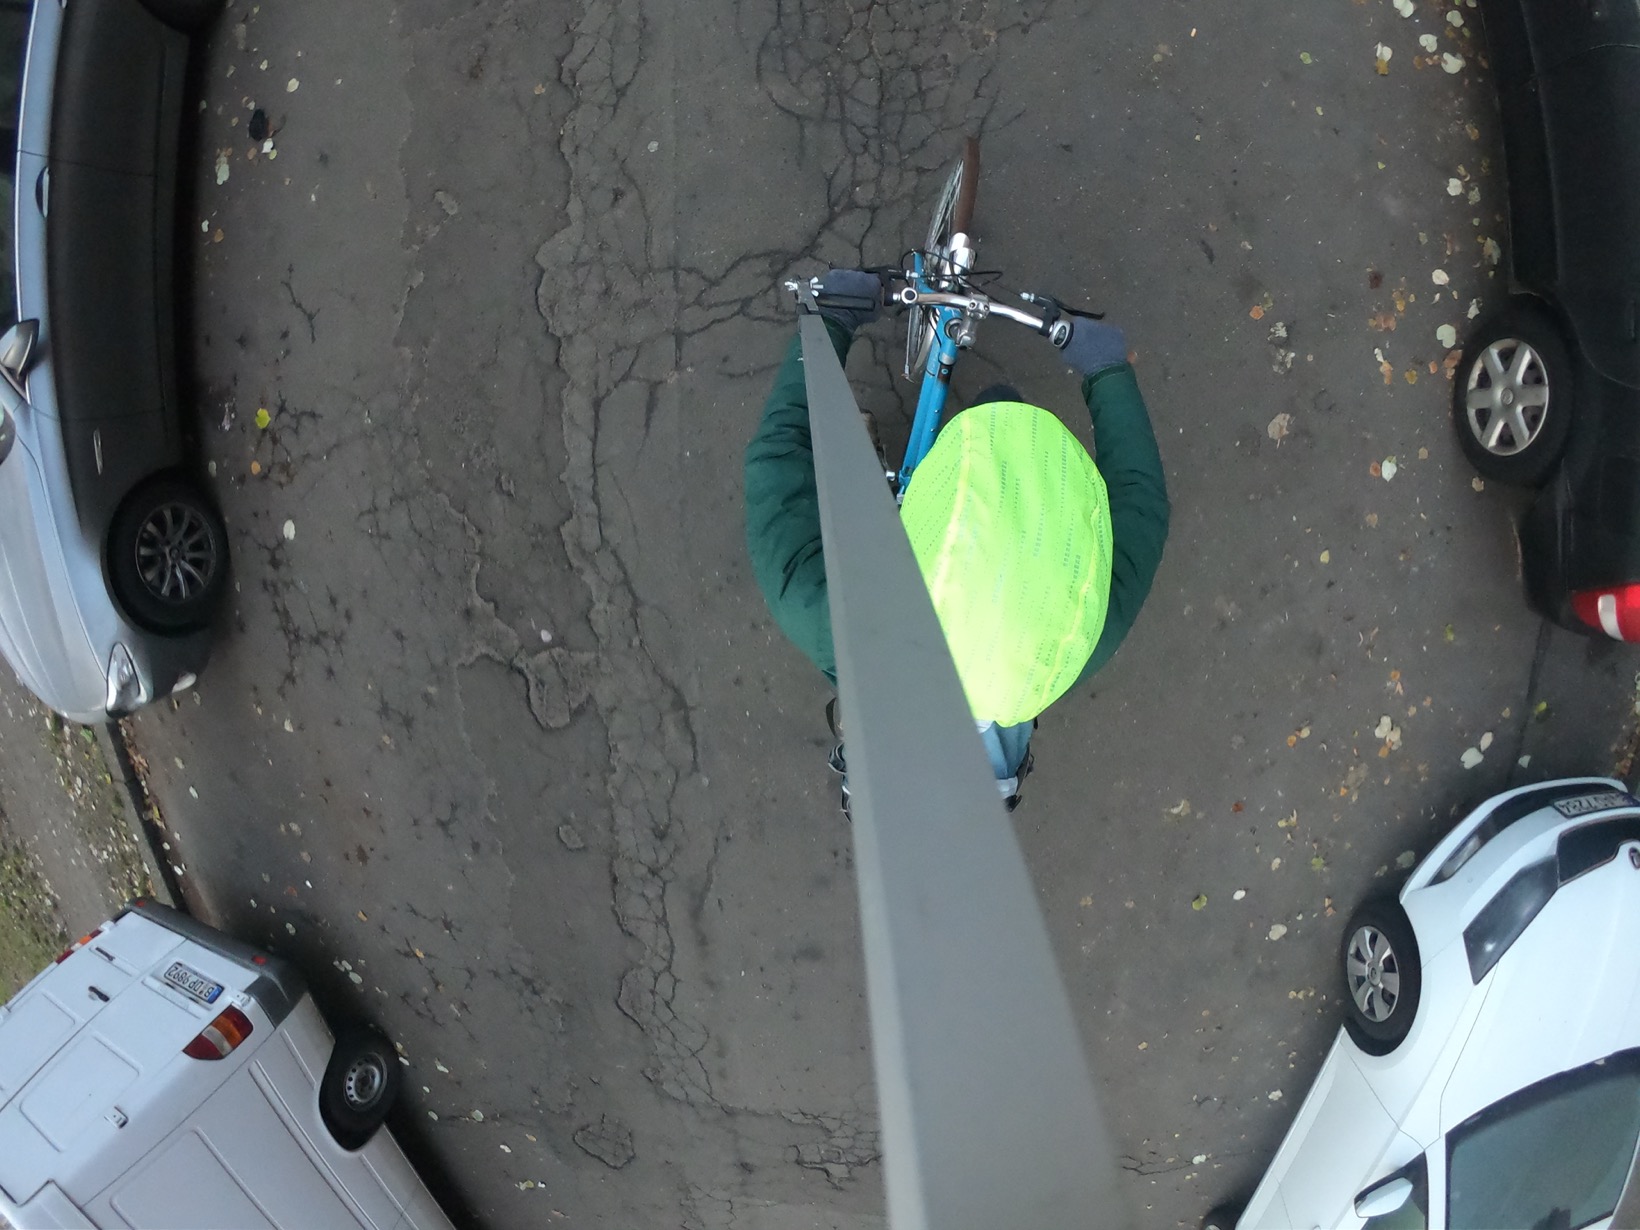
What the tripod looks like
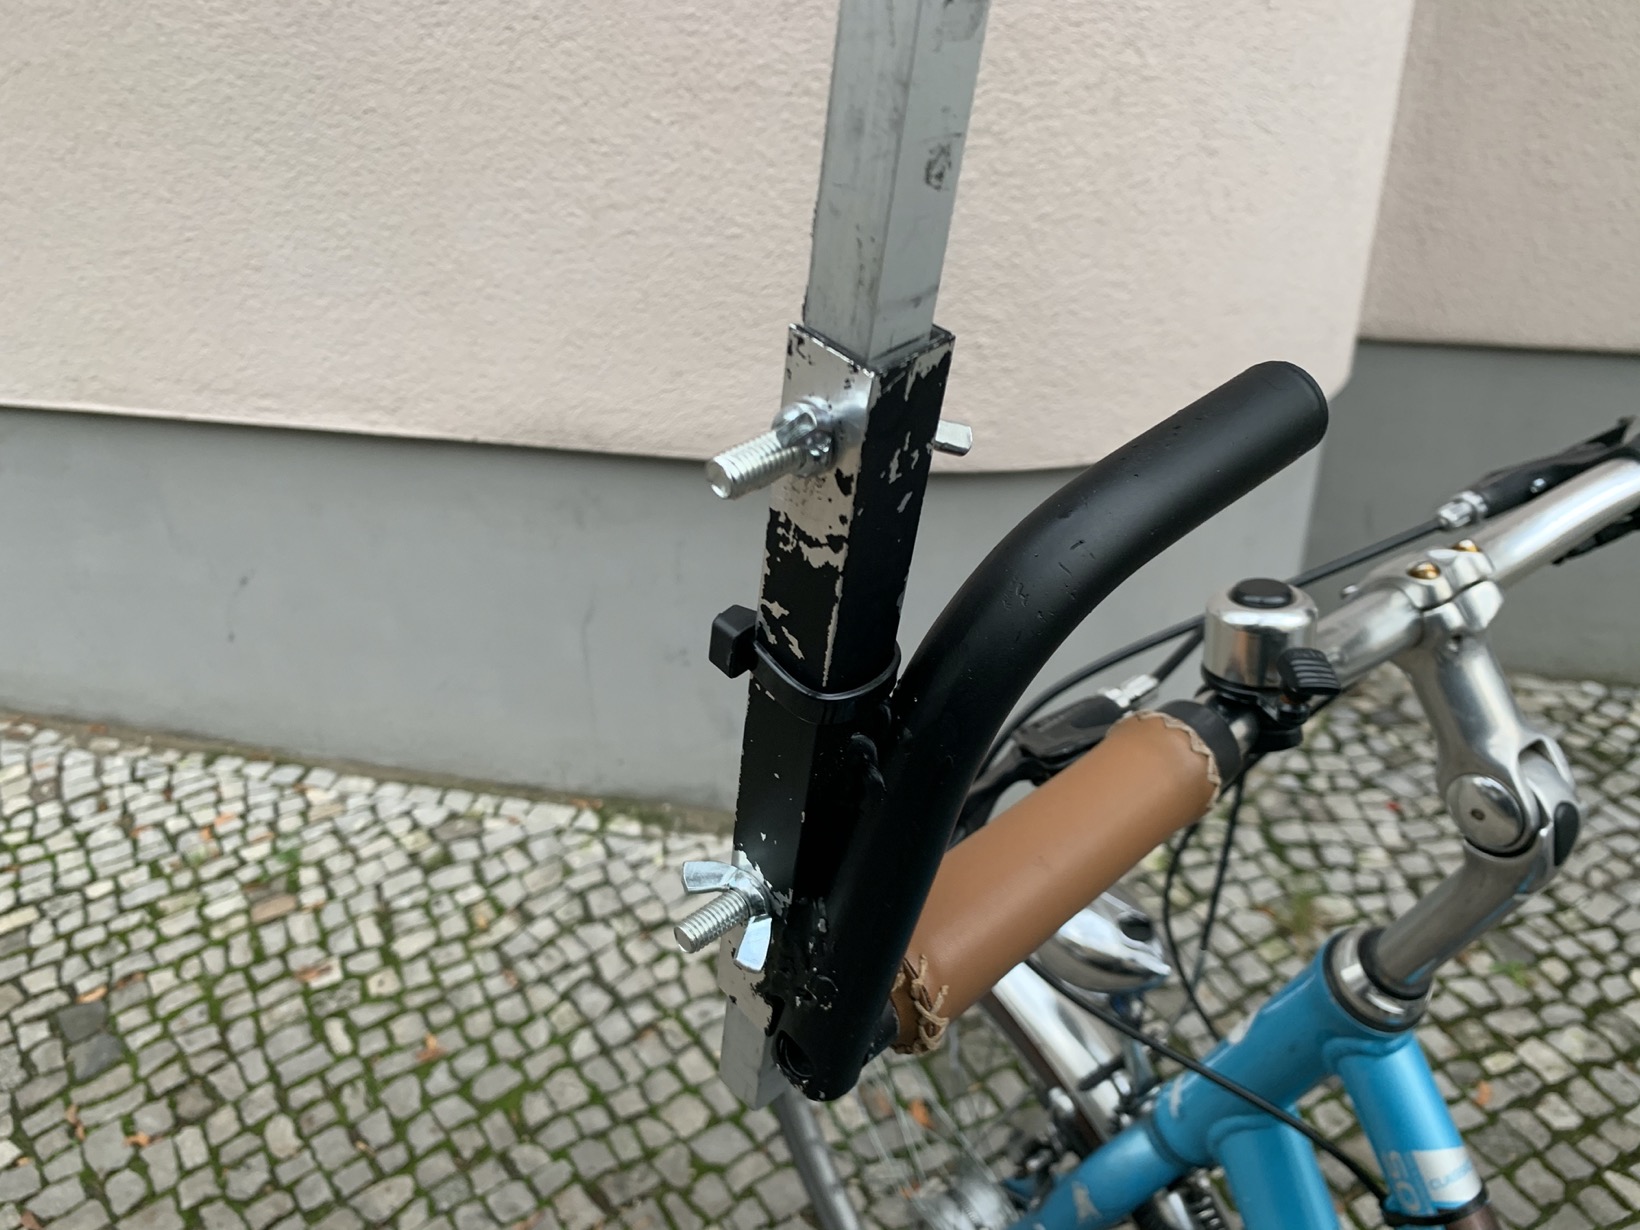
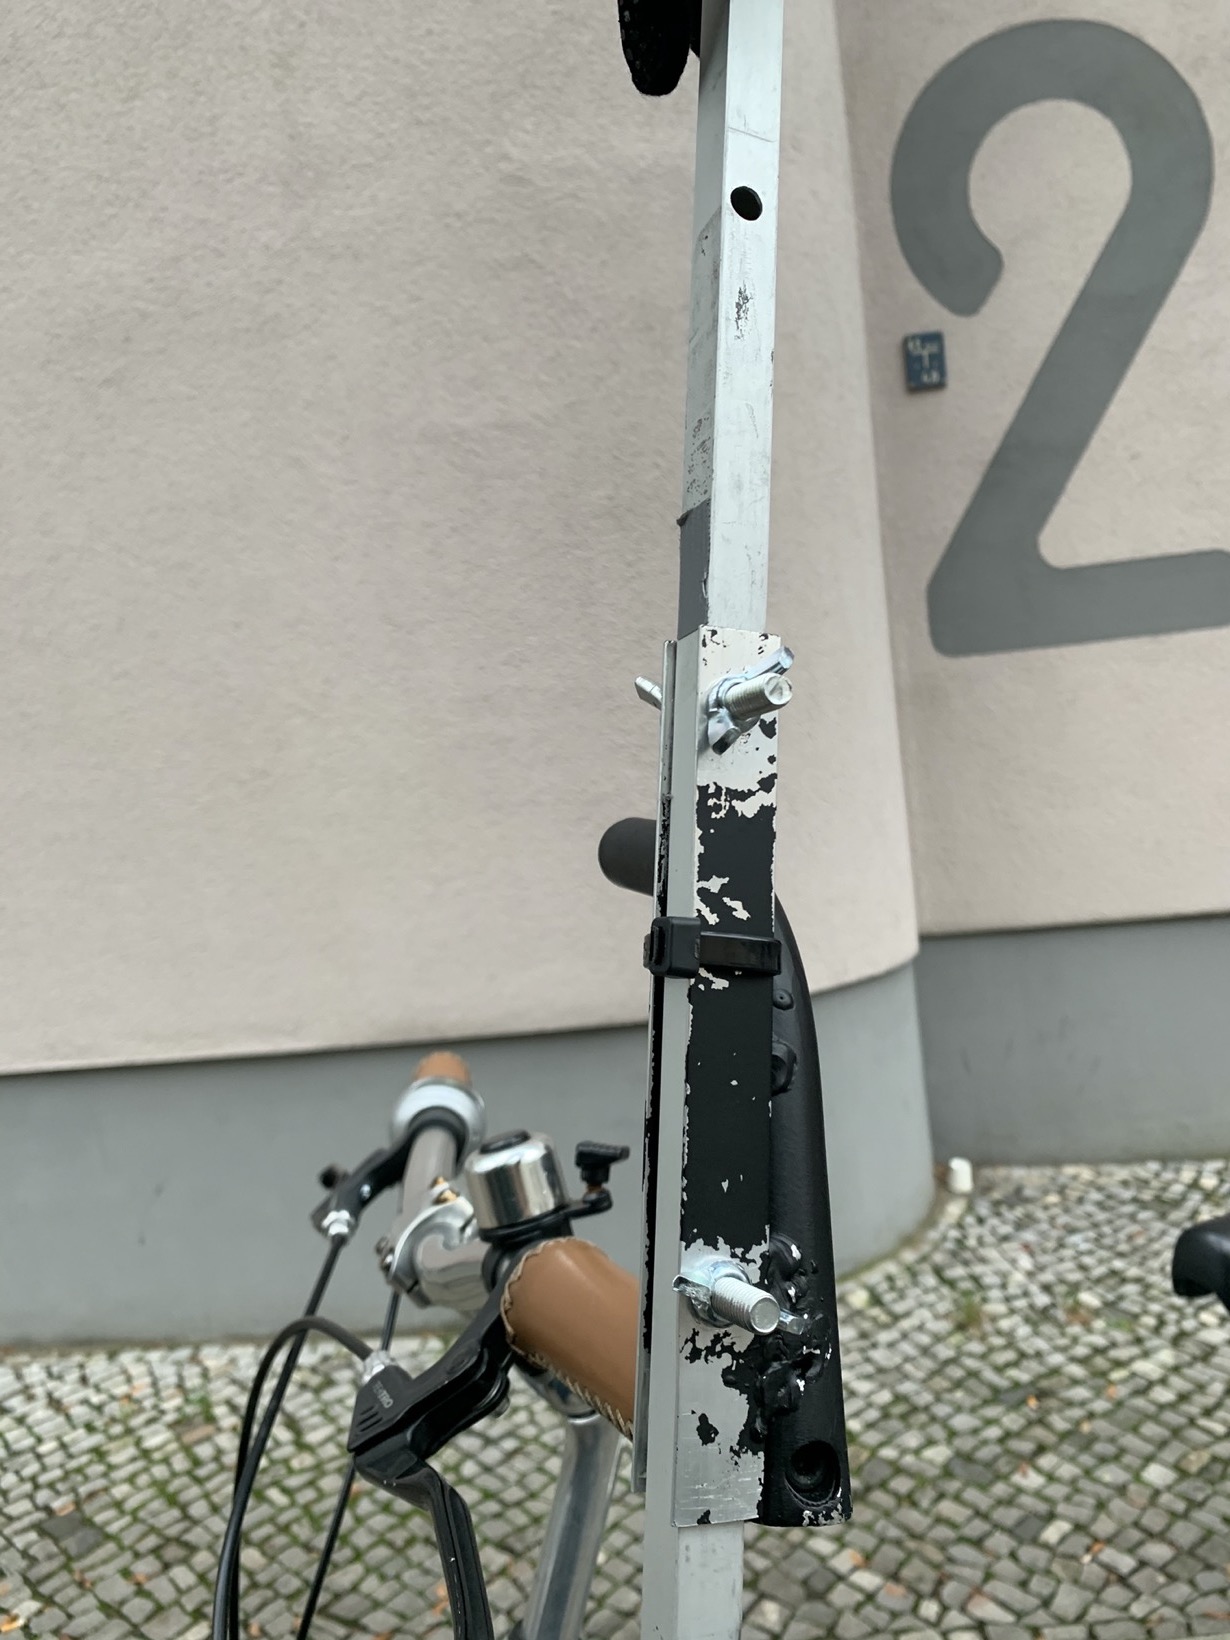
I used an extension that attaches to the bicycle handlebar as a base.
My local bike shop welded a metal guide piece on which I use to screw the square tube on.
I can adjust the height in 5 steps. But in reality I find I either use the lowest or highest – at least for now.
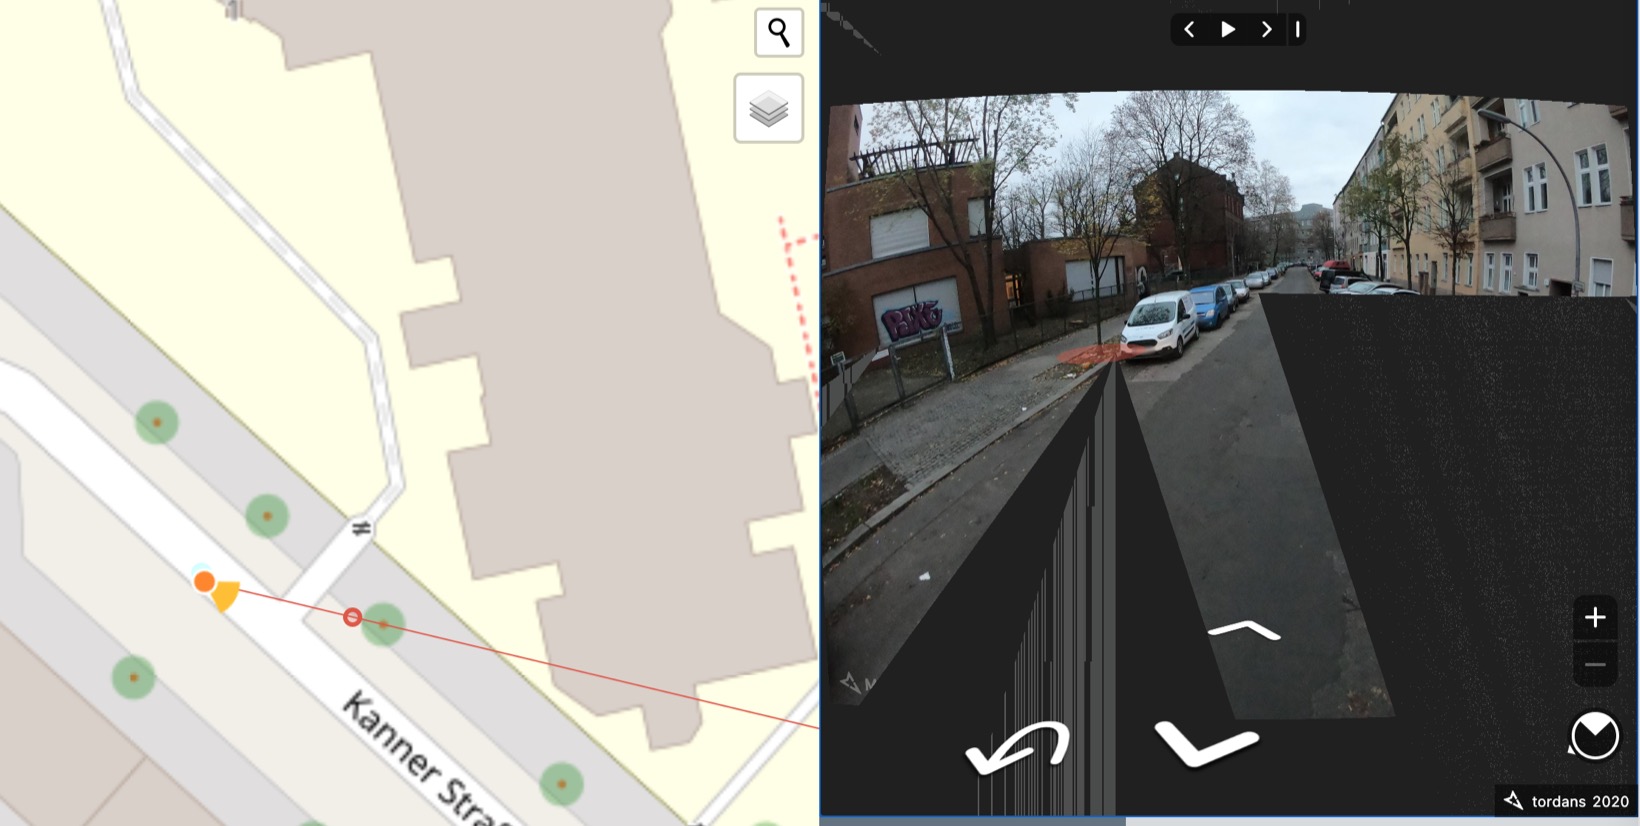
What the images look like
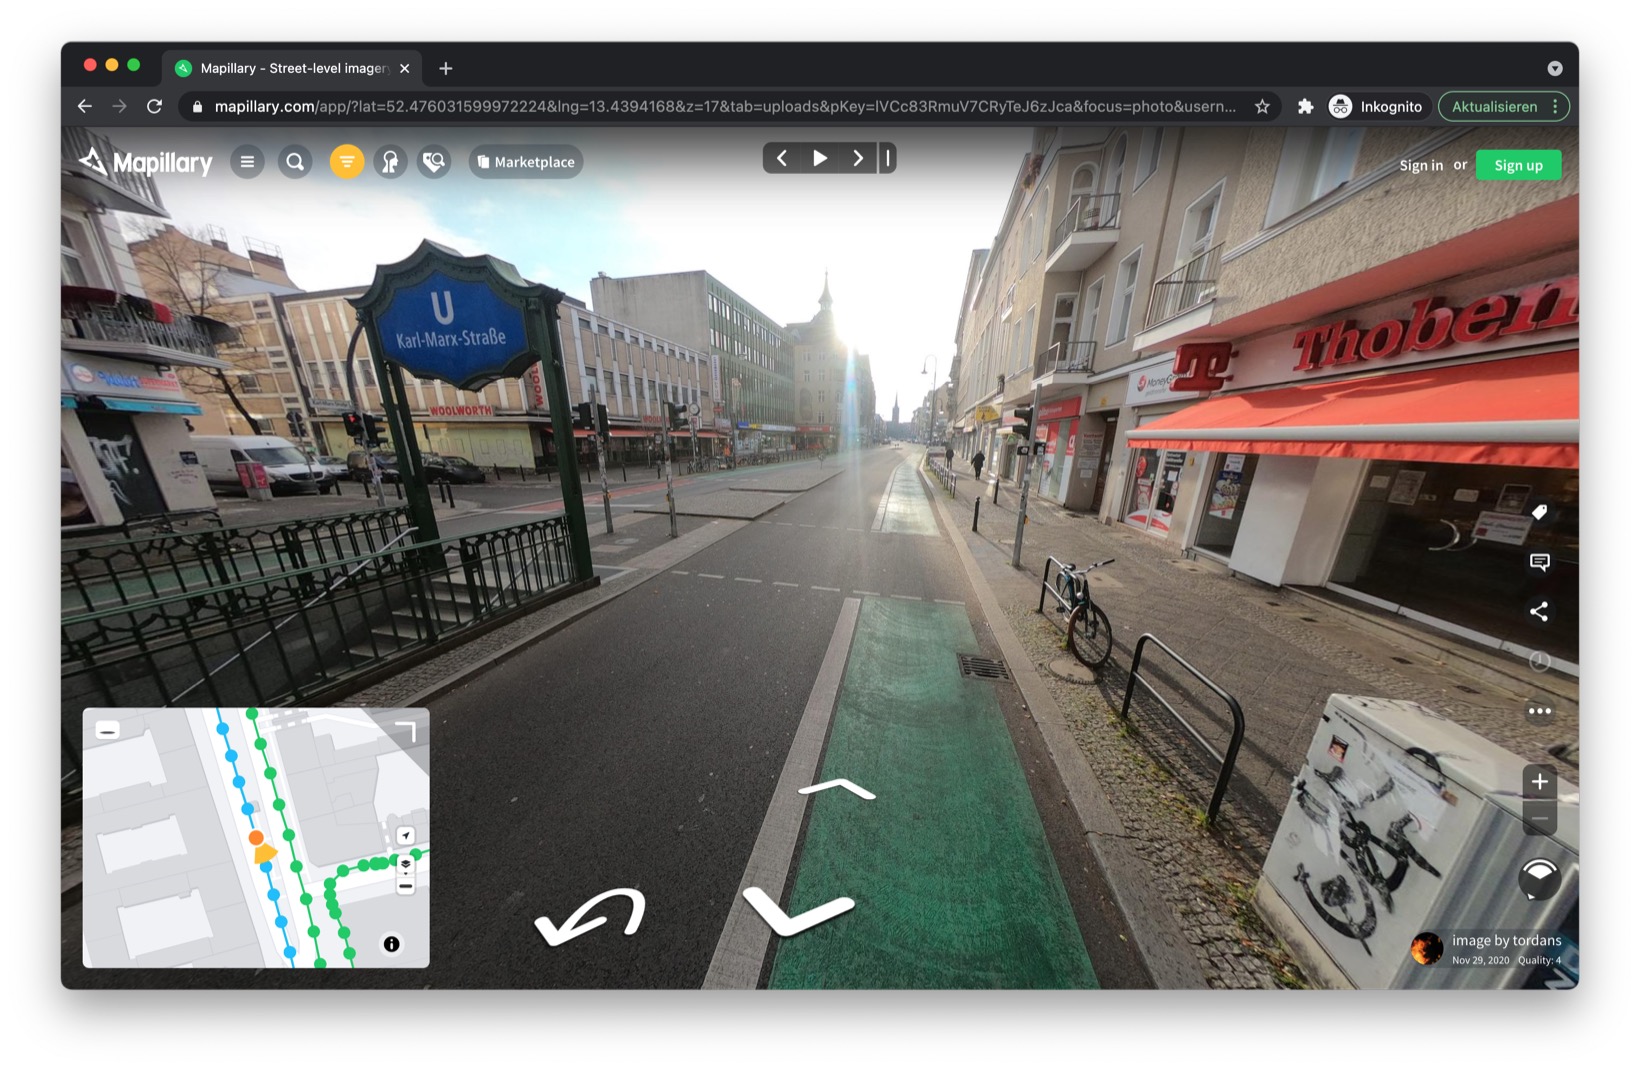
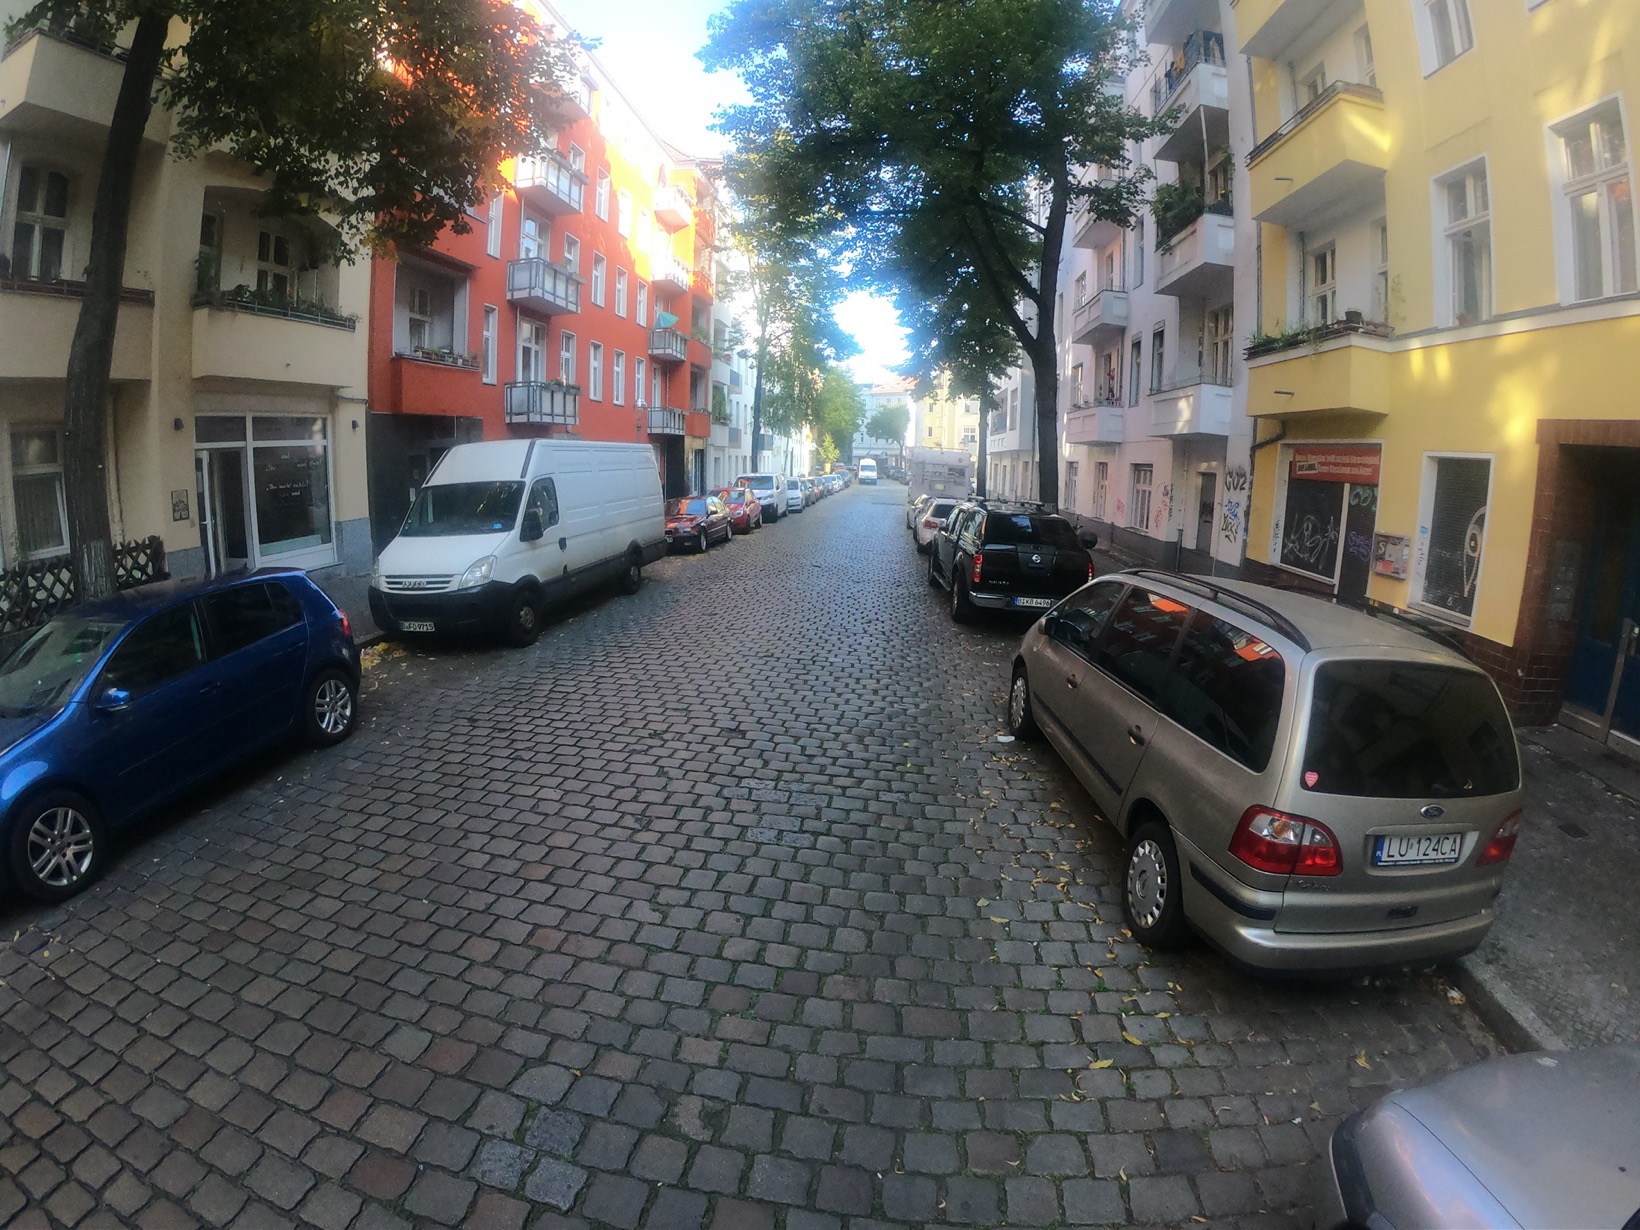
I took a sequence of Mapillary images of a typical street in all 5 positions. Starting at the handlebar mount and going up to the highest position on the tripod.
I picked this street because it shows quite well why a high viewpoint is important, if you want to see more of the infrastructure than just parked cars.
- For comparison: GoPro mounted on my bicycle handlebars (Level 0) https://www.mapillary.com/app/user/tordans?lat=52.47692159997222&lng=13.4447665&z=17&tab=uploads&pKey=9tK7DQ5rXNF5CkPH1qgI6n&focus=photo
- Tripod Level 5 (Default, ~2,4m) https://www.mapillary.com/app/user/tordans?lat=52.4769203&lng=13.444762&z=17&tab=uploads&pKey=Vs3abhonNJqDXo1CfizINK&focus=photo
- Tripod Level 4 https://www.mapillary.com/app/user/tordans?lat=52.4769304&lng=13.444738499972223&z=17&tab=uploads&pKey=hQQgqgjx5S5JlSZBAMGGTR&focus=photo
- Tripod Level 3 https://www.mapillary.com/app/user/tordans?lat=52.4769123&lng=13.4447457&z=17&tab=uploads&pKey=HSM6qmWt4kMdWjTdPPMIJd&focus=photo
- Tripod Level 2 https://www.mapillary.com/app/user/tordans?lat=52.4769249&lng=13.444742599972223&z=17&tab=uploads&pKey=UnKymrNKs0Lry5JftLwoF9&focus=photo
- Tripod Level 1 https://www.mapillary.com/app/user/tordans?lat=52.476934499972224&lng=13.4447737&z=17&tab=uploads&pKey=1r2Uaq2prGrqEzPLsWuQ3f&focus=photo
Failed iterations of this prototype
I did a lot of quick experiments to guide me in the right direction. Here are a few of those experiments. Some worked, some failed.
Experiment with wooden tripod
What the images looked like:
What the experiment looked like:
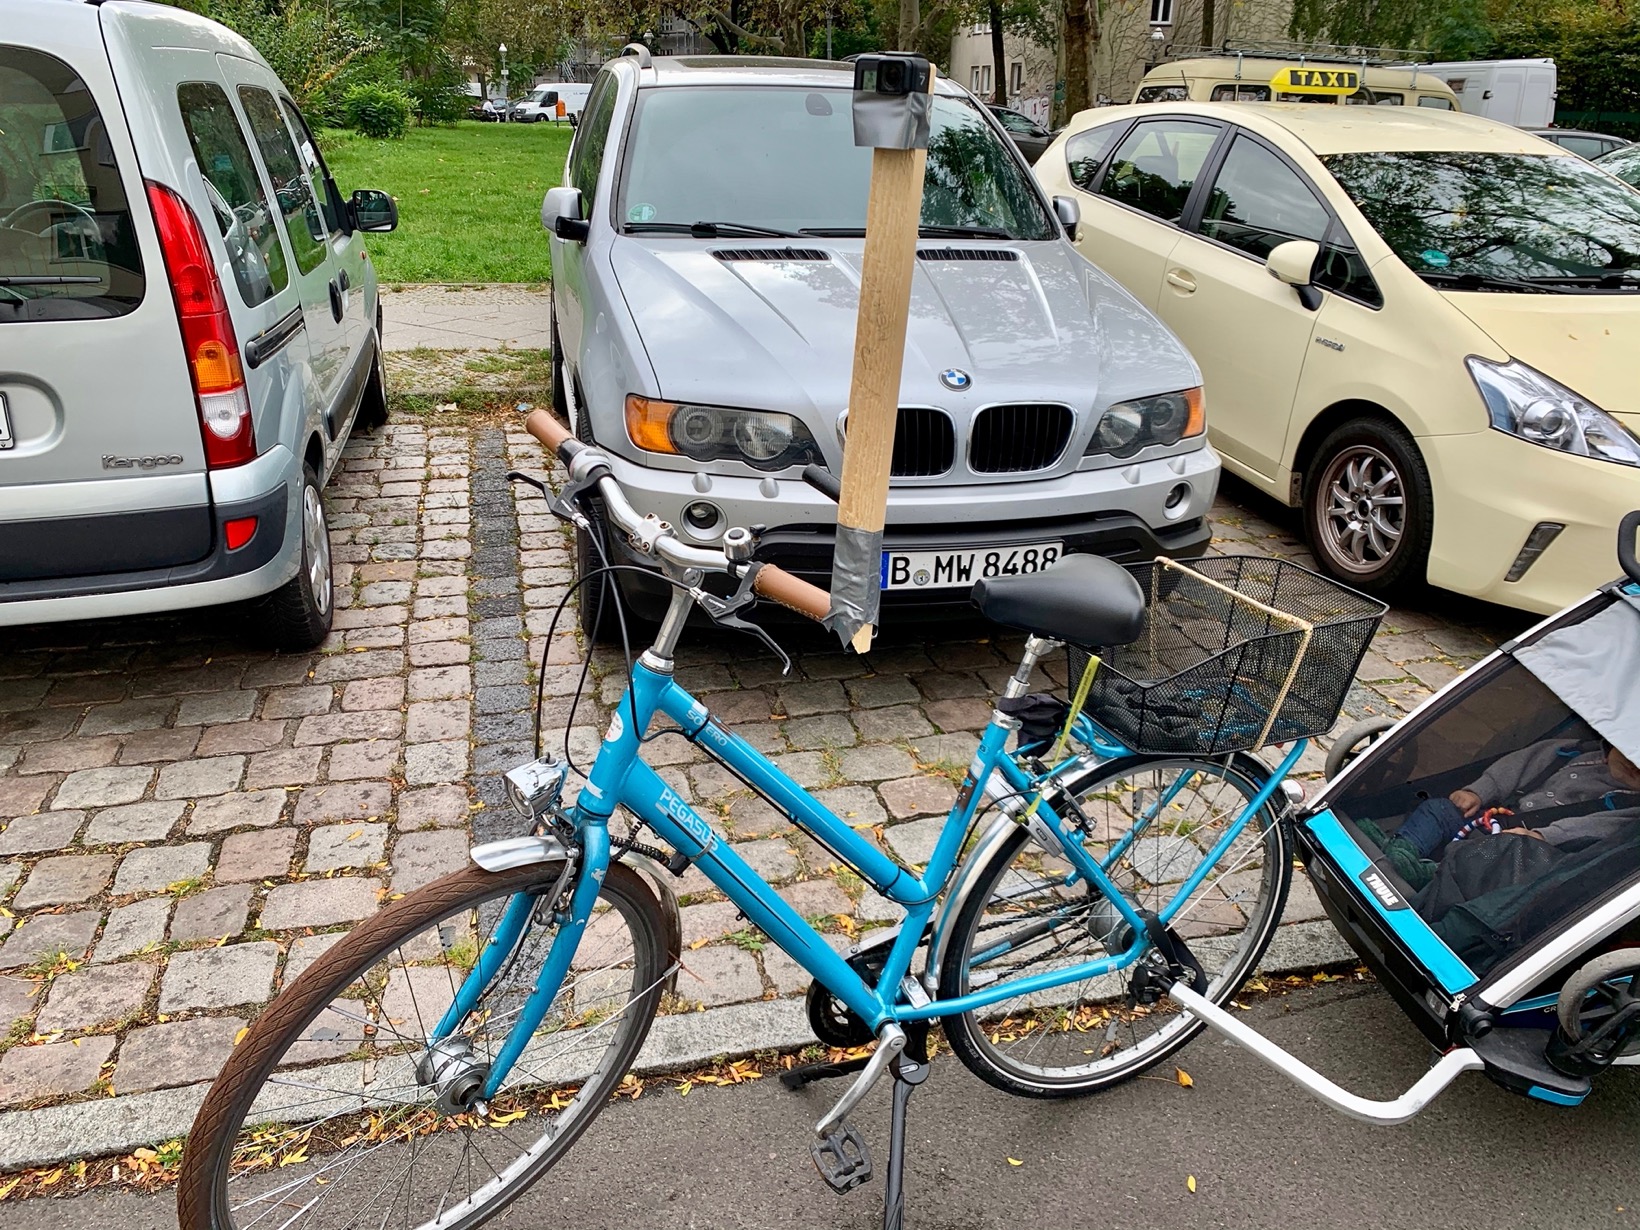
My take: Using the handlebar as a mount does work but the camera needs to be mounted higher.
Experiment: mounted to the luggage rack
What the experiment looked like:
What the images looked like:
My take: Good height, but bad field of view.
Experiment: mounted at the center of my handlepar
What the experiment looked like:
What the images look like:
My take: The images are good but the mounting point is really bad. Its basically right in your face :-D. It is also more static than mounting the camera on the handlebar.
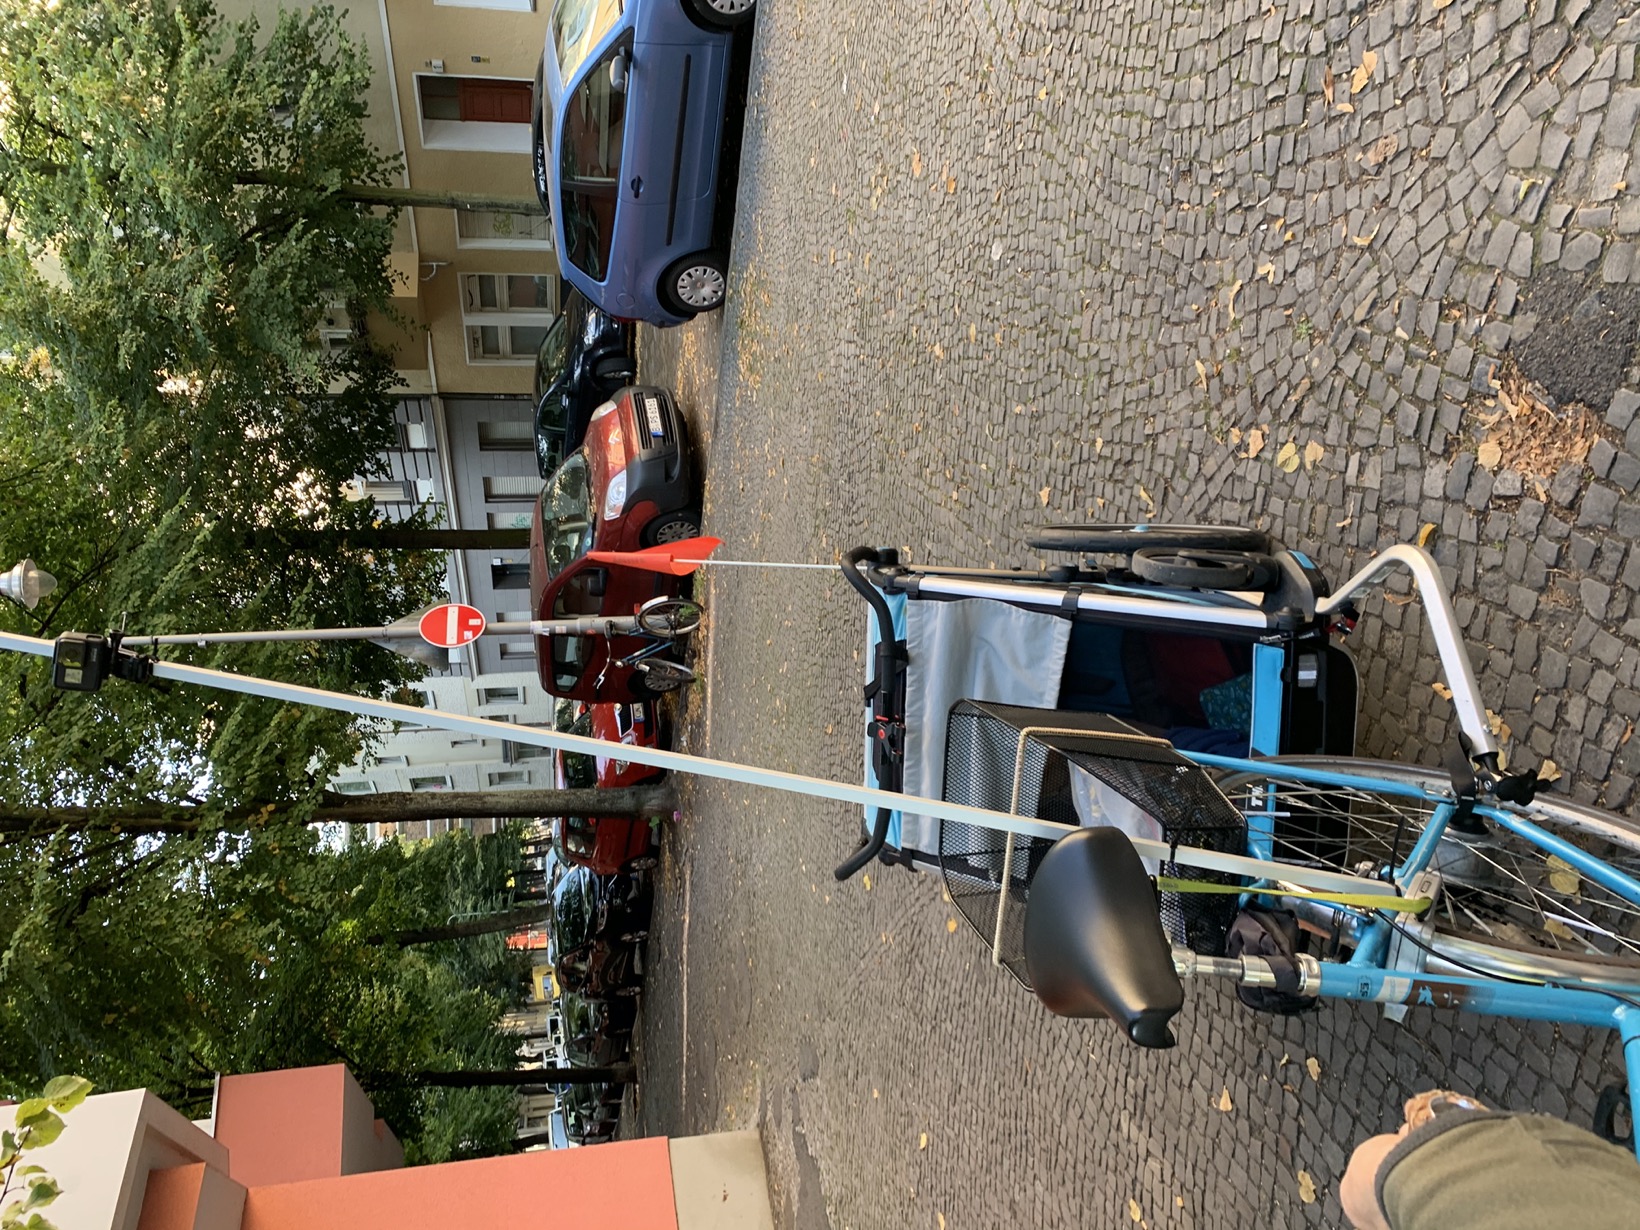
Experiment: mounted to the bicycle trailer
What the experiment looked like:
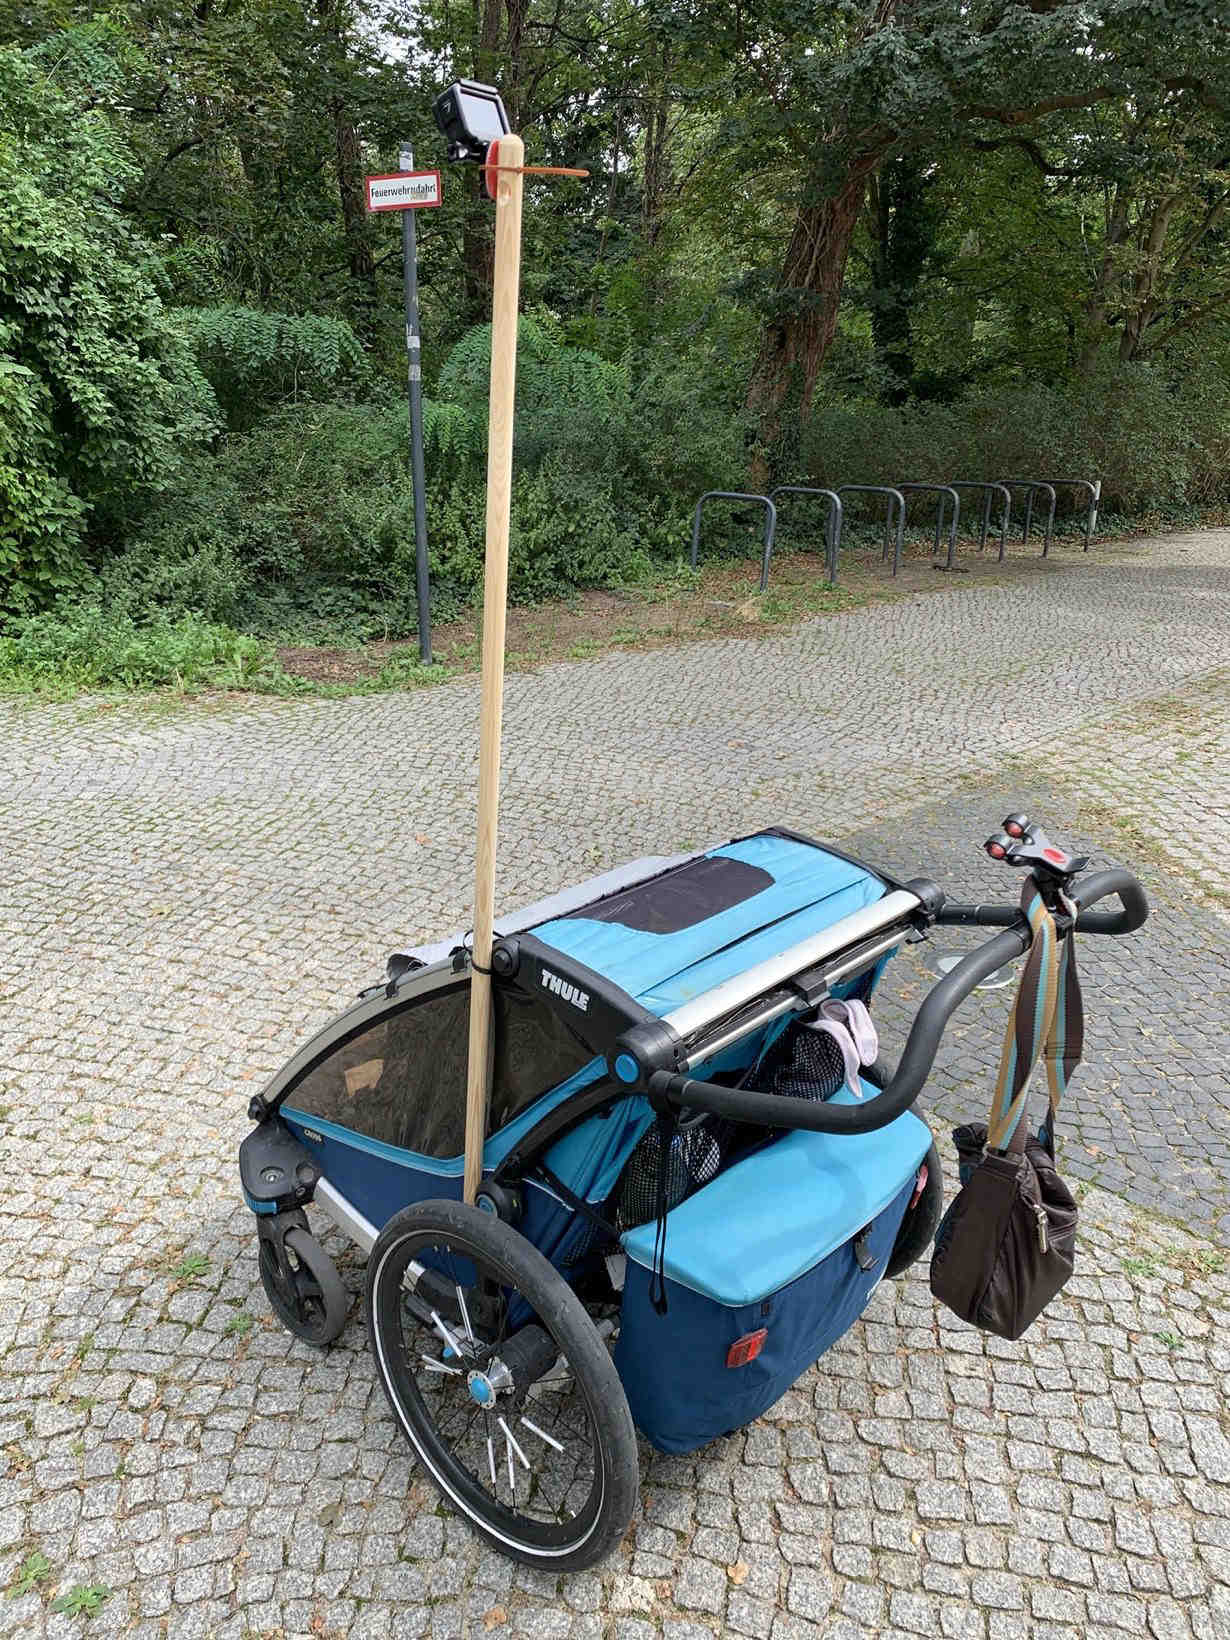
What the images look like:
Basically all images in Brandenburg an der Havel use this setup :-) https://www.mapillary.com/app/?lat=52.41002186112698&lng=12.560155037356026&z=15.042866673831352&focus=map&username%5B%5D=tordans
My take: Very easy to “build” and takes good pictures. The height is quite good for this mode of transport as well. I would have to improve the camera angle, however, so I may get full 5 quality score points (https://blog.mapillary.com/update/2020/11/05/introducing-the-quality-score.html) :-).
Assessment of this prototype
Great: Elevation (Goal 1) and Field of view (Goal 2). This turned out great. I really like how much I can see on the images. It makes mapping with those a lot easier. In most cases, it’s possible to see the sidewalk well enough to be used for mapping. It’s also easier to placing objects near the kerb on the map since context of the object to other objects is cleare
OK: Mounting (Goal 3). The mounting is OK, but the screws are not ideal. I would love to have a setup that allows to change the height with one hand more or less – ideally while moving. I like the construction detail (realised by a cable tie for now) that allows me keep the main “tube” in the guide piece without fixing the screws, yet.
Another improvement would be to be able to turn the field of view to the left/right. This would allow me to see just a bit more of the sidewalk and house entries whenever I take pictures from both sides of a street. That would make working with those images for mapping even easier.
Great: GPS. I am really pleased with the quality of GPS. It’s a lot better than that of my iPhone. A small disadvantage is, that it takes a while to connect. I need to remember not to start moving right away but wait a bit. Otherwise the images will have no GPS at all (not even a bad GPS) and the uploader will show an error and ignore the image.
I also noticed missing GPS below bridges which results in no images being uploaded. Which reminds me, that a while ago I suggested to add an interpolation feature for those cases (https://forum.mapillary.com/t/feature-request-continue-creating-pictures-even-if-gps-is-red/2805).
To test the quality of the GPS, the Deriviste app https://osm.cycle.travel/deriviste/ is a good indicator. In this test, it places the tree nearly at the right position. Which is a lot better than what I experienced in 2018 when I experimented with pictures taken from my iPhone (see https://github.com/mapillary/mapillary-js/issues/272).
Great: Vibration protection. I was really pleased with the vibration protection of the GoPro. We have a lot of cobblestone in my hood and the high mount makes vibrations an even bigger issue. However, looking at my images there are only a few that are blurry, which is great.
Speaking of cobblestone: I do, however, need to remember to really tighten the screws well. Especially in winter when the cold seems to make the plastic less forgiving. One session ended up looking like this for a few streets.
Problem: Height. The height is great. But I really need to pay attention to objects in front of me. Once a tree branch knocked my cam from the pole. And quite a few times I had to dodge traffic signs which protrude over the bike line (to make the car lane free ob object, of course). I some cases, I need to stop and adjust the height, which is annoying but OK. I will need to keep the bicycle handlebar extension a bit loose if I hit an object the whole think will gracefully bend and not break.
A few examples:
- A branch of a tree knocked the camera off https://www.mapillary.com/app/user/tordans?lat=52.4876087&lng=13.4496161&z=17&dateFrom=2020-10-01&tab=uploads&pKey=8cgTp8poLxqn7fu2CmUAQx&username%5B%5D=tordans&focus=photo
- I had to duck below a garland which was placed across the sidewalk https://www.mapillary.com/app/user/tordans?lat=52.48905719997222&lng=13.440967099972223&z=16.197209520297907&dateFrom=2020-10-01&tab=uploads&pKey=795qT9dr75mYvhI7i3rq9M&username%5B%5D=tordans&focus=photo
- This construction area required me to adjust the height https://www.mapillary.com/app/user/tordans?lat=52.47997329997222&lng=13.419761499972221&z=17&tab=uploads&pKey=LbYQMNRD7VqwygJY5LvbdG&username%5B%5D=tordans&focus=photo&dateFrom=2020-05-01
- Quite a few big traffic signs are place above the bike lane to keep the car lane free of obstacles. My camera’s batteries ran out on this tour but those are two examples https://www.mapillary.com/app/user/tordans?lat=52.45383035396454&lng=13.459542179492729&z=17&tab=uploads&pKey=j204YsGQDlc2fe3At5G4wY&focus=photo and https://www.mapillary.com/app/user/tordans?lat=52.46344311845536&lng=13.44415168896694&z=18.183127396588947&tab=uploads&pKey=57p7TKMcc9HEL5HCWq3ILg&focus=photo and also this traffic light https://www.mapillary.com/app/user/tordans?lat=52.46327776324699&lng=13.444240626693272&z=17&tab=uploads&pKey=9O9F-vkXRLZzGC_4qzBGhA&focus=photo
- And there is advertising too, of course https://www.mapillary.com/app/?lat=52.4653428&lng=13.452523699999999&z=15.679263692765229&tab=uploads&pKey=isemqOysjkCNLjHfubnWpT&focus=photo&username%5B%5D=tordans&dateFrom=2020-12-01
Annoying: No hand off cycling. With the new setup, the weight distribution does not allow to cycle hand free anymore.
OK: Uploading images. In my current setup I take a batch of pictures and have to review them manually at home before uploading. Especially, to remove those pics that show me mounting the cam and my house. But also to remove images of roads that I already uploaded – I don’t want to kill any more trees by uploading masses data if I can help it.
For apple users, I recommend to use the gallery-view in finder, not the preview. Its a faster by a lot so you can speed through images and shift-delete those that need to go. I then use the Mapillary desktop uploader to get the images online, which is a great tool for this job.
Annoying: Keeping track of what’s still to capture. I needed a super quick way to plan a route once I have a chance to get out with my setup. The Mapillary viewer with active filters felt too slow for this (and my devices are not that old …). Right now I manually document where I went whenever I check the images for upload. I use a uMap for this: https://umap.openstreetmap.de/de/map/mapillary-hohes-stativ_7207#14/52.4762/13.44
Annoying: Transfering images. Apparently the GoPro (or Apple?) does not allow to just connect the cam and copy images. I need to remove the card and plug it in manually. This is OK, but annoying.
Annoying: Hard to double check of the camera is running. I find myself wondering if the GoPro is running again and again. But thanks to the great height of the tripod, I would need to unscrew it all to check. Or to park the bike and climb up a bike stand. Both is pretty annoying. The GoPro App might be of help but I tested it once and it stopped the recording which I did not notice and thus lost images. I will need to tripple check the settings before mounting the camera, for now.
Annoying: Wrong direction arrows in Mapillary. ATM, Mapillary shows the wrong direction arrows on GoPro images. This is quite annoying when using the images in iD. Maybe one day there can be a choise in the uploader saying “Camera mounted in direction of travel” (or “to the left” …), so the processor can set and adjust the camery angle.
The cost of it
So what did this project cost?
-
GoPro Hero 7 Black – 230 € (second hand)
-
Square pole and U-Shaped pole-“wrapper” and screws – I think those were about 30 € in total at the hardware store
-
bicycle handlebar extension and welding – about 20-25 €
-
a bit of tape and cable ties
Next steps:
For now, I am done. The prototype works well enough to use it. I will need to replace some tape and cable ties with more permanent solutions at some point, but there is no hurry. I switched my focus on collecting images now.
Discussion
Comment from Supaplex030 on 27 December 2020 at 17:11
From the perspective of a mapper mapping in the area where these images of yours are taken, all I can say is: amazing! The elevated perspective (and good picture quality) really take the quality and possibilities of mapping to a new level. Thanks alot, also for documenting your method. I wish more users would document their working techniques (also for other forms of data collection, mapping, or whatever) so that the community can lern and build on these experiences.
Comment from jimkats on 27 December 2020 at 20:29
That’s a heck of setups over there, amazing job.
Comment from voschix on 3 January 2021 at 11:13
Impressive job, But what about safety? I would be worried about possibly injuring people in case of an accident. I am sure your bicycle liability insurance would not pay. I am not a legal expert, but I would be worried. I had looked in the past into a solution for a high-mount (360°) camera for Mapillary and had come to the conclusion that it needs to be at least a tripod both for security and stability reasons,
Comment from ibanez on 5 January 2021 at 10:15
Thanks for sharing, so I adding my two cents in the hope to help you with some of your annoying points. I also decided to use the GoPro Hero 7 Black with a professional bike frame mount to take Mapillary pics for mapping purposes after my mobile phone crashes on the road several times. To get a good GPS result, I switch on the GoPro (right button) for 30 seconds before starting my mapping tour than I switch it off and start the recording at a later time with the red button. After the tour I copy the MP4 videos to my computer using the USB-C connector on the camera and a USB3 connector on my PC. I have a lot of hassle with that at the beginning. Hint: A lot of connector cables are garbage, but a good cable did the job; the camera must be switched on (right button) during connection. Using Linux (not Apple), but I think the OS is not the problem here.
For processing the images and uploading I use the mapillary tools https://github.com/mapillary/mapillary_tools . The –interpolate_directions option should fix your wrong direction arrows issue. It’s possible to divide the processing and uploading in two steps, so you can sort out images.The bad thing about the mapillary tools is that they are running on an very old python version (2.7), to not mess up my system I’ve put the mapillary tools inside a docker container.
For tour planning I’m using OSMAnd (Android) with mapillary option on. This is more useful than the Mapillary app, because you get a (bike) offline navigation, too,
Up to now I never ran out of memory with a 128GB SD, but a fresh battery is dead after 1-1,5h tour at, so a reserve battery is useful.
Finally, thinking there is a minimal legal risk for you with those setup in germany, because the “freedom of panorama” (§ 59 UrhG) is only applicable to pictures taken without helper tools from a pedestrian perspective. Google Streetview had problems with it, but Mapillary is not that popular yet.Link in german: https://www.spiritlegal.com/de/aktuelles/details/paris-sehen-und-dann-sterben-kleiner-leitfaden-zur-panoramafreiheit-im-deutschen-recht.html#perspektive
Comment from Mateusz Konieczny on 5 January 2021 at 22:01
Thanks, that was very interesting!
Comment from tordans on 11 January 2021 at 20:49
Thank you all for your encouraging comments!
@voschix: I did not reasearch the insurance dimension of this. I make sure the whole thing can move in the direction of travel (or oposite) if I get stuck in a tree or something, the whole thing moves and does not break. Other aspects would need more testing to find out more.
@ibanez thanks for sharing your setup.
I will experiment with video at some point. And test out the
--interpolate_directionsoption soon, thanks.“freedom of panorama” – thanks for the link. I tried getting more clarity from Mapillary and other sources without much success. For now I will wait and see what happens.