
Host an OpenMapTiles Vector Tile Server on AWS for $19.75/month
Posted by ZeLonewolf on 7 June 2023 in English.Thanks to planetiler, it is possible to run your own OpenMapTiles vector tile server on Amazon Web Services (AWS) for less than $20 per month. This guide describes the process that I used to stand up tile.ourmap.us for the OSM Americana project, and it does require some knowledge of AWS. However, I taught myself how to use AWS, and I’ve tried to include enough details here to assist someone trying to stand up their own tileserver.
There are many different ways to do this, including different storage, hosting, and tileserver setups. This is just one option that worked for me for what I was trying to do.
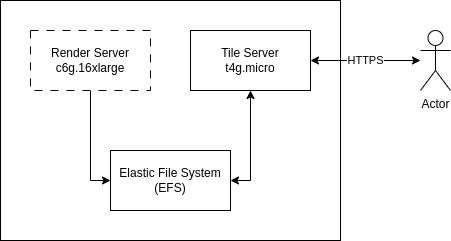
The architecture
This setup in this guide assumes that infrequent planet updates is acceptable for your use case. So, we will spin up a powerful server to update the map only when needed, and use a low-powered server to run the HTTPS tile server on an ongoing basis. If you require more frequent map updates, this is probably not a good solution and you should consider dedicated hardware. The main advantage of AWS in this use case is the ability to rent a high-performance computer for a short period of time.
Additionally, this setup assumes that you already own a domain name that you can use to point to the tile server. If you don’t have one, you can purchase one on Google Domains for $12 per year.
In our setup, we will render a planet to a large file in .mbtiles format, and use tileserver-gl to serve that .mbtiles as an HTTPS server.
Another advantage of using AWS is that they host a locally-mirrored copy of the planet file. Therefore, it is posible to download the planet in a few minutes, which reduces the amount of time that we have to rent that high-powered server to render the planet.
When we say “render the planet,” it means the following operation:

In this setup, I’ve chosen AWS’s Elastic File System (EFS) to store my planet file. EFS is just an expandable file system that can we can mount using NFS. With EFS, you pay only for the amount of storage you use. This cost ($13/mo) is the largest recurring cost of running a tileserver. I will note that AWS’s s3 storage is much cheaper than EFS (2.3 cents / GB) and is worth exploring as an even cheaper alternative.
Thus, our setup looks something like this, when the Render Server running only when we need to update the planet:
Setting it up
The following is an approximate step-by-step guide to setting up the tile server and performing a single planet render. Some of this is from memory, I’m glossing over some of it, and I may be missing steps, so be prepared to adjust. However, this should be a rough recipe, and I did all of this in AWS’s point-and-click GUI.
- Set up a Virtual Private Cloud (VPC) to host your tileserver network, and assign a subnet, route table, and gateway allowing it to access the Internet.
- Create an Elastic File System (EFS) volume. Take note of the volume identifier.
- Create an EC2 instance, of type
t4g.micro. Be sure to tick the box that assigns a public IP address. - Create security groups to:
- Permit NFS access to and from the EFS volume (ports 111/2049 on TCP and UDP).
- Permit port 443 (HTTPS) access to and from the tile server
- Log into the tileserver and install:
- docker
- an NFS client
- nginx
- Create a mount point, and mount the EFS share:
 mkdir -p /mnt/efs
 sudo mount -t nfs4 -o nfsvers=4.1,rsize=1048576,wsize=1048576,hard,timeo=600,retrans=2,noresvport your_filesystem_id.efs.us-east-2.amazonaws.com:/ /mnt/efs
- Spin up a render server! Be careful with the step, because this server is expensive to run. Ensure that you can attend to it while it’s running. Create a
c6g.16xlargeEC2 Spot Instance, log into it and run through the following steps to render the planet and save it to the EFS share. Depending on your setup, you may need to configure a security group for your render server once it’s running in order for it to access the EFS share and/or to log into it. - Install the required software packages:
 sudo apt update -y
 sudo apt install -y pyosmium
 sudo snap install docker
- Format and mount the local SSD disk:
 sudo mkfs.xfs /dev/nvme1n1
 mkdir /home/ubuntu/build
 sudo mount -t xfs /dev/nvme1n1 /home/ubuntu/build
 cd /home/ubuntu/build
- Download the planet and other data sources (including Wikidata and Natural Earth):
sudo docker run -e JAVA_TOOL_OPTIONS='-Xmx80g' -v "$(pwd)/data":/data \
  ghcr.io/onthegomap/planetiler:latest --area=planet --bounds=world --download --download-threads=20 --download-chunk-size-mb=500 \
  --only-fetch-wikidata
- (Optional) update the planet file to current. Note this operation can take 30-40 minutes to complete.
sudo pyosmium-up-to-date -vvvv --size 10000 data/sources/planet.osm.pbf
- Render the planet! Be sure to list the languages you’re interested in (for example, “en,de,pt” will render tiles with English, German, and Portuguese). In addition there are a few options in the command below based on what I use in Americana; consult the Planetiler docs in order to appropriately customize the render for your use case.
sudo docker run -e JAVA_TOOL_OPTIONS='-Xmx30g' -v "$(pwd)/data":/data \
ghcr.io/onthegomap/planetiler:latest --area=planet --bounds=world \
--mbtiles=/data/planet.mbtiles \
--transportation_name_size_for_shield \
--transportation_name_limit_merge \
--boundary-osm-only \
--storage=mmap --nodemap-type=array \
--building_merge_z13=false \
--languages=list_of_languages
- Copy the rendered .mbtiles file from the local disk to the EFS share
cp /home/ubuntu/build/data/planet.mbtiles /mnt/efs/planet.mbtiles
- Terminate the render server. Time is money! Do not forget to stop that server if you’re doing a one-time render.
- Configure a domain name to point to the IP address of your tileserver. For example, something like tile.your_domain.com would work.
- Log back into the tileserver configure tileserver-gl. Create a basic config.json in the same location as your planet mbtiles. Replace your domain name in the indicated spot:
{ "options": { "paths": { "root": "/data", "fonts": "fonts", "sprites": "sprites", "styles": "styles", "mbtiles": "." } }, "domains": [ "tile.your_domain_name.com:8080" ], "styles": { }, "data": { "v3": { "mbtiles": "planet.mbtiles" } } } - Launch tileserver-gl. It should run without errors and be accessible via HTTP on port 8080 if your security group allows access from the Internet.
docker stop $(docker ps -aq)
docker run -it --restart always -v /mnt/efs/:/data -p 8080:8080 maptiler/tileserver-gl
- Next, we need to set up HTTPS. Configure an nginx site with SSL certificates using Certbot. The nginx configuration should end up looking something like something like this:
server { listen 443 ssl; ssl on; ssl_certificate /etc/letsencrypt/live/tile.yourserver.com/fullchain.pem; ssl_certificate_key /etc/letsencrypt/live/tile.yourserver.com/privkey.pem; server_name ; access_log /var/log/nginx/nginx-ourmap.vhost.access.log; error_log /var/log/nginx/nginx-ourmap.vhost.error.log; location / { proxy_pass http://localhost:8080; proxy_set_header Host $host; proxy_set_header X-Real-IP $remote_addr; proxy_set_header X-Forwarded-Proto https; proxy_set_header X-Forwarded-For $proxy_add_x_forwarded_for; proxy_set_header X-Forwarded-Ssl on; } } server { if ($host = ) { return 301 https://$host$request_uri; } listen 80; server_name ; return 301 https://$host$request_uri; } - Start nginx with
service start nginx. That should make your tileserver accessible via HTTPS at the address you configured in DNS.
Cost Analysis
This cost analysis is based on the US East (Ohio) zone, which I found to be the cheapest of all the US-based alternatives.
Overall:
- $19.75 base recurring cost
- $1.64 - $3.28 each time the planet is updated
- $0.09 for each million tiles served
Base Recurring Costs:
- One EC2 node, t4g.micro type. On-demand Cost: $6.13/mo. This cost further can be reduced by up to 40% by purchasing a reserved instance.
- One Elastic File System shared drive. Cost: $0.16/GB per month x 82Gb = $13.12/mo
- One Route 53 Hosted Zone DNS table. Cost: $0.50/mo
Bandwidth Costs:
- Average tile size (per OpenMapTiles CI): 1,039.7 bytes/tile
- 1GB = 1,032,036 tiles
- $0.09/GB bandwidth costs
- Approximately 9 cents per million tiles
Rendering Costs (per planet update):
- One on-demand c6g.16xlarge instance at $2.18 per hour
- Approximately 45 minutes to render a planet from the current planet.pbf ($1.64)
- Approximately 90 minutes to update and render a planet. ($3.28)
Useful links
- AWS instance pricing: https://instances.vantage.sh/
Discussion
Comment from MxxCon on 8 June 2023 at 15:57
Many of these steps could be automated with Ansible. Faster execution time, less chance for typos or forgetting/skipping steps.
Comment from Kai Johnson on 14 June 2023 at 15:39
Very nicely done! I love the cost analysis!