OpenStreetMap

ZeLonewolf's Diary

Recent diary entries

Surveying the country, one street at a time, with StreetFerret

Posted by ZeLonewolf on 2 March 2024 in English. Last updated on 4 March 2024.

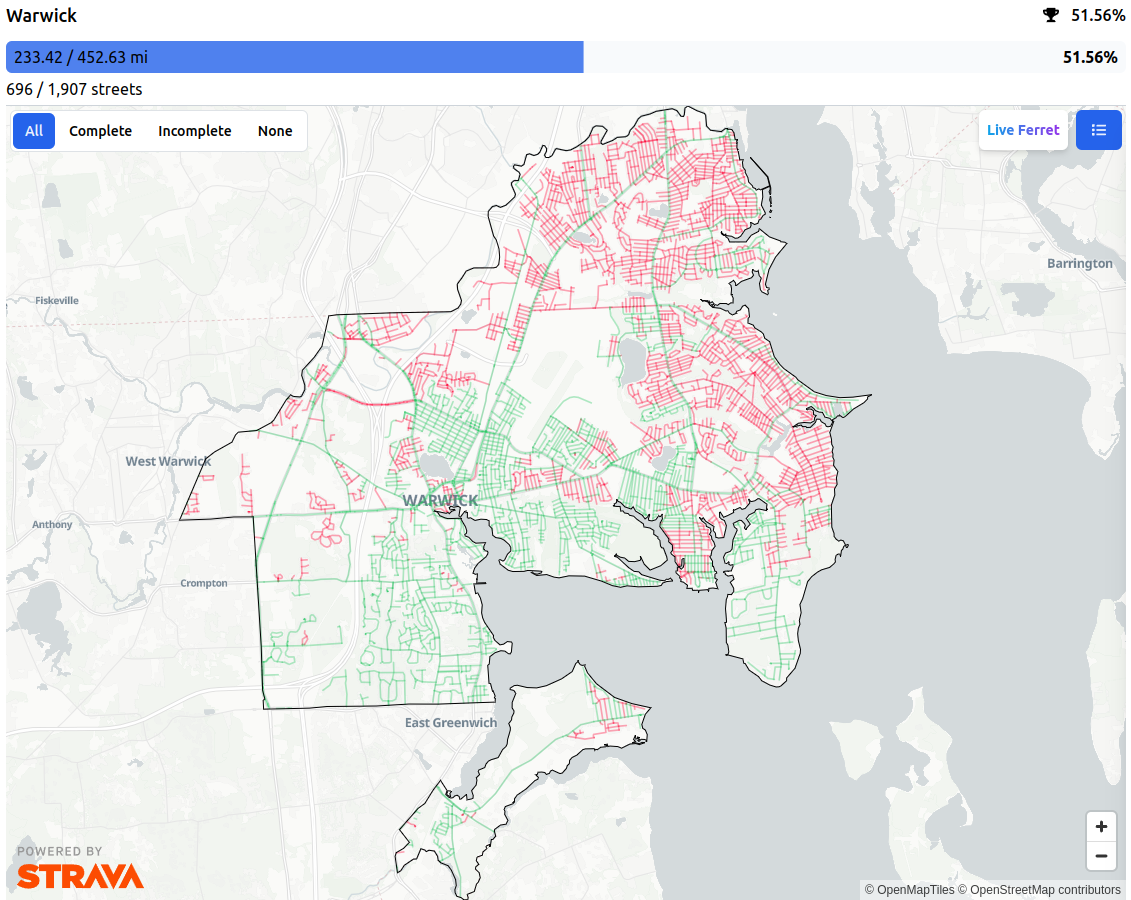
I operate StreetFerret, a site that shows runners, walkers, and cyclists which streets they’ve visited in a city or town. StreetFerret works by taking a user’s Strava activity data, and comparing it to OpenStreetMap map data to decide which streets they’ve completed.

For example, this is my StreetFerret map of Warwick, Rhode Island (USA):

StreetFerret map of Warwick, RI

OpenStreetMap is an awesome partner for StreetFerret because as the map gets updated, StreetFerret can update its street data too, within about a week. For someone trying to run, walk, or bike every street in their city, they don’t want to get their map to 99%, they want to get it to 100%! So, when they encounter a street that’s wrong in StreetFerret, they are motivated to edit OSM, which makes StreetFerret AND OpenStreetMap better at the same time. StreetFerret users have corrected OSM data countless times in pursuit of 100% completion.

One day, StreetFerret user and US Navy lieutenant Paul Johnson approached me at our local run club in Newport, Rhode Island. He was planning to attempt to break the world record for running across the United States - 3,000 miles from Los Angeles to New York City in less than 40 days and raise $1 million for mental health awareness.

And thus, pauljohnson.run was born, along with the StreetFerret run tracker.

As of this writing, Paul is on day 2 of his transcontinental journey, somewhere between San Bernadino and Palm Springs, California.

Paul’s run - and the StreetFerret run tracker - appeared in a spot on the local TV news in Los Angeles today!

I’m excited to see how OpenStreetMap data supports real people doing real things to make the world better, one step at a time.

Location: Yucaipa, San Bernardino County, California, 92399, United States

In my last diary entry, I described how I hosted the tile.ourmap.us planet vector tileserver for the OSM Americana project using Amazon Web Services (AWS). This approach is good, but it costs more than necessary and is expensive if you want the tiles to update continuously!

While I was at State of the Map US in Richmond, VA this summer, I ran into Brandon Liu, the creator of protomaps and more importantly, the PMTiles file format. PMTiles provides several advantages over mbtiles which allow us to create an ultra low-cost setup. He shared with me the key elements of this recipe, and I highly recommend his guides for building and hosting tile servers.

With this setup, I am able to run tile.ourmap.us for $1.61 per month, with full-planet updates every 9 hours.

Eliminating things that cost money

The first thing that cost money is running a cloud rendering server. I would spin up a very hefty server with at least 96Gb ram and 64 CPUs, which could render a planet in about a half hour. However, thanks to improvements in planetiler, we can now run planet builds on hardware with less ram (provided there is free disk space), at the expense of the builds taking longer.

I happened to have a Dell Inspiron 5593 laptop lying around that I wasn’t using, because it had a hardware defect where several keys on the keyboard stopped working, even after a keyboard replacement. It had decent specs - an 8-core processor (Intel(R) Core(TM) i7-1065G7), 64Gb of ram, and a 500Gb SSD hard drive. Rather than let it continue to collected dust, I plugged in a keyboard and installed Ubuntu so it could be my new render server.

I did have to add one piece of hardware to complete the setup – a USB-to-gigabit ethernet adapter, which I bought on Amazon for $13. The built-in hardwire ethernet jack was limited to 10/100 (11MiB/s), and the built-in wifi proved to be unstable at high speeds. The USB ports on this model laptop are USB 2.0, so it’s limited to 480Mbps rather than the full gigabit, but that’s still fast enough to upload a planet file in less than 20 minutes rather than over an hour. This one addition brought the 11-hour build loop down to a 9-hour build loop.

Laptop with State of the Map US sticker on it

The next two things that cost money are the computer to run a tileserver (an EC2 t4g.micro instance) and an EFS network file share to store the planet file. We can replace both of these costs by switching to PMTiles, which planetiler now supports as an output option. The advantage of PMTiles over mbtiles is that the PMTiles format is a raw, indexed archive of tiles, while mbtiles is an sqlite database. That means that code to retrieve individual tiles from the archive using HTTP range requests is possible using so-called serverless functions rather than having to run a tile server such as TileServerGL.

A “serverless function” is simply a bit of code that runs in cloud infrastructure without dedicating a specific machine to it, and therefore it is significantly cheaper – the cloud provider can group your function along with other customers’ functions on shared hardware. The AWS solution for serverless functions is called AWS lambda, and it can access files stored on AWS’s Simple Storage System (s3), which supports HTTP range requests. In this case, the function takes z/x/y tile requests, performs a few lookups on the PMTiles file to determine where in the file the tile is located, and retrieves the tile as a block from that location, all without the overhead of a database layer.

This setup is advantageous because an AWS lambda is a fraction of the cost of running an EC2 node, and s3 is a fraction of the cost of EFS. Additionally, we can run the CloudFront Content Delivery Network (CDN), which further reduces our costs by reducing the number of times that our serverless function is invoked.

Here’s the cost breakdown between the two approaches

EC2 + EFS architecture:

  • EC2 t4g.micro: $6.13 / month (This cost further can be reduced by up to 40% by purchasing a reserved instance)
  • EFS storage (30¢ per GB-month x 70Gb) = $21.00 / month

Lambda + s3 + CloudFront architecture:

  • Lambda: FREE for the first 1 million requests per month
  • s3 storage: 2.3¢ per GB x 70Gb = $1.61 / month
  • CloudFront: FREE for the first 1TB of outbound bandwidth

If you exceed these “free tier” limits, you will start to incur costs. However, under the EC2+EFS architecture, you’d have the same issue, even if you put a CDN in front of it. In practice so far, this has reduced my tile server cloud hosting costs down to near-zero.

Additionally, uploads to s3 are totally free (up to a limit that we won’t exceed), and as long as all of your services – Lambda, s3, and CloudFront – are running in the same region and availability zone, you’ll incur no data transfer charges between them. Additionally, PUT operations on s3 buckets are atomic, so the file will be cleanly swapped out when you upload it.

The technical setup

The setup is rather simple:

  1. The 70Gb planet file is hosted in an s3 bucket
  2. A lambda converts /z/x/y HTTP requests to HTTP range requests on the s3 bucket
  3. The CloudFront instance applies HTTPS and caches requests
  4. The laptop tile server uploads directly to the s3 bucket

s3+lambda+CloudFront architecture diagram

This setup is essentially what Brandon describes in his Protomaps on AWS guide, and I was able to use his lambda code with no modification.

It’s important that the planet pmtiles file hosted on your s3 bucket isn’t directly downloadable, otherwise, someone might download the entire 70Gb file, leaving you with the bill for bandwidth!

For the laptop build server, I’ve published my build scripts on GitHub. First, I downloaded a copy of the planet using bittorrent. Then, each time the build runs, the script does the following:

  1. Updates an RSS feed to indicate that a build has started, and links a seashells.io console that shows the live build in action
  2. Updates the planet.osm.pbf file to the most recent hourly diff using pyosmium-up-to-date
  3. Renders the planet in pmtiles format using planetiler
  4. Uploads the generated planet.pmtiles to s3
  5. Invalidates the CDN cache so users start seeing the new tiles
  6. Deletes the local planet.pmtiles file
  7. Updates the RSS feed to indicate that that the build has completed, and reports how long the build took.

Note that the cache invalidation is a somewhat optional step. You can choose to set a cache timeout instead, and simply allow users to received cached tiles until the CDN’s time to live (TTL) expires.

Since I’m producing an RSS feed, I can hook it up to a Slack channel, which I’ve done in the OSM US Slack, at the channel #ourmap-tile-render. This allows me to easily check in on the status of my build server when I’m away from home and can’t log into the laptop on my home network.

Full automation

Since we’re using hourly diffs, it makes sense to kick off a build just after each hourly diff is published. Hourly diffs are published at 2 minutes past the hour. However, since the build takes longer than an hour, we’ll need to implement a lock file to make sure only one build runs at a time. We’ll also wait a minute after the hourly diff publish time to make sure that the file is available.

Therefore, the full-automation setup looks like this:

  1. A cron job deletes the lock file (if it exists) at system startup
  2. Every hour, at 3 minutes past the hour, start a build if there’s no lock file
  3. Create a lock file
  4. Run the build
  5. Delete the lock file

Voilà! We now have a continuously-updating vector planet tile server, hobbyist-style.

Thanks to planetiler, it is possible to run your own OpenMapTiles vector tile server on Amazon Web Services (AWS) for less than $20 per month. This guide describes the process that I used to stand up tile.ourmap.us for the OSM Americana project, and it does require some knowledge of AWS. However, I taught myself how to use AWS, and I’ve tried to include enough details here to assist someone trying to stand up their own tileserver.

There are many different ways to do this, including different storage, hosting, and tileserver setups. This is just one option that worked for me for what I was trying to do.

The architecture

This setup in this guide assumes that infrequent planet updates is acceptable for your use case. So, we will spin up a powerful server to update the map only when needed, and use a low-powered server to run the HTTPS tile server on an ongoing basis. If you require more frequent map updates, this is probably not a good solution and you should consider dedicated hardware. The main advantage of AWS in this use case is the ability to rent a high-performance computer for a short period of time.

Additionally, this setup assumes that you already own a domain name that you can use to point to the tile server. If you don’t have one, you can purchase one on Google Domains for $12 per year.

In our setup, we will render a planet to a large file in .mbtiles format, and use tileserver-gl to serve that .mbtiles as an HTTPS server.

Another advantage of using AWS is that they host a locally-mirrored copy of the planet file. Therefore, it is posible to download the planet in a few minutes, which reduces the amount of time that we have to rent that high-powered server to render the planet.

When we say “render the planet,” it means the following operation:

Render the planet

In this setup, I’ve chosen AWS’s Elastic File System (EFS) to store my planet file. EFS is just an expandable file system that can we can mount using NFS. With EFS, you pay only for the amount of storage you use. This cost ($13/mo) is the largest recurring cost of running a tileserver. I will note that AWS’s s3 storage is much cheaper than EFS (2.3 cents / GB) and is worth exploring as an even cheaper alternative.

Thus, our setup looks something like this, when the Render Server running only when we need to update the planet:

Tile server architecture

Setting it up

The following is an approximate step-by-step guide to setting up the tile server and performing a single planet render. Some of this is from memory, I’m glossing over some of it, and I may be missing steps, so be prepared to adjust. However, this should be a rough recipe, and I did all of this in AWS’s point-and-click GUI.

  1. Set up a Virtual Private Cloud (VPC) to host your tileserver network, and assign a subnet, route table, and gateway allowing it to access the Internet.
  2. Create an Elastic File System (EFS) volume. Take note of the volume identifier.
  3. Create an EC2 instance, of type t4g.micro. Be sure to tick the box that assigns a public IP address.
  4. Create security groups to:
    1. Permit NFS access to and from the EFS volume (ports 111/2049 on TCP and UDP).
    2. Permit port 443 (HTTPS) access to and from the tile server
  5. Log into the tileserver and install:
    1. docker
    2. an NFS client
    3. nginx
  6. Create a mount point, and mount the EFS share:
     mkdir -p /mnt/efs
     sudo mount -t nfs4 -o nfsvers=4.1,rsize=1048576,wsize=1048576,hard,timeo=600,retrans=2,noresvport your_filesystem_id.efs.us-east-2.amazonaws.com:/ /mnt/efs
    
  7. Spin up a render server! Be careful with the step, because this server is expensive to run. Ensure that you can attend to it while it’s running. Create a c6g.16xlarge EC2 Spot Instance, log into it and run through the following steps to render the planet and save it to the EFS share. Depending on your setup, you may need to configure a security group for your render server once it’s running in order for it to access the EFS share and/or to log into it.
  8. Install the required software packages:
     sudo apt update -y
     sudo apt install -y pyosmium
     sudo snap install docker
    
  9. Format and mount the local SSD disk:
     sudo mkfs.xfs /dev/nvme1n1
     mkdir /home/ubuntu/build
     sudo mount -t xfs /dev/nvme1n1 /home/ubuntu/build
     cd /home/ubuntu/build
    
  10. Download the planet and other data sources (including Wikidata and Natural Earth):
    sudo docker run -e JAVA_TOOL_OPTIONS='-Xmx80g' -v "$(pwd)/data":/data \
      ghcr.io/onthegomap/planetiler:latest --area=planet --bounds=world --download --download-threads=20 --download-chunk-size-mb=500 \
      --only-fetch-wikidata
    
  11. (Optional) update the planet file to current. Note this operation can take 30-40 minutes to complete.
    sudo pyosmium-up-to-date -vvvv --size 10000 data/sources/planet.osm.pbf
    
  12. Render the planet! Be sure to list the languages you’re interested in (for example, “en,de,pt” will render tiles with English, German, and Portuguese). In addition there are a few options in the command below based on what I use in Americana; consult the Planetiler docs in order to appropriately customize the render for your use case.
    sudo docker run -e JAVA_TOOL_OPTIONS='-Xmx30g' -v "$(pwd)/data":/data \
    ghcr.io/onthegomap/planetiler:latest --area=planet --bounds=world \
    --mbtiles=/data/planet.mbtiles \
    --transportation_name_size_for_shield \
    --transportation_name_limit_merge \
    --boundary-osm-only \
    --storage=mmap --nodemap-type=array \
    --building_merge_z13=false \
    --languages=list_of_languages
    
  13. Copy the rendered .mbtiles file from the local disk to the EFS share
    cp /home/ubuntu/build/data/planet.mbtiles /mnt/efs/planet.mbtiles
    
  14. Terminate the render server. Time is money! Do not forget to stop that server if you’re doing a one-time render.
  15. Configure a domain name to point to the IP address of your tileserver. For example, something like tile.your_domain.com would work.
  16. Log back into the tileserver configure tileserver-gl. Create a basic config.json in the same location as your planet mbtiles. Replace your domain name in the indicated spot:
    {
        "options": {
            "paths": {
                "root": "/data",
                "fonts": "fonts",
                "sprites": "sprites",
                "styles": "styles",
                "mbtiles": "."
            }
        },
        "domains": [
            "tile.your_domain_name.com:8080"
        ],
        "styles": {
        },
        "data": {
            "v3": {
                "mbtiles": "planet.mbtiles"
            }
        }
    }
    
  17. Launch tileserver-gl. It should run without errors and be accessible via HTTP on port 8080 if your security group allows access from the Internet.
    docker stop $(docker ps -aq)
    docker run -it --restart always -v /mnt/efs/:/data -p 8080:8080 maptiler/tileserver-gl
    
  18. Next, we need to set up HTTPS. Configure an nginx site with SSL certificates using Certbot. The nginx configuration should end up looking something like something like this:
    server {
        listen               443 ssl;
        ssl                  on;
        ssl_certificate /etc/letsencrypt/live/tile.yourserver.com/fullchain.pem;
        ssl_certificate_key /etc/letsencrypt/live/tile.yourserver.com/privkey.pem;  
        server_name  ;
        access_log   /var/log/nginx/nginx-ourmap.vhost.access.log;
        error_log    /var/log/nginx/nginx-ourmap.vhost.error.log;
        location / {
            proxy_pass http://localhost:8080;
            proxy_set_header Host $host;
            proxy_set_header X-Real-IP $remote_addr;
            proxy_set_header X-Forwarded-Proto https;
            proxy_set_header X-Forwarded-For $proxy_add_x_forwarded_for;
            proxy_set_header X-Forwarded-Ssl on;
        }
    }
    server {
        if ($host = ) {
            return 301 https://$host$request_uri;
        }
        listen 80;
        server_name ;
        return 301 https://$host$request_uri;
    }
    
  19. Start nginx with service start nginx. That should make your tileserver accessible via HTTPS at the address you configured in DNS.

Cost Analysis

This cost analysis is based on the US East (Ohio) zone, which I found to be the cheapest of all the US-based alternatives.

Overall:

  • $19.75 base recurring cost
  • $1.64 - $3.28 each time the planet is updated
  • $0.09 for each million tiles served

Base Recurring Costs:

  • One EC2 node, t4g.micro type. On-demand Cost: $6.13/mo. This cost further can be reduced by up to 40% by purchasing a reserved instance.
  • One Elastic File System shared drive. Cost: $0.16/GB per month x 82Gb = $13.12/mo
  • One Route 53 Hosted Zone DNS table. Cost: $0.50/mo

Bandwidth Costs:

  • Average tile size (per OpenMapTiles CI): 1,039.7 bytes/tile
  • 1GB = 1,032,036 tiles
  • $0.09/GB bandwidth costs
  • Approximately 9 cents per million tiles

Rendering Costs (per planet update):

  • One on-demand c6g.16xlarge instance at $2.18 per hour
  • Approximately 45 minutes to render a planet from the current planet.pbf ($1.64)
  • Approximately 90 minutes to update and render a planet. ($3.28)

OpenMapTiles planet-scale vector tile debugging at low zoom

Posted by ZeLonewolf on 10 January 2023 in English. Last updated on 11 January 2023.

The Americana vector style uses OpenMapTiles as its backing data schema. When the project desires to add a new feature that isn’t available in OpenMapTiles, someone from the team typically submits a PR to add it. Eventually, OpenMapTiles will create a release, which gets picked up by the Planetiler OpenMapTiles profile, after which I would re-render the planet on an AWS instance. This process from end-to-end often takes months before we see the results at planet scale.

Because planetiler’s update cycle follows OpenMapTiles, contributors need to use the older openmaptiles-tools, which can take days, weeks, or even months to render a planet, depending on how powerful the developer’s computer is.

Therefore, when testing a change to OpenMapTiles, a contributor would typically test their changes on a small area, with a command like:

./quickstart.sh rhode-island

This command would download a PBF extract from Geofabrik, and run a series of scripts that ultimately produce an .mbtiles file of Rhode Island. If you’re testing a feature that appears at high zoom, you can edit .env and change the setting to render down to the maximum zoom of 14. Because Rhode Island is so small, a full-depth render only takes a few minutes.

However, what if you are testing a low zoom feature like an ocean or sea label? If you need to test whether the Atlantic Ocean label is rendering properly, there is no extract short of the planet that will contain an ocean.

The solution for developers working with these features is to download the planet file, and then pre-filter it using the tags-filter feature in osmium tool for just the features that you care about testing at low zoom, and then render that into tiles.

First, you download the planet pbf file:

AREA=planet make download

This will download a file planet.osm.pbf into the data/ folder.

Next, run osmium to filter the planet file. In my case, I wanted boundaries, protected areas, places, water features, rivers/canals, top-level highways, and US/Canada route information. The command below filters produces a new file called slim-planet.osm.pbf with just those features:

osmium tags-filter -v -O -o slim-planet.osm.pbf planet.osm.pbf r/boundary=administrative,protected_area wr/natural=water,bay n/place=city,town,country,state,continent,sea,ocean wr/place=sea w/highway=motorway,trunk,primary r/network=US:*,CA:* w/waterway=river,canal

Next, you can replace your original planet.osm.pbf with the slim one that you just created, and run ./quickstart.sh planet. The script will detect that you already have a planet file and proceed on. The size difference is dramatic! The full planet file is 67GB, while the filtered extract is just 6.6GB. While this is still “big”, it’s now down to the size where openmaptiles-tools is able to process it on a typical developer’s high-end laptop. And of course, if you care about fewer features, you can create an even slimmer extract.

I then started up my vector tile server with make start-tileserver, pointed my Americana style to it, and started browsing the map at planet-level zoom. It was then that I saw there was a bug that I needed to fix:

Unpretty water labels

The difference in style between “Gulf of Bothnia” and “Baltic Sea” was due to an SQL error that I had introduced in my PR. I quickly fixed the bug, the PR got merged a few days later, and now I sit confidently knowing that low-zoom seas will render properly after the next release of OpenMapTiles.

Location: 61.418, 20.566