 OpenStreetMap

Setting up an Overpass API server - how hard can it be? (updated)
Posted by SomeoneElse on 27 July 2026 in English. Last updated on 3 August 2026.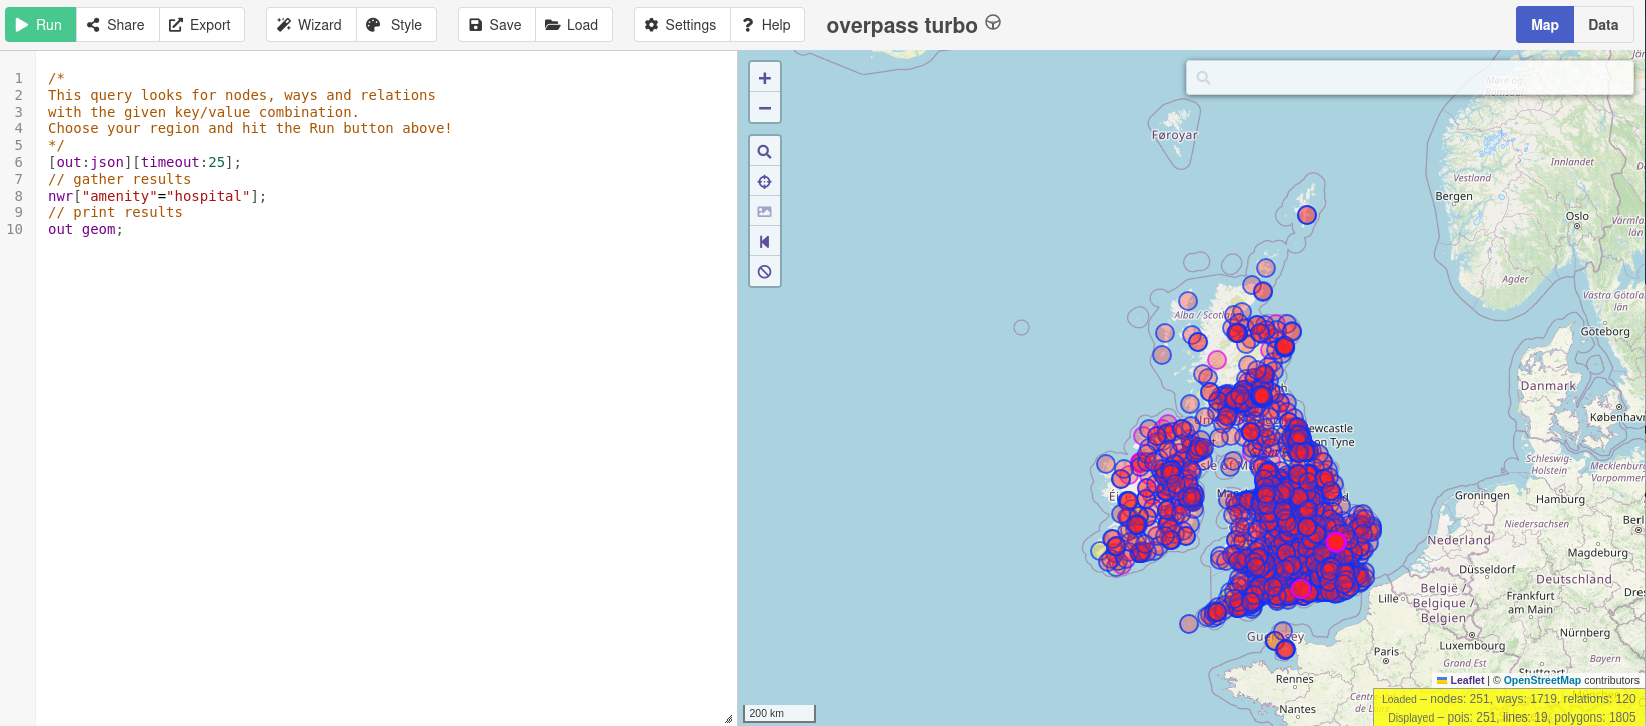
Note that this is an update of a previous diary entry. This version uses updated Overpass software from a fork.
Many people have noticed that publicly available Overpass servers have been suffering from overuse (a typical “tragedy of the commons”). OSM usage policies generally contain the line “OpenStreetMap (OSM) data is free for everyone to use. Our tile servers are not”. Unfortunately, there have been problems with overuse of the public Overpass servers, despite the usage policy. “Just blocking cloud providers” isn’t an option, because (see here - use the translate button below) lots of different sorts of IP addresses, including residential proxy addresses, are the problem.
People who want to use e.g. Overpass Turbo do have the option to point it at a different Overpass API instance. If you’re using Overpass Turbo and you get an error due to unavailability, likely that is because the Overpass API that it is using is overwhelmed. There are other public Overpass API instances, but they may be complete (in terms of geography, or history) or up to date.
At this point, if you’re one of the people who created the problem you’ll likely just spin up more instances to retry after timeouts and make the problem worse. Most people reading this are I hope not in that category. There are commercial Overpass API providers - more details for the example in that table can be found here.
Other people (including me) might wonder whether it’s possible (without too much work) to set up an Overpass API server that just covers one or two countries. To keep it simple, let’s restrict myself to Britain and Ireland 2.3GB in OSM, and let’s not worry about Attic Data (used for “queries about what was in OSM in the past”) or metadata.
Let’s just try and do regular Overpass queries such as you might start from this taginfo page, like this. I’ll also only target the Overpass API, and will use “settings” in an Overpass Turbo instance to point to my Overpass API server. I do want to apply updates as OSM data is changed.
I’m interested in creating a server covering the UK and Ireland. In terms of size, have a look at how much bigger or smaller your area of interest is than the 2.3GB of Britain and Ireland below and use that to judge what size server you might need.
Documentation
At this point it’s perhaps worth mentioning that the documentation around Overpass has historically been … (and I’m channelling my inner Sir Humphrey here) “challenging”.
There’s the OSM wiki which talks about “Debian 6.0 (squeeze) or Debian 7.0 (wheezy)”, the latter of which went EOL in May 2018. There is also an HTML file on overpass-api.de. That is … (engages Sir Humphrey mode again) not entirely accurate, in that it says to run something that doesn’t exist if you’ve cloned the github repository.
One of the best documents by far is external and is by ZeLonewolf, which starts off by saying “I found the existing guides to be lacking”. It then says “This is a combination of various other guides, the official docs, Kai Johnson’s diary entry…” (which is the other “best document”) “… and suggestions from @mmd on Slack. This guide is intended to demonstrate how to configure a server dedicated to only running overpass”. Kai’s diary entry from 2023 is definitely worth reading (sample quote there “Running an Overpass server is not for the faint of heart. The software is really finicky and not easy to maintain. You need to have some good experience with Linux system administration and the will and patience to deal with things that don’t work the way they’re supposed to”).
Also, this github issue (and things linked from it) summarises some of the issues that I had on the way to getting my test servers set up.
Since Kai’s diary entry in 2023 his instructions have grown into a full followable README in github; I’ll link to that below.
Where what I’m doing below differs from what the other guides say I’ll try and say why I am doing it differently. Usually it’s because my requirements are different (e.g. an overpass server for a small area rather than everywhere, on a VSP rather than a piece of tin or a Docker container, or because I need limited functionality).
Server
For my use case, we’ll need a server that is publicly accessible on the internet to do this. I’m already a customer of Hetzner, so initially I created a test server there. Other providers are available, and may make more sense depending where you are in the world and how much you want to pay. For testing, spinning up something at one of the hyperscalers might make financial sense, but I suspect not long-term. I went with a CX43 with 160GB of SSD disk space, 16GB RAM and a rather large amount of bandwidth. This turned out to be about the right size for Britain and Ireland. I went with Debian 13 and public ipv4 and ipv6 addresses. I don’t know if Overpass releases need a particular architecture, but went with “x86” rather than “ARM” just in case. I actually moved to a different VM configuration, but these instructions have been tested and do work.
If you’re needs are different you don’t have to use a cloud server for this. and Kai’s diary entry has a lot of information about physical server sourcing and setup.
Sizing was alas largely guesswork and trial and error - while I’m sure that the commercial providers know chapter and verse on this, there isn’t a lot written down about “sizing based on extract size” that isn’t “how long is a piece of string”. I found that loading even North Yorkshire (just 56MB in OSM) created a nodes file in the database area of 23GB, so that sets the minimum server size, even for very small test extracts.
The speed of the disk used needs to be able to apply updates in less time than the updates are of. If it takes 2 hours to apply 1 hour of updates, your server will never catch up. In practice I didn’t find this to be an issue with the servers at Hetzner and the relatively small extracts (updated daily) that I was working with.
Initial server setup
In what follows I’ll use youruseraccount, yourserver and yourdomain in place of the actual values I used.
I already have some ssh keys stored at Hetzner, so when buying the server, I chose a new name in the format “yourserver.yourdomain” and added my ssh keys. I have yourdomain registered at a DNS provider, and I added the IPV4 and IPV6 addresses there. I can now ssh in as root to “yourserver.yourdomain”, and run the usual:
ssl -l root yourserver.yourdomain
apt update
apt upgrade
and bounce the server and log back in again.
The next job is to create a non-root account for regular use and add it to the “sudo” group:
useradd -m  youruseraccount
usermod -aG sudo youruseraccount
chsh -s /bin/bash youruseraccount
I’ll create a new password in my password manager for youruseraccount on this server (obviously I used my account name rather than actually youruseraccount, but you get the idea…). Next, set the new account password to the newly chosen password
passwd youruseraccount
and check I can login to the new server as youruseraccount with that password, and become root:
ssh -l youruseraccount yourserver.yourdomain
sudo -i
exit
Install some initial software:
sudo apt install emacs-nox screen git tar unzip wget bzip2 net-tools curl apache2 wget g++ make expat libexpat1-dev zlib1g-dev libtool autoconf automake locate osmium-tool
That list includes both software prerequisites (apache2) and things that will be really useful (screen). It also includes emacs as a text editor; you can use your preferred one instead wherever emacs is mentioned below.
To use screen you just type screen and then press return. You can manually detach from it by using ^a^d and later reattach by using “screen -r”. If there are multiple screens you can attach to you’ll see something like this:
There are several suitable screens on:
    95207.pts-2.h23 (02/15/2026 09:20:20 AM)        (Detached)
    95200.pts-2.h23 (02/15/2026 09:19:57 AM)        (Detached)
    1633.pts-2.h23  (02/14/2026 12:37:50 PM)        (Attached)
Type "screen [-d] -r [pid.]tty.host" to resume one of them.
and you can choose which one to reconnect to by typing in (say) “95207” and pressing “tab”. To force a reconnection to a screen that something else is attached to, use “screen -d -r”.
In many cases below I’ll say “(in screen)” - this just means it’s a good idea to run these commands from somewhere that you can detach from and reattach to. It doesn’t mean you need to create a new screen every time.
The ssh keys that I had stored have been added for root by Hetzner, but I also want to add them to my new account too:
sudo -i
sudo -u youruseraccount -i
ssh-keygen -t rsa
(either use existing password for ssh passphrase, or create and store a new one)
exit

cp /root/.ssh/authorized_keys /home/youruseraccount/.ssh/
emacs /home/youruseraccount/.ssh
… and in there change the ownership of the files to youruseraccount.
Next, check that you can ssh in to yourserver.yourdomain without a password. Next disable regular password access. We don’t want people to be able to brute force password access to a server on the internet, so we can just turn this off.
sudo emacs /etc/ssh/sshd_config
Find the line that says
# To disable tunneled clear text passwords, change to "no" here!
and uncomment and change the next two lines to say
PasswordAuthentication no
PermitEmptyPasswords no
save the file and then
sudo /etc/init.d/ssh restart
and then try and login (from the shell on that machine will work as a test)
ssh 127.0.0.1
It should say Permission denied (publickey).
Setting up a certificate is the next priority. Everything on the internet these days pretty much assumes https access, so let’s do that before even thinking about overpass. I’ll use acme.sh for that. Other providers and tooling are available and you can use them if you prefer. Login as your non-root account and then:
sudo -i
cd
wget -O -  https://get.acme.sh | sh -s email=youremailaddress
exit
sudo -i
/etc/init.d/apache2 stop
acme.sh --standalone --issue -d yourserver.yourdomain -w /home/www/html  --server letsencrypt
the last lines of the output you get should be like
-----END CERTIFICATE-----
[Sat Feb 14 12:51:45 AM UTC 2026] Your cert is in: /root/.acme.sh/yourserver.yourdomain_ecc/yourserver.yourdomain.cer
[Sat Feb 14 12:51:45 AM UTC 2026] Your cert key is in: /root/.acme.sh/yourserver.yourdomain_ecc/yourserver.yourdomain.key
[Sat Feb 14 12:51:45 AM UTC 2026] The intermediate CA cert is in: /root/.acme.sh/yourserver.yourdomain_ecc/ca.cer
[Sat Feb 14 12:51:45 AM UTC 2026] And the full-chain cert is in: /root/.acme.sh/yourserver.yourdomain_ecc/fullchain.cer
Next do
sudo a2ensite default-ssl
sudo a2enmod ssl
sudo systemctl reload apache2
and then edit the default site config
sudo emacs /etc/apache2/sites-enabled/default-ssl.conf
Replace the SSL references with the correct ones.
SSLCertificateFile      /root/.acme.sh/yourserver.yourdomain_ecc/fullchain.cer
SSLCertificateKeyFile   /root/.acme.sh/yourserver.yourdomain_ecc/yourserver.yourdomain.key
Restart apache
sudo systemctl restart apache2
and browse to https://yourserver.yourdomain to make sure that the certificate is working. You’ll need to arrange for that certificate to be renewed every couple of months, but let’s concentrate on overpass for now.
That is it for the initial server setup, so now would be a good time for a server snapshot or other sort of backup.
Which Overpass software to install
It’s confusing, but there are several forks of Overpass. The original one (I think) is here; last updated 2 years ago. There’s also this one, also last updated 2 years ago - see here for positive comments about the speed of meta queries vs the original. There is also this, last updated at the time of writing last week. The main branch there has numerous enhancements, including .pbf support; we’ll use that.
The Readme is excellent and contains much more information than this summary diary entry.
Setting up the user for Overpass
For this part, we’re going to follow parts of ZeLoneWolf’s guide. I’ve reproduced that mostly as written below, although some of the software already was installed earlier.
sudo su

mkdir -p /opt/op
groupadd op
usermod -a -G op youruseraccount
useradd -d /opt/op -g op -G sudo -m -s /bin/bash op
chown -R op:op /opt/op
apt-get update
apt-get install g++ make expat libexpat1-dev zlib1g-dev apache2 liblz4-dev curl git
a2enmod cgid
a2enmod ext_filter
a2enmod headers

exit
The username that we created above is “op”. We won’t use a password for that but will just use
sudo -u op -i
when we need to change to it from our normal user account.
Configuring Apache
We already have Apache set up with a default HTTPS website that says “It works!”. We’ll use some of what’s in ZeLoneWolf’s Guide but we DON’T want to completely replace our config with that one. Instead we’ll selectively copy in some sections. Edit the file as is:
sudo emacs /etc/apache2/sites-available/default-ssl.conf
Note that we are using https with the defaults and the filename is different to the example.
Find this line:
DocumentRoot /var/www/html
and after it insert this section:
# Overpass API (CGI backend)
ScriptAlias /api/ /opt/op/cgi-bin/

<Directory "/opt/op/cgi-bin/">
        AllowOverride None
        Options +ExecCGI -MultiViews +SymLinksIfOwnerMatch
        Require all granted

        # CORS for Overpass Turbo
        Header always set Access-Control-Allow-Origin "*"
        Header always set Access-Control-Allow-Methods "GET, POST, OPTIONS"
        Header always set Access-Control-Allow-Headers "Content-Type"
</Directory>

# Compression (for API responses)
ExtFilterDefine gzip mode=output cmd=/bin/gzip

# Logging
ErrorLog /var/log/apache2/error.log
LogLevel warn
CustomLog /var/log/apache2/access.log combined

# Long-running Overpass queries
TimeOut 300
I then deleted a bunch of lines, all comments of functional duplicates of what we had just added, down to but not including:
# SSL Engine Switch:
Save and restart apache:
sudo /etc/init.d/apache2 restart
and check that you can still browse to “https://yourserver.yourdomain”. It won’t look any different as the default website has not been changed; we’ll test the “cgi-bin” parts later.
Compile and Install Overpass
As our local user:
mkdir ~/src
cd ~/src
git clone https://github.com/b1tw153/Overpass-API
cd Overpass-API
git branch
Note that main (the updated version) is the default branch
cd ~/src/Overpass-API/src/
autoreconf -i
./configure CXXFLAGS="-O2" --prefix=/opt/op --enable-lz4
The next bit might take a while, so you might want to run it from within screen in case of disconnection:
time sudo make install
(that’ll take a few minutes)
sudo -u op -i
mkdir db
mkdir diff
exit
sudo cp -pr ~/src/Overpass-API/src/rules/ /opt/op/db/
Those two directories above created are for the database and minutely diff files. Logfiles are written to the user directory or in the database directory with this version. In operation, the biggest by far will be “db” - we’ll expect 2.3GB of .pbf extract to create a database of initially 20GB or so. We’ll talk more about this later.
Loading OSM Data
In the fork of Overpass that we are using, this process for initialising the Database from an extract is documented here. See also Initialize the Database from a Clone and Initialize the Database from a Planet File for other options.
Based on the example script there, we’ll load the initial data like this, from the “op” user:
EXTRACT_FILE_URL=https://download.geofabrik.de/europe/britain-and-ireland-latest.osm.pbf   # URL of the extract file to import
OVERPASS_DIFF_URL=https://download.geofabrik.de/europe/britain-and-ireland-updates/        # URL of the chosen replication source associated with the extract file
OVERPASS_BIN_DIR=/opt/op/bin/                                                              # path to the bin directory in your Overpass installation
OVERPASS_DB_DIR=/opt/op/db/                                                                # path to your Overpass database directory
OVERPASS_DIFF_DIR=/opt/op/diff/                                                            # path to the directory that will be used to store diff files
OVERPASS_META_MODE=no # yes|no|attic - include meta data, base data only, or attic data
nohup "$OVERPASS_BIN_DIR/import_osm_data.sh" \
  --db-dir="$OVERPASS_DB_DIR" \
  --diff-dir="$OVERPASS_DIFF_DIR" \
  --diff-url="$OVERPASS_DIFF_URL" \
  --data-source="$EXTRACT_FILE_URL" \
  --meta="$OVERPASS_META_MODE" &
I created an example shell script in /opt/op/bin/ to do this in case it needs to be run more than once. When run, it writes all output to nohup.out; in order to see the current progress you can run:
tail -f nohup.out
On a test server with fast SSD disk the process took a couple of hours or so for me; at the end you should see lines something like:
compute_geometry: Node 13537323062 used in relation 20194148 not found.
Flushing to database ....... done.
Update complete.
2026-07-23 21:22:09: Database import complete
2026-07-23 21:22:09: Finding replicate_id for https://download.geofabrik.de/europe/britain-and-ireland-updates/ ...
WARNING: Failed to download https://download.geofabrik.de/europe/britain-and-ireland-updates/000/002/428.state.txt
WARNING: Failed to download https://download.geofabrik.de/europe/britain-and-ireland-updates/000/003/641.state.txt
WARNING: Failed to download https://download.geofabrik.de/europe/britain-and-ireland-updates/000/004/248.state.txt
WARNING: Failed to download https://download.geofabrik.de/europe/britain-and-ireland-updates/000/004/551.state.txt
WARNING: Failed to download https://download.geofabrik.de/europe/britain-and-ireland-updates/000/004/703.state.txt
2026-07-23 21:22:11: REPLICATE_ID=4854
2026-07-23 21:22:11: Database ready
Those warnings at data load don’t indicate an actual problem. There will always be “X used in Y not found” messages when loading extracts, and the first state file on Geofabrik’s server is currently actually 727; I’ve no idea why the software tries to download earlier versions here.
Note that with this version of Overpass we didn’t need to download a .pbf file and convert it into .bz2 format - we just loaded the .pbf directly. We also didn’t need to manually edit several of the scripts needed to run overpass since those parameters were set by the load script above and/or will be set by the start script we’ll come to in the next section.
Also note that on slow disk this process will take MUCH longer - perhaps unfeasibly so.
After an initial data load of Britain and Ireland, the “db” directory was 16GB in size. That’s with compression, and is a factor of 3 or 4 better than without compression. It’s still much bigger than the initial .pbf, which was 2.4GB.
It is a good idea to do some sort of snapshot or backup at this stage.
log file management
There’s a section in ZeLoneWolf’s guide that covers this.
This version of Overpass doesn’t have an explicit log directory; logs are written to nohup.out or in the database directory. These will eventually grow large and will eventually need a log rotation mechanism to be set up, but let’s gloss over that for now and see Overpass actually running first! For more on logfiles, read the Readme here,
Maintenance
I have deliberately not set this up yet as I don’t want to automatically do anything at e.g. reboot; rather I’d like to control it manually so that I can watch that it does what it is supposed to. This section of the readme has more details.
Start overpass
If this isn’t the first time you’ve started overpass you may want to take a backup copy of the previous “diff” directory.
In the fork of Overpass that we are using, this process for running Overpass is documented here.
Based on the example script there, we’ll run overpass like this from the “op” user:
OVERPASS_BIN_DIR=/opt/op/bin/                                                                      # path to the bin directory in your Overpass installation
export OVERPASS_REPLICATE_ID=auto                                                                  # use the replicate_id file from the database directory
export OVERPASS_DB_DIR=/opt/op/db/                                                                 # path to your Overpass database directory
export OVERPASS_DIFF_DIR=/opt/op/diff/                                                             # path to the directory that will be used to store diff files
export OVERPASS_DIFF_URL=https://download.geofabrik.de/europe/britain-and-ireland-updates/         # URL of the replication source that matches the database
export OVERPASS_UPDATE_FREQUENCY=86357                                                             # update interval in seconds (should match replication source)
export OVERPASS_META_MODE=no                                                                       # yes|no|attic - include meta data, base data only, or attic data (should match existing database or import)
export OVERPASS_AREAS=yes                                                                          # yes|no - create or skip derived area data
nohup "$OVERPASS_BIN_DIR/run_osm3s.sh" &
I created an example shell script in /opt/op/bin/ to do this in case it needs to be run more than once. When run, it writes all output to nohup.out; in order to see the current progress you can run:
tail -f nohup.out
When started, in there you should see lines something like:
tail nohup.out
2026-07-27 21:50:33: Started areas dispatcher  (PID 1218)
2026-07-27 21:50:33: Starting apply_osc_to_db.sh
2026-07-27 21:50:34: Started apply_osc_to_db.sh (PID 1224)
2026-07-27 21:50:34: Starting fetch_osc.sh
2026-07-27 21:50:35: Started fetch_osc.sh (PID 1270)
2026-07-27 21:50:35: Starting rules_loop.sh
2026-07-27 21:50:36: Started rules_loop.sh (PID 1333)
2026-07-27 21:50:36: Skipping backup.sh startup (set OVERPASS_BACKUP_* environment variables to enable backup)
2026-07-27 21:50:36: Checking startup ...
2026-07-27 21:50:36: Startup complete
In the directories below “diff”, you should see that it has downloaded daily diffs for any days since your extract, for example:
ls -alt diff/000/004/
total 6452
drwxrwxr-x 2 op op    4096 Jul 27 22:50 .
-rw-rw-r-- 1 op op 3561802 Jul 27 22:50 859.osc.gz
-rw-rw-r-- 1 op op     113 Jul 27 22:50 859.state.txt
-rw-rw-r-- 1 op op 2996912 Jul 27 22:50 858.osc.gz
-rw-rw-r-- 1 op op     113 Jul 27 21:52 858.state.txt
-rw-rw-r-- 1 op op     113 Jul 27 21:52 857.state.txt
-rw-rw-r-- 1 op op     113 Jul 27 21:52 856.state.txt
-rw-rw-r-- 1 op op     113 Jul 27 21:52 854.state.txt
-rw-rw-r-- 1 op op     113 Jul 27 21:52 849.state.txt
-rw-rw-r-- 1 op op     113 Jul 27 21:52 840.state.txt
-rw-rw-r-- 1 op op     113 Jul 27 21:52 821.state.txt
-rw-rw-r-- 1 op op     113 Jul 27 21:52 783.state.txt
drwxrwxr-x 5 op op    4096 Jul 27 21:52 ..
Testing standalone
At the command line type:
bin/osm3s_query
Paste in this:
<query type="nwr"><bbox-query n="51.96" s="51.86" w="-3.31" e="-3.22"/><has-kv k="amenity" v="pub"/></query><print/>
Press return. Press ^d. A selection of data will be returned.
Testing from Overpass Turbo
In a web browser, browse to https://overpass-turbo.eu/s/2kEW .
Click “settings”. Change “server” from “https://overpass-api.de/api/” to “https://yourserver.yourdomain/api/”. Click “run”. You should not get an error, and should get a couple of nodes and 4 ways returned. At the top right of the Overpass Turbo window you can click “Map” and “Data”. Among the things that “Data” shows are the “Overpass API” version (at the time of writing “0.7.62.11 87bfad18”) and the “timestamp_osm_base”. With an extract downloaded from Geofabrik, that will always be “around 8pm yesterday”. The new update appears in the early hours of the morning, based on the previous day’s updates to 8pm. If the data is more than a day old the results at the bottom right of the “map” screen show in yellow, not white.
For the avoidance of doubt - if you browse to “https://yourserver.yourdomain/” you’ll get some sort of “It works!” page. If you browse to “https://yourserver.yourdomain/api/” you’ll actually get an error - it’s designed to be accessed (see the CORS settings above) by Overpass Turbo, not a regular browser.
It’s also worth testing that the area generation has worked. This is done automatically behind the scenes by the new Overpass scripts; it’ll take a little while to complete. A simple example of an area query is here.
Shutting down Overpass
The maintenance section above also mentions it, but for completeness you shut down this version of overpass by sending a regular SIGTERM to the run_osm3s.sh process.
$ ps -ef | grep osm3s
op          1145       1  0 22:50 ?        00:00:00 bash /opt/op/bin//run_osm3s.sh
op          1668    1657  0 23:17 pts/1    00:00:00 grep osm3s
$
$ kill 1145
$
$ ps -ef | grep osm3s
op          1712    1657  0 23:17 pts/1    00:00:00 grep osm3s
$
This will leave behind some sleeping processes:
$ ps -ef | grep sleep
op          1362       1  0 22:50 ?        00:00:00 sleep 86400
op          1430       1  0 22:50 ?        00:00:00 sleep 2444
op          1643       1  0 23:08 ?        00:00:00 sleep 81726
op          1648       1  0 23:08 ?        00:00:00 sleep 85305
op          1717    1657  0 23:18 pts/1    00:00:00 grep sleep
$
It won’t cause any problems to leave them, but you could also send a regular “kill” signal to each of those just to tidy up.
Now what?
Shutting everything down and taking a snapshot of the server is a good idea at this point. The long-term cost of snapshots is small (€0.20 per month or so). The cost of leaving a server of this specification running 24x7 isn’t that large - around €10, perhaps a couple of beers or a couple of fancy coffees.
You might also want to think about setting up an Overpass server that does include metadata and attic data - but you’re probably better off with a dedicated server for that, and better off following one of the other guides linked above.
Discussion
Comment from aharvey on 3 August 2026 at 01:05
Given how useful Overpass is to mappers doing mapping work, it would be nice if OSMF could host an Overpass API instance, and either restrict it or give priority to logged in OSM accounts. Ideally that would make it easier to manage usage policies.
Comment from SomeoneElse on 19 August 2026 at 07:36
More details…
Reliability
This server is actually much more flexible and reliable than the previous version.
Even if loaded with an extract, it can work with minutely updates from the whole planet. The previous version just fell over if you tried to do that.
Attic data
Turning on attic data (at load and at update) also mostly works with updates for an extract; but alas not with planet minutely updates and an extract.
A slight caveat here is that updates for Geofabrik’s extracts don’t go back to the dawn of time, but that doesn’t matter for my main use case, which is not “what was this in 2013” but “what was this last week”.
There’s also a possibility for “what’s in the
db” to lag behind “what’s downloaded indiff” with attic data added via diffs, but that needs further investigation - I’m not sure what’s causing that and whether it is some external factor or not.