OpenStreetMap logo OpenStreetMap

Kai Johnson's Diary

Recent diary entries

This diary entry is also available as a personal page on the OSM wiki.

Some History of GNIS Imports

GNIS is a database developed by USGS that contains information about the official, standardized names for geographic features in the US.

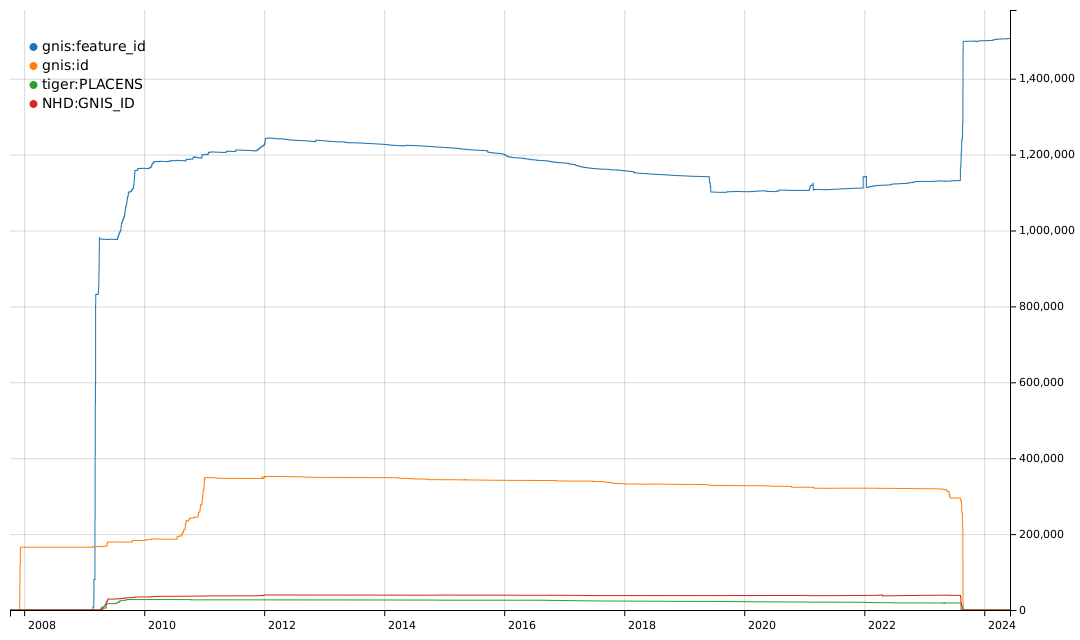
From 2008 to 2011, there was an effort to import basic data into the US map, including records from GNIS and records from TIGER and NHD that are cross-referenced to GNIS. You can see some of the history of these imports based on the tags they used.

Graph of the history of tags for GNIS Feature IDs

The gnis:feature_id tag was typically used for imports of many types of GNIS records. The gnis:id tag was used for imports of nodes for Populated Places, i.e. place=city, town, village, hamlet, etc. The tiger:PLACENS tag was used for imports of civil boundaries from the US Census Bureau datasets and contained a GNIS Feature ID value. The NHD:GNIS_ID tag was used for imports of waterways and other hydrographic features from the National Hydrography Dataset and also contained a GNIS Feature ID value.

An effort by @watmildon in late 2023 normalized the various tags to use the gnis:feature_id key. You can see this in the drop in other tag usage and the bump in gnis:feature_id usage. However, it is easy to see that there have been no substantial new imports of records referring to GNIS since about 2011.

The imports from 2008 to 2011 did not bring all the GNIS records into OSM. The imports for some features were much more complete than others. And the GNIS database has not been static since 2011.

Updates to GNIS

USGS adds, updates, and removes records in GNIS all the time. New records are added when new features are created, such as when a new reservoir is built or a new municipality is incorporated. Records are updated when official names change, and records are corrected when there are errors in the data that are resolved by references to definitive sources.

Although GNIS actively maintains records for historical features that no longer exist (e.g. a summit removed by strip mining), USGS will remove records where there is no evidence that the feature ever existed. The most common case is when GNIS has two records that refer to the same feature. The data is consolidated in one record and the other record is removed.

USGS also made two big changes to GNIS data in the last few years.

In 2021, USGS made a major reorganization of GNIS data. Many record classes relating to man-made features were removed from GNIS. Notably, this included all of the records for buildings. The final version of the old data set containing these records was archived and is still available but is no longer updated. The current data set retains all the records for natural features but also includes civil boundaries maintained by the US Census Bureau and reservoirs included in the NHD data set.

In 2023, USGS published new names for some 650 features that previously used a derogatory term for Native American women in their names. I, along with a group of other mappers, manually updated all these features in OSM to reflect the revised names.

GNIS and OSM Today

Let’s take a look at how much of the GNIS data was originally imported from 2008 to 2011. For this comparison, we’re looking at features mapped in OSM versus the archived GNIS data set, which has all the same types of records as the original imports but also has 10 years of updates and corrections that happened after the imports.

Bar chart of GNIS records imported (or not) in 2008-2011

Bar chart of percentage of GNIS records imported in 2008-2011

Some of the classes were more thoroughly imported than others but no class was completely imported. Overall, about 45% of the GNIS records in the archived data set are mapped in OSM and 1,249,416 records were not imported. One of the biggest gaps is the Stream class, which covers waterway features in OSM. That’s understandable because the GNIS and NHD data can’t be imported directly into OSM without some manual editing.

Any effort to map additional features in OSM using GNIS data should be using the current data set – not the archived data set – since the records in the archived data set are now out of date. Here’s how much of the current GNIS data set is mapped in OSM.

Bar chart of current GNIS records mapped in OSM (or not)

Bar chart of the percentage of current GNIS records mapped in OSM

Only 42% of the current GNIS records are mapped in OSM and 566,328 of the current records are not mapped. Waterways are a big part of that gap, but other natural features like lakes, valleys, and springs are not well mapped.

Notably, only 27% of the civil boundaries in GNIS have been mapped in OSM. The GNIS records for civil boundaries are synched with TIGER boundary data from the US Census Bureau, so it looks like OSM is missing a whole lot of administrative boundary data.

As I mentioned above, GNIS gets updated all the time. There have not been any substantial new imports of GNIS data into OSM since 2011. But there have been 15,952 new GNIS records that were created in 2012 or later. These are new features that OSM hasn’t kept up with.

Bar chart of GNIS features created since 2012

Stale GNIS Data in OSM

Sometimes GNIS records are withdrawn, particularly when the record was a duplicate but sometimes when the feature never existed. There are 4,270 instances of withdrawn GNIS records that have been mapped in OSM.

Bar chart of withdrawn GNIS records mapped in OSM

An additional 6,255 elements in OSM have gnis:feature_id tag values that are not present in either the archived or current GNIS data sets. Many of these features also likely have IDs associated with records that have been withdrawn. Every one of these things should be corrected.

GNIS actively collects records of “historical” features, which are features that once existed but no longer exist. Since OSM is a map of things that are currently present, features that no longer exist should not be mapped in OSM. However, OSM has 7,271 historical GNIS features that no longer exist!

Bar chart of historical GNIS features mapped in OSM

Some of these historical features could be correctly mapped with lifecyle prefixes, but it seems likely that many of these historical features should not be mapped in OSM at all.

The Future of GNIS and OSM

One key lesson of the GNIS imports into OSM is that the work doesn’t end when the data is imported. Source data changes over time, and for very good reasons! Anywhere that OSM has imported data, we need to find ways to keep that data up to date with changes in the original source.

GNIS presents a huge opportunity for OSM in the US, but the scale of the tasks needed to bring OSM and GNIS into alignment is also huge.

  • GNIS records not mapped in OSM: 566,328
  • Historical GNIS features mapped in OSM: 7,271
  • OSM features with invalid GNIS IDs: 6,255
  • Withdrawn GNIS records present in OSM: 4,270

There is little opportunity to import missing GNIS records into OSM because many of the GNIS records lack the detailed geometry that OSM requires and because the standards for import quality are much higher now than they were in 2011. But where we have hundreds of thousands of features to map, or thousands of features that need review and correction, these tasks are also not practical for purely manual editing.

Instead, my hope is that projects like the recoGNISer will provide automated assistance to make manual editing simpler and faster.

A Glossary of Tags for Landforms

Posted by Kai Johnson on 25 June 2023 in English.

In the course of working with GNIS data from the US Geological Survey, I’ve sometimes been frustrated with the limited range of expression in OSM tags for natural features. For example, we have a lot of tags that can be applied to a Bench as a place for a people to sit, but nothing specific to identify a Bench as a geographic landform other than tagging the edges as natural=cliff or natural=earth_bank.

There have been some good efforts to improve geological tagging, such as the Proposal for additional volcanic features and the Categories of Sea Areas, which give us broader vocabularies for some features. Strangely, the seamark:sea_area:category=* tag set is more expressive for undersea features than the OSM tags we have for features on land!

So, I decided to put together a Glossary of landforms for OSM, based on a similar glossary on Wikipedia. In the process, I’ve found that OSM does have a broad set of tags for geographic features, although many of them have limited or no documentation.

I also think that there is an opportunity to expand the values of the geological=* tag to include more types of geological features. If the main tag for a features is natural=* or something similar, that can identify the general shape of the landform and be the main tag used by renderers. The addition of a geological=* tag can add more specificity to the feature and identify the nature and structure of the landform. For example, the famous Sugarloaf Mountain in Rio de Janeiro is not just a mountain, but a Bornhardt. So, we might consider adding a geological=bornhardt tag to the feature.

If you have an interest in mapping natural features, check it out:

Glossary of landforms

It’s certainly a work in progress and there are some prospective tags on the list that aren’t currently in use, but I hope it might be useful. If anyone has input, I’d be very happy to have some additional contributions to the effort!

How to Build a Personal Overpass Server on a Tiny Budget

Posted by Kai Johnson on 30 March 2023 in English. Last updated on 25 March 2024.

The GNIS matching project I’ve been working on uses a lot of Overpass queries to find things in OSM. At some point during the project, I needed a faster, more reliable Overpass server than the public servers. So I built a local Overpass server as cheaply as I could. It’s working well. This is how you can build one for yourself.

Why Would I Build My Own Overpass Server?

If you’re using the Overpass API for software development, you’re going to be running a lot of queries. You could use a public Overpass instance, but it’s more polite and a lot more efficient to run one locally. Also, public overpass servers have query limits that you may not like. And sometimes they go down or flake out, and then there’s nothing you can do but wait until the operators fix them. If you run your own server, your fate is in your own hands!

For most use cases, a cheap local Overpass server can be significantly faster than using one of the public Overpass servers. The setup described here is a lot smaller with a lot less computing power than those big public servers. But it doesn’t have the entire world hammering on it constantly. Also, Overpass queries can return huge amounts of data. The network latency and throughput is a lot better on your own local network segment than if you’re downloading results from halfway across the world.

I’d like to give a special thanks to Kumi Systems for hosting the public Overpass server that I abused until I set up my own server. They’re providing a great service for the OSM community!

Do I Really Want to Do This?

Running an Overpass server is not for the faint of heart. The software is really finicky and not easy to maintain. You need to have some good experience with Linux system administration and the will and patience to deal with things that don’t work the way they’re supposed to.

What’s in this guide?

There are four useful guides to setting up an Overpass server, and you should read all of them:

  1. The Overpass quick installation guide
  2. The Overpass complete installation guide
  3. The Overpass API Installation guide on the Wiki
  4. And by far the most excellent of the four, ZeLonewolf’s Overpass Installation Guide

These four guides describe how to set up the Overpass software. This blog entry describes how to set up the hardware on a very small budget. It also has tips that will make the other four guides easier to use.

Getting the Hardware

Overpass likes to use a fair amount of memory, a huge amount of disk space, and a fair amount of CPU time. We’re going to make some compromises to get a working Overpass server with reasonable performance on a tiny budget. Memory and storage are relatively cheap, so we’ll remove those bottlenecks and your system will end up being CPU bound.

Here are the specs you’re looking for:

  • A PC that can run Ubuntu
  • 16GB of RAM
  • A primary SSD big enough for Ubuntu and some scratch files, 256GB is plenty
  • An unused M.2 slot or PCIe X4 (or X8/X16) slot
  • A DVD-R drive (if that’s what you’re using for the Ubuntu installation)

To that, you’ll add:

  • A 1TB M.2 NVMe PCIe SSD
  • An M.2 to PCIe adapter (if needed)

As of early 2023, there are plenty of cheap refurbished Dell desktop computers for sale on Amazon in the U.S.: https://www.amazon.com/s?k=dell+sff. Start with a cheap Dell and you should be able to get all the hardware for under $200.

If you have options, look for a PC with the most RAM and fastest CPU that fits your budget. You’re going to be looking at computers with CPUs that are few generations behind the latest processors. You don’t have to get the latest CPU, but try not to get one of the oldest ones. As I’m writing this, that means you’re looking at a 6th or 7th gen Core i5 or i7 processor.

You’ll also want some spare hardware around for the setup and backups:

  • A 4GB or larger USB flash drive or a blank DVD-R for the Ubuntu install
  • A 1TB or larger USB drive for backups
  • A monitor with an appropriate monitor cable that you can plug in for the initial setup
  • An Ethernet cable you can plug into a spare port on your hub or router

The cheap refurbished computers on Amazon often don’t have Wi-Fi, but this setup is better with wired Ethernet anyway. If you’re going to use Wi-Fi, add a USB adapter that works with Linux to your shopping list if you need one.

About Network Quotas

The initial setup for Overpass is going to download a couple hundred gigabytes of data for the database. If you mess up, you might have to download the data twice. If you’re doing this on a home network connection, make sure you’re not going to get billed for going over your monthly quota.

After you have the server up and running, the update files are relatively small. So they’re not likely to push you over the limit.

Setting up the Hardware

Dell has nice owners manuals for their systems. Google the model name of your system and “owners manual” and download the PDF file to your daily use computer for reference.

Plug in that cheap computer with the monitor, keyboard and mouse and boot it up. It likely has Windows 10 preinstalled and likely won’t ever run Windows 11.

Give the system a once over to make sure everything looks like it’s working normally, then download the Ubuntu installer. You can choose either Ubuntu Desktop if you’d like to have the GUI, or Ubuntu Server if you’re going to run headless and only login via SSH. Pick whatever you prefer.

Ubuntu has very good installation instructions. Follow them, download the installer image, and burn it onto the DVD or USB flash drive. From there you can boot up the installer and install Ubuntu on your system. I chose to delete the Windows NTFS partition and replace it with a fresh ext4 partition, but you can make other decisions about how you want to manage partitions on your main SSD. Follow the Ubuntu instructions! They’re great!

Check out your new Ubuntu installation and make sure it looks good, including checking out the network connection. If you’re running headless, confirm that you can access the system using SSH.

Power down, and if you’re runnning headless, get rid of the keyboard, monitor, and mouse.

Crack open the case and install the 1TB M.2 NVMe PCIe SSD drive, using the PCIe X4 adapter if needed. This is where that owner’s manual you downloaded helps. Most hardware is pretty easy to work on, but sometimes it’s not obvious how to remove the system components to get at the slots on the motherboard. The owner’s manual will show you how to pop out all the parts.

Put the system back together and rack it where it’s going to live permanently.

Now you need to format and mount that new SSD drive. This is a pretty good reference for what you need to do: https://gist.github.com/keithmorris/b2aeec1ea947d4176a14c1c6a58bfc36

You can use a DOS/MBR partition table for the drive, but since you’re starting from scratch, you might choose a gpt partition table instead. This page describes how to set that up in fdisk: https://ostechnix.com/create-linux-disk-partitions-with-fdisk/

This SSD drive is going to hold your Overpass database, which is huge. So you just want one big partition with an ext4 filesystem.

Once you have that set up, decide where you want to keep Overpass in your file system. ZeLonewolf uses /opt/op, which is as good as anywhere, but you can choose a different location if you like. Create that directory and mount the NVMe SSD there. This is a pretty good reference for permanently mounting the NVMe SSD drive: https://help.ubuntu.com/community/Fstab

Setting up the Software

There are already four good guides to setting up the Overpass software. I’m not going to reproduce them, but I’ll add some commentary.

First, DO NOT BLINDLY COPY AND PASTE COMMANDS FROM THE GUIDES! Take a close look at what each step is doing and make sure the parameters match your setup and your use cases.

Second, NONE OF THE GUIDES (INCLUDING THIS ONE) ARE PERFECT! Read all of them thoroughly to get the best understanding of how to install and manage the Overpass software.

The Overpass quick installation guide - This is really a cheat sheet for someone who already knows how to run Overpass. It cuts a lot of corners and leaves out a lot of things you’re already supposed to know. I wouldn’t suggest trying to follow this guide literally.

The Overpass complete installation guide - This is expanded version of the “quick” installation guide, but it’s also a cheat sheet for someone who already knows how to run Overpass. It still cuts some corners and leaves out things you’re already supposed to know. It’s probably not enough for a first-time user.

The Overpass API Installation document on the Wiki - This is a reference guide that fills in many of the blanks in the “quick” and “complete” installation guides. It’s written more to cover specific cases, so it’s not always linear. But it is a good reference.

ZeLonewolf’s Overpass Installation Guide - This guide covers everything you need to get Overpass up and running, from start to finish, with some good explanation. This guide is set up for one particular configuration, which may or may not be exactly what you want.

ZeLonewolf’s guide is really the only one that’s usable start to finish, but for this configuration there are some changes we want to consider. And there are some places where you might want things to be a little different for your use case or your personal preferences. Going step by step through ZeLonewolf’s sections:

Configure Overpass User & Required Dependencies

ZeLonewolf gets this right where the other guides are missing some important information. Specifically, you must have the liblzr-dev package if your Overpass server is going to index areas. None of the other guides will tell you that.

I like to give the Overpass user a standard home directory in /home and keep the source code and build scripts there, but deploy the software builds to a directory in /opt. ZeLonewolf puts everything in /opt, which is fine. But I find that having a separate home directory keeps things cleaner.

I also put the Overpass user in nogroup, didn’t assign sudo privileges, and didn’t set a login password. This makes the Overpass user account somewhat more restricted, just in case any of the Overpass software components gets compromised.

We already made the /opt/op directory as the mount point for the NVMe SSD, so we can skip that step. My user and dependency setup looks like this:

sudo su

# mkdir -p /opt/op
# groupadd op
# usermod -a -G op user
useradd -d /home/op -g nogroup -m -s /bin/bash --disabled-login op
chown -R op:nogroup /opt/op
apt-get update
apt-get install g++ make expat libexpat1-dev zlib1g-dev apache2 liblz4-dev
a2enmod cgid
a2enmod ext_filter

exit

Of course, you can use ZeLonewolf’s setup as-is or make your own modifications.

Web Server Configuration

ZeLonewolf’s setup is great. Rather than editing the 000-default.conf file in /etc/apache2/sites-available/, I prefer to put an overpass.conf file in /etc/apache2/sites-enabled/ and leave the default example alone.

Since this is your own personal Overpass instance, you can run really long queries. Setting TimeOut to 600 is plenty because it’s hard to keep the rest of the software stack happy for longer than that.

ZeLonewolf configures the full path for the log files, but it probably makes sense to use the ${APACHE_LOG_DIR} prefix.

Compile and Install Overpass

Don’t copy the URL for the Overpass tarball from ZeLonewolf’s script. Either use https://dev.overpass-api.de/releases/osm-3s_latest.tar.gz or browse to the https://dev.overpass-api.de/releases/ directory and pick the release you want.

Download the Planet

When ZeLonewolf says this will take a long time, he means it! It took me about 7 hours to download a clone of the Overpass database on my 1 Gbps connection. The first time I tried the download was on Patch Tuesday, and the Windows machine I had SSH’d in from rebooted halfway through. That killed my shell on the Overpass server and aborted the download. So I had to start over from scratch. Don’t make that mistake. Use nohup and run the download_clone.sh command in the background.

Also, my use case didn’t require attic data. You can adjust the --meta option as you like for your use case.

cd /opt/op
nohup bin/download_clone.sh --db-dir=db --source=http://dev.overpass-api.de/api_drolbr/ --meta=yes >/dev/null &

Backup

ZeLonewolf casually says, “Now would be an excellent time to backup your downloaded database folder.” That’s not a suggestion. You don’t want to download the database a third time and bump up against your network quota. Plug in and mount that spare USB drive and make a backup of the database NOW.

ZeLonewolf uses cp for the backup. I like to use rsync. It doesn’t matter so much this time, but it will be better when you want to make an incremental update to your backup later.

rsync -rtv /opt/op/db /media/op/usb-drive

Modify that with the right paths for your setup.

Configure Launch Scripts

ZeLonewolf is right that the scripts that come with Overpass are not ideal. He has some good scripts that work for his use case, but I had to make some significant changes for this low-powered server. Here’s what’s going on in that script.

First, Overpass is really finicky about paths and working directories. You always want to start overpass from the /opt/op directory, and you have to have all the directory aliases in this script set up right.

Second, whenever Overpass goes down (or is shut down), it leaves a bunch of semaphore files around and it will refuse to start up until these files are cleaned up. So, before you start Overpass, you always have to delete these files.

Third, there are several separate processes that make up the Overpass server:

  • The osm-base dispatcher, which is the core process for the server
  • The areas dispatcher, which is used for area updates
  • The fetch_osc.sh script which polls for and downloads changeset data
  • The apply_osc_to_db.sh script which reads the changeset data and imports it into the database

Then there’s ZeLonewolf’s area_updater.sh script that runs in a loop, continuously updating the index of areas. That’s a replacement for the rules_loop.sh script that comes with Overpass and basically does the same thing.

The first change you have to make to the launch.sh script is to put a sleep 5 command after the startup of the osm-base dispatcher. Apparently there’s a race condition between the startup of this dispatcher and the rest of the components, because if the other components get running before the dispatcher is ready, they get stuck and don’t do anything. That probably doesn’t show up on the high-powered public Overpass servers, but we’re running on pennies here.

To have a healthy Overpass server, you need the fetch_osc.sh script getting regular changeset updates and the apply_osc_to_db.sh script importing them promptly. ZeLonewolf describes this in his guide, but if the updates aren’t keeping up with real time, things get bad fast.

On this low-powered server, the process kicked off by the area_updater.sh script is a problem for that. The area indexing is both CPU and I/O intensive and the script runs it continuously. That can get in the way of the regular changeset updates.

There are two changes you can make to keep this from being a problem. First, the ionice and nice parameters in ZeLonewolf’s script give the area indexing more priority than the changeset updates. We want to swap that around.

#!/usr/bin/env bash

# updated to work with Overpass v0.7.61.4

EXEC_DIR="/opt/op/bin"
DB_DIR="/opt/op/db"
DIFF_DIR="/opt/op/diff"
LOG_DIR="/opt/op/log"

BASE_DISPATCHER_PID=$(ps -ef | sed -n 's/\([[:alpha:]]\+\) \+\([[:digit:]]\+\).*[d]ispatcher --osm-base.*/\2/ p')

if [ $BASE_DISPATCHER_PID ]
then
  echo "WARNING: dispatcher --osm-base is already running" $BASE_DISPATCHER_PID
else
  rm -fv /dev/shm/osm3s_osm_base
  rm -fv $DB_DIR/osm3s_osm_base
  ionice -c 2 -n 7 nice -n 17 nohup "$EXEC_DIR/dispatcher" --osm-base --meta --space=10737418240 --db-dir="$DB_DIR" >> "$LOG_DIR/osm_base.out" &
  echo "INFO: started dispatcher --osm-base"
  sleep 3
fi

AREA_DISPATCHER_PID=$(ps -ef | sed -n 's/\([[:alpha:]]\+\) \+\([[:digit:]]\+\).*[d]ispatcher --areas.*/\2/ p')

if [ $AREA_DISPATCHER_PID ]
then
  echo "WARNING: dispatcher --areas is already running" $AREA_DISPATCHER_PID
else
  rm -fv /dev/shm/osm3s_areas
  rm -fv $DB_DIR/osm3s_areas
  ionice -c 3 nice -n 19 nohup "$EXEC_DIR/dispatcher" --areas --allow-duplicate-queries=yes --db-dir="$DB_DIR" >> "$LOG_DIR/areas.out" &
  echo "INFO: started dispatcher --areas"
fi

APPLY_PID=$(ps -ef | sed -n 's/\([[:alpha:]]\+\) \+\([[:digit:]]\+\).*[a]pply_osc_to_db.sh.*/\2/ p')

if [ $APPLY_PID ]
then
  echo "WARNING: apply_osc_to_db.sh is already running" $APPLY_PID
else
  ionice -c 2 -n 7 nice -n 17 nohup "$EXEC_DIR/apply_osc_to_db.sh" "$DIFF_DIR" `cat "$DB_DIR/replicate_id"` --meta=yes >> "$LOG_DIR/apply_osc_to_db.out" &
  echo "INFO: started apply_osc_to_db.sh"
fi

FETCH_PID=$(ps -ef | sed -n 's/\([[:alpha:]]\+\) \+\([[:digit:]]\+\).*[f]etch_osc.sh.*/\2/ p')

if [ $FETCH_PID ]
then
  echo "WARNING: fetch_osc.sh is already running" $FETCH_PID
else
  ionice -c 3 nice -n 19 nohup "$EXEC_DIR/fetch_osc.sh" `cat "$DB_DIR/replicate_id"` "https://planet.openstreetmap.org/replication/minute" "$DIFF_DIR" >> "$LOG_DIR/fetch_osc.out" &
  echo "INFO: started fetch_osc.sh"
fi

echo "INFO: verifying startup"
sleep 3

BASE_DISPATCHER_PID=$(ps -ef | sed -n 's/\([[:alpha:]]\+\) \+\([[:digit:]]\+\).*[d]ispatcher --osm-base.*/\2/ p')

if [ $BASE_DISPATCHER_PID ]
then
  echo "INFO: dispatcher --osm-base is running" $BASE_DISPATCHER_PID
else
  echo "ERROR: dispatcher --osm-base is not running"
  echo "INFO: shutting down all components"
  $EXEC_DIR/shutdown.sh
  exit
fi

AREA_DISPATCHER_PID=$(ps -ef | sed -n 's/\([[:alpha:]]\+\) \+\([[:digit:]]\+\).*[d]ispatcher --areas.*/\2/ p')

if [ $AREA_DISPATCHER_PID ]
then
  echo "INFO: dispatcher --areas is running" $AREA_DISPATCHER_PID
else
  echo "ERROR: dispatcher --areas is not running"
  echo "INFO: shutting down all components"
  $EXEC_DIR/shutdown.sh
  exit
fi

APPLY_PID=$(ps -ef | sed -n 's/\([[:alpha:]]\+\) \+\([[:digit:]]\+\).*[a]pply_osc_to_db.sh.*/\2/ p')

if [ $APPLY_PID ]
then
  echo "INFO: apply_osc_to_db.sh is running" $APPLY_PID
else
  echo "ERROR: apply_osc_to_db.sh is not running"
  echo "INFO: shutting down all components"
  $EXEC_DIR/shutdown.sh
  exit
fi

FETCH_PID=$(ps -ef | sed -n 's/\([[:alpha:]]\+\) \+\([[:digit:]]\+\).*[f]etch_osc.sh.*/\2/ p')

if [ $FETCH_PID ]
then
  echo "INFO: fetch_osc.sh is running" $FETCH_PID
else
  echo "ERROR: fetch_osc.sh is not running"
  echo "INFO: shutting down all components"
  $EXEC_DIR/shutdown.sh
  exit
fi

The osm-base dispatcher and apply_osc_to_db.sh script run at ionice class 2 for best effort, and the areas dispatcher runs at ionice class 3 so it only gets I/O scheduling when the system is idle. The nice values for CPU scheduling line up with this too.

We’re going to take the area_updater.sh script out of launch.sh entirely. Replace it with a script that doesn’t loop, and install it as a cron job. That way we can update the area index less frequently, rather than running it non-stop.

#!/usr/bin/env bash

DB_DIR="/opt/overpass/db"
EXEC_DIR="/opt/overpass/bin"
LOG_DIR="/opt/overpass/log"

pushd "$EXEC_DIR"

echo "`date '+%F %T'`: update started" >> "$LOG_DIR/area_update.out"
ionice -c 3 nice -n 19 "$EXEC_DIR/osm3s_query" --progress --rules < "$DB_DIR/rules/areas.osm3s" >> "$LOG_DIR/area_update.out" 2>&1
echo "`date '+%F %T'`: update finished" >> "$LOG_DIR/area_update.out"

popd

This also runs the osm3s_query process for area updates at ionice class 3 with low CPU priority. The osm3s_query process also seems to grumble to stderr, so I’m forwarding that to the log as well.

On a small server like this, re-indexing all the areas takes 2-3 hours. I’m running the area indexing once a day. You could run it more frequently, but I wouldn’t run it more than every four hours.

If you’d prefer to keep the area_updater.sh script and not use a cron job, edit the script to change sleep 3 to sleep 1h.

Log File Management

ZeLonewolf tried to use symbolic links to move all the Overpass log files to a single directory, but logrotate really doesn’t like that. Instead, we’ll just leave the logs where they are and rotate them in place. Here’s what the modified configuration in /etc/logrotate.d/overpass looks like.

/opt/op/diff/*.log /opt/op/state/*.log /opt/op/db/*.log /opt/op/log/*.out {
        daily
        missingok
        copytruncate
        rotate 3
        compress
        delaycompress
        notifempty
        create 644 op nogroup
}

Server Automation

ZeLonewolf has a crontab entry that deletes old changeset files. That’s really important, but it’s possible that the command could delete the replicate_id and state.txt files that are crucial to keeping Overpass running. Let’s keep those files safe. Here’s what the modified crontab entries look like.

0 1 * * * find /opt/op/diff -mtime +2 -type f -regex ".*[0-9]+.*" -delete
0 18 * * * /opt/op/bin/single_pass_area_updater.sh

This is also where I run my area updates.

I do not recommend using @reboot in the crontab entry to launch Overpass at startup.

An uncontrolled shutdown of the Overpass processes can corrupt the database files. Sometimes this can’t be avoided, e.g. when there’s a power outage. If the database is corrupted, you need to restore a backup or start over with a fresh clone.

For regular administration, I use this shutdown.sh script to bring down Overpass safely:

#!/usr/bin/env bash

# updated to work with Overpass v0.7.61.4

EXEC_DIR="/opt/op/bin"
DB_DIR="/opt/op/db"
DIFF_DIR="/opt/op/diff"
LOG_DIR="/opt/op/log"

FETCH_PID=$(ps -ef | sed -n 's/\([[:alpha:]]\+\) \+\([[:digit:]]\+\).*[f]etch_osc.sh.*/\2/ p')

if [ $FETCH_PID ]
then
  kill $FETCH_PID
  echo "INFO: killed fetch_osc.sh" $FETCH_PID
  sleep 1
else
  echo "WARNING: fetch_osc.sh is not running"
fi

FETCH_PID=$(ps -ef | sed -n 's/\([[:alpha:]]\+\) \+\([[:digit:]]\+\).*[f]etch_osc.sh.*/\2/ p')

if [ $FETCH_PID ]
then
  echo "ERROR: unable to kill fetch_osc.sh - other processes may still be running"
  exit
fi

APPLY_PID=$(ps -ef | sed -n 's/\([[:alpha:]]\+\) \+\([[:digit:]]\+\).*[a]pply_osc_to_db.sh.*/\2/ p')

if [ $APPLY_PID ]
then
  for (( i=0; i<100; i++ ))
  do
    APPLY_IDLE_COUNT=$(tail -n 5 $DB_DIR/apply_osc_to_db.log | grep -c from)
    if [ $APPLY_IDLE_COUNT -eq 5 ]
    then
      kill $APPLY_PID
      echo "INFO: killed apply_osc_to_db.sh" $APPLY_PID
      break
    else
      echo "INFO: waiting for apply_osc_to_db.sh to finish updates"
      sleep 6
    fi
  done
else
  echo "WARNING: apply_osc_to_db.sh is not running"
fi

for (( i=0; i<100; i++ ))
do
  APPLY_PID=$(ps -ef | sed -n 's/\([[:alpha:]]\+\) \+\([[:digit:]]\+\).*[a]pply_osc_to_db.sh.*/\2/ p')
  if [ $APPLY_PID ]
  then
    echo "INFO: waiting for apply_osc_to_db.sh to die"
    sleep 3
  else
    break
  fi
done

APPLY_PID=$(ps -ef | sed -n 's/\([[:alpha:]]\+\) \+\([[:digit:]]\+\).*[a]pply_osc_to_db.sh.*/\2/ p')

if [ $APPLY_PID ]
then
  echo "ERROR: unable to kill apply_osc_to_db.sh - other processes may still be running"
  exit
fi

AREA_SCRIPT_PID=$(ps -ef | sed -n 's/\([[:alpha:]]\+\) \+\([[:digit:]]\+\).*[a]rea_updater.sh.*/\2/ p')

if [ $AREA_SCRIPT_PID ]
then
  kill $AREA_SCRIPT_PID
  echo "INFO: killed area_updater.sh" $AREA_SCRIPT_PID
  sleep 1
else
  echo "WARNING: area_updater.sh is not running"
fi

AREA_SCRIPT_PID=$(ps -ef | sed -n 's/\([[:alpha:]]\+\) \+\([[:digit:]]\+\).*[a]rea_updater.sh.*/\2/ p')

if [ $AREA_SCRIPT_PID ]
then
  echo "ERROR: unable to kill area_update.sh - other processes may still be running"
  exit
fi

AREA_UPDATER_PID=$(ps -ef | sed -n 's/\([[:alpha:]]\+\) \+\([[:digit:]]\+\).*[o]sm3s_query --progress --rules.*/\2/ p')

while [ $AREA_UPDATER_PID ]
do
  echo "INFO: waiting for area updater to finish - this may take a L-O-N-G time"
  sleep 15
  AREA_UPDATER_PID=$(ps -ef | sed -n 's/\([[:alpha:]]\+\) \+\([[:digit:]]\+\).*[o]sm3s_query --progress --rules.*/\2/ p')
done

AREA_DISPATCHER_PID=$(ps -ef | sed -n 's/\([[:alpha:]]\+\) \+\([[:digit:]]\+\).*[d]ispatcher --areas.*/\2/ p')

if [ $AREA_DISPATCHER_PID ]
then
  $EXEC_DIR/dispatcher --areas --terminate
  echo "INFO: terminated dispatcher --areas" $AREA_DISPATCHER_PID
  sleep 1
else
  echo "WARNING: dispatcher --areas is not running"
fi

AREA_DISPATCHER_PID=$(ps -ef | sed -n 's/\([[:alpha:]]\+\) \+\([[:digit:]]\+\).*[d]ispatcher --areas.*/\2/ p')

if [ $AREA_DISPATCHER_PID ]
then
  echo "ERROR: unable to terminate dispatcher --areas - other processes may still be running"
  exit
fi

BASE_DISPATCHER_PID=$(ps -ef | sed -n 's/\([[:alpha:]]\+\) \+\([[:digit:]]\+\).*[d]ispatcher --osm-base.*/\2/ p')

if [ $BASE_DISPATCHER_PID ]
then
  $EXEC_DIR/dispatcher --osm-base --terminate
  echo "INFO: terminated dispatcher --osm-base" $BASE_DISPATCHER_PID
  sleep 1
else
  echo "WARNING: dispatcher --osm-base is not running"
fi

BASE_DISPATCHER_PID=$(ps -ef | sed -n 's/\([[:alpha:]]\+\) \+\([[:digit:]]\+\).*[d]ispatcher --osm-base.*/\2/ p')

if [ $BASE_DISPATCHER_PID ]
then
  echo "ERROR: unable to terminate dispatcher --osm-base - other processes may still be running"
  exit
fi

Note that if the area update query process is running, this script may wait an hour or more for that process to finish a full pass over all the area creation.

Performance Verification

This section is crucial for keeping tabs on the health of your Overpass server. If something starts to go wrong, you’ll notice it in the fetch_osc.out, apply_osc_to_db.log, and area_update.out files. Keep tabs on these to make sure everything looks normal.

What if something goes wrong?

If you have Overpass running and it dies, you might have to start over with a clean database. The easiest way to do this is to restore the db directory from a backup. Make sure you update your backups frequently!

If you’re having trouble getting Overpass up and running in the first place, go back to those four guides and look for clues. US users can also try the #overpass channel on Slack.

May your queries be fast and your results accurate!

I’ve started a new project working with watmildon. While we were working together on applying the USGS Sq___ name changes to OSM we noticed was that there were often features in OSM that were out of sync with official name changes that happened years ago.

That got us thinking about walking through the USGS GNIS data set to find places where names had changed and OSM could be updated. After all, there are many features in OSM that have gnis:feature_id (and similar) tags that can be directly matched back to the GNIS data set.

After kicking the idea around for a while, we recently started writing some code. I’ve been working on a matching engine in C# that matches records from GNIS to OSM by Feature ID. The code also looks for likely matches where the feature name, primary tags, and geometry are close to the information from GNIS. So far the results are pretty good, but we’re still working on improving the matching.

Meanwhile, watmildon did some large scale statistical analysis on a local PBF file to look at the scale and scope of the problem. The results were very interesting!

Of the 2.3 million features in GNIS, there are only 1 million corresponding features with GNIS IDs in OSM. Some portion of these are surely existing features that just don’t have the gnis:feature_id (or similar) tags. But given our manual review of results from the matching code, there are a lot of GNIS features that are not present in OSM at all.

That’s not too much of a surprise. Some of the most common types of missing features are Streams, Valleys, Lakes, Springs, and Ridges – all things that not widely mapped in the US.

GNIS recently archived the feature classes for civil names and man-made features. About half of the 1.3 million GNIS records that don’t have corresponding features in OSM are for those archived features. You might reasonably wonder whether it’s worth tagging the archived features in OSM. But that leaves about 600,000 current GNIS features that aren’t fully tagged in OSM. And a large portion of those are likely not mapped at all.

At this point, we’re still working on improving our tools, collecting, and analyzing the data. There do seem to be some opportunities for some automated tag cleanup, and if that makes sense we’ll follow community practices for anything like that.

But fixing the untagged/missing features is going to require manual review and there are too many features for us do that alone. We’ll have to keep working to find ways to enlist the rest of the community to help!

I’ve run across a few places where there seems to be some disagreement and confusion about how to distinguish between roads that should be tagged as highway=service versus highway=track. I see quite a few ways that get switched back and forth between the two tags each time a different mapper touches them.

So I figured I’d write up how I make the distinction. I understand that other mappers might think about these things differently, but here’s how I think about the two types of roads.

Service roads (highway=service) are:

  • used to provide motor vehicle access from a through road or a local road to a specific destination (building, etc.)
  • typically very short
  • typically used for a single purpose
  • often one lane (although sometimes wider)
  • typically not named or numbered (i.e. no name or ref tags)

Some examples of highway=service: a driveway, an urban alley, a parking aisle, a short access road for utility equipment, an access road leading to one or more campsites, or an access road in a municipal dump.

Track roads (highway=track) are:

  • local roads that are only wide enough for a single four-wheeled vehicle (i.e. dual-track on the ground)
  • can be short or long (i.e. many miles)
  • typically used for multiple purposes
  • typically named and/or numbered when they are approved public routes of travel

Some examples of highway=track: a dual-track dirt road, a remote single-lane paved road, a graded single-lane road along a canal or railway, or a dirt road along the path of a power line.

The place that seems to cause the most confusion is where a longer road is used to access some sort of infrastructure. For me, this is typically a highway=track. Although roads like this can be used to access infrastructure (e.g. towers for high-voltage power lines) they can also be used for through travel, recreation, and other purposes. Roads like this are often designated for multiple uses by the land manager responsible for them.

In contrast, highway=service roads are typically short connections from a local or through road to a specific structure or facility.

Both highway=track and highway=service roads can be any type of road bed or condition (i.e. any combination of surface, smoothness, and tracktype tags). Adding these tags where possible is helpful to further define the type of road.

So, there’s this gem:

BLM track crossing Warren H. Brock Reservoir

This is the Warren H. Brock Reservoir overlayed with the BLM 356 track from the latest BLM GTLF data set. Construction started on the reservoir in 2008, so the BLM GTLF data in this area is at least that old.

Sometimes dealing with external data sources requires a little creative interpretation. Aerial imagery shows a track that goes around the reservoir, so that’s the new alignment for BLM 356.

Location: Imperial County, California, United States

BLM Off-Highway Vehicle Areas

Posted by Kai Johnson on 15 December 2022 in English.

While I’ve been working on BLM Ground Transportation Linear Features (i.e. highways) in Imperial County, I took a small diversion to put in the BLM Off-Highway Vehicle Areas in California. Four of the major BLM OHV areas are in Imperial County, so it was relevant. These boundaries are important because many of the OHV areas are “open,” allowing cross-country travel off of designated roads and trails.

I’ve been working with the BLM CA Off Highway Vehicle Designations data set, which has 31 OHV areas in California and one OHV area from Nevada that slipped in because it’s managed by a BLM field office in California.

As I started adding the OHV areas, I noticed that almost all of these areas have never been mapped. Some of these areas are notable institutions in the off-road community, like Imperial Dunes (aka Glamis) and Johnson Valley (home of King of the Hammers). So adding these areas is a significant contribution to the map.

Tagging these areas is a little bit of a challenge. After some discussion with Minh Nguyen, I settled on landuse=recreation_ground and leisure=offroad_driving to tag all the OHV areas. The recreation_ground tag is a slightly odd fit but it seems close enough to be appropriate. And some renderers have an idea what to do with it.

Some of the OHV areas only permit vehicles on designated routes. That’s no problem because the access tags go on highway features and the OHV area doesn’t need any additional tagging. But many OHV areas permit open cross-country riding, so tagging vehicle access is an issue for these areas. I settled on adding motor_vehicle and ohv access tags directly to the areas, with values like yes for unrestricted access, permit where vehicles must have a pass, and permissive for the shared-use area of Johnson Valley which is periodically closed for military use (but not on a predetermined schedule).

The motor_vehicle tag implies the same access conditions for motorcycles, and the ohv tag includes both buggies and ATVs, so the OHV areas don’t need specific motorcycle or atv tags.

The El Mirage OHV Area is open to ultra-light aircraft, gyrocopters, parasails, and full-sized aircrafts. So it gets an aeroway=yes tag to cover all of the above!

Since the OHV areas are administrative boundaries, they sometimes share alignment with other boundaries. In cases where it was clear that the boundary locations were (nearly) identical, I used multipolygons to share ways between the boundaries. But in a lot of cases where the map has similar boundaries established by different agencies, the boundaries really don’t line up and there’s no clear way to resolve the discrepancies. In those cases, I left the boundaries to overlap and cross. Maybe someday there will be a reliable data source to resolve those inconsistencies.

In the end, there was one OHV area that I left off the map. It wasn’t clear how the South Spit area near Eureka is meant to line up with the terrain or existing boundaries. There didn’t seem to be much OHV activity present in aerial imagery. And I didn’t find any additional explanation on the BLM web site. So I left that for someone who might have more insight.

Putting the OHV areas on the map is also going to help me finish up adding the BLM routes in Imperial County. The Imperial Dunes OHV Area is the major spot I still have to work on. The OHV area has a central open riding area surrounded by not quite contiguous areas where riding is restricted to established trails. Having those boundaries is going to make it easier to get the access conditions on the trails right!

Location: Imperial County, California, United States

Many of the features we had to deal with in the Sq___ renaming were small streams and creeks. For some reason, Sq___ Creek seemed to be a very popular name. In most cases, the creeks weren’t present on OSM, and as part of the renaming, we decided to add missing features with the new names so that future mappers wouldn’t unknowingly add the features with the old Sq___ names. So, we had to map a lot of small creeks.

One of the challenges with mapping named waterways is identifying the full extent of the waterway. Where is the mouth of the waterway? Where is the source? Of the many branches upstream from the mouth, which branch is the identified course?

If you’re just working with GNIS, the GNIS data has two or sometimes three sets of coordinates for waterway features. The first coordinate is the mouth. If there is a second coordinate, it falls somewhere in the middle of the waterway. The last coordinate is the source.

From there, you can use topo and aerial maps to trace the course of the waterway by hand.

Alternatively, you can download the local data file from the National Hydrography Dataset, find the waterway you want, merge it into an OSM layer, and clean it up before uploading it. Here’s how that works:

  1. Go to The National Map downloader web site. Select “NHD” from the “Custom Views” menu at the top. Zoom to the area you’re interested in on the map. Select the National Hydrography Dataset (NHD) data set (not NHDPlus High Resolution), HU-8 subbasin (this gets you the smallest slice of the data set), and Shapefile format, then search for available products. This should hopefully give you a list of four or five results. Click each of the Thumbnail links in the results list to toggle the extent of the data sets. When you find the data set with coverage of the area you’re interested in, click the Download link.

  2. Unzip the file(s) and use the opendata plugin in JOSM to open the .shp files. You want the Area (polygons for rivers, etc.), Flowline (ways for streams), Waterbody (polygons for lakes, etc.), Point (springs, etc.), and Line (dams, etc.) data files. Or maybe you just want the Flowline file if you’re just going to import a single creek.

  3. Use GNIS and Topo maps to figure out where your feature is. Go to the relevant NHD layers that you imported and pick up the pieces you need for your feature. Most linear features are split into several ways so it helps to use the Find function in JOSM to select them. Alternatively, some features in the NHD files have relations that you can use to select all the individual ways. Once you have everything selected, use Merge Selection to copy the selected data to the OSM layer.

  4. If you didn’t merge an entire relation into the OSM layer, create one for all the ways you just pasted in. This makes it much easier to find the ways and update them. Use the continuity check in the relation tool to make sure you didn’t miss any of the smaller ways. Make sure you have connected ways where they’re supposed to be connected.

  5. Clean up the NHD attributes using this mapping: osm.wiki/wiki/NHD_Rules. It’s out of date, but I figure keeping some of the attributes isn’t harmful.

  6. Check your OSM tags against the NHD FCode osm.wiki/wiki/National_Hydrography_Dataset#Attributes-to-OSM-tags. E.g. some streams have intermittent=yes

  7. Use the Simplify Way command to reduce the number of points in the imported waterway. You probably want to use a 2 or 3 meter maximum error for the command. NHD waterways typically have a lot more points than are necessary to get good alignment with the natural watercourse. Simplifying the ways reduces the number of points you’ll need to check and correct in the next step.

  8. Use Bing or another reasonably well-aligned set of aerial tiles to check the alignment of the NHD features. Sometimes they’re OK, sometimes they’re a little off, and sometimes they’re just plain wrong. Tweak all the ways so that they match up with the aerial imagery. This part is a lot of work.

  9. Double-check everything before you upload the new feature.

All that sounds great, but the NHD data is often pretty poor. As in, waterways going up the sides of canyons. And even where the NHD data is close, you might have to go in and manually adjust every node in the waterway to align it with aerial and topo maps.

In practice, it’s often easier to just draw the waterway by hand than to use the NHD data. If you’re starting with GNIS coordinates, add them as nodes in JOSM, connect the nodes into a single way, then use the Improve Way Accuracy mode to fill in the remaining nodes to get a good fit to the aerial imagery. It’s still a lot of work, but it’s easier than cleaning up imported NHD data.

Meanwhile, work continues on mapping BLM Ground Transportation Linear Features in SoCal…

I guess I didn’t keep up with this diary. I’ve been busy since that first entry.

I’ve gone through both Cleveland National Forest and San Bernardino National Forest to fill in and tag forest roads and trails. At this point, both forests should have all of the official routes of travel with their official names and refs. There will be some differences between OSM and the FS Topo data source where conditions on the ground are different from what USFS has in their data set.

I also worked with a team of mappers to update all the Sq___ names that were changed by BGN/USGS in both OSM and Wikidata. (See https://www.doi.gov/pressreleases/interior-department-completes-removal-sq-federal-use and https://edits.nationalmap.gov/apps/gaz-domestic/public/all-official-sq-names.) That made me really happy because the unfortunately named local “Squaw Tit” that I used in my backcountry navigation course is now appropriately named “Mat Kwa’Kurr.”

I have two things going on now. I’m filling in the roads that CBP has made in the Jacumba Wilderness Area. There’s been a lot of activity out there recently and some construction work on two new border wall segments. This activity is controversial for a number of reasons, so I think it’s important to document the impact CBP has had in the area.

I’ve also started working with the BLM Ground Transportation Linear Features data set to fill in backcountry routes in SoCal.

I’m starting with the area around Superstition Mountain in Imperial County because it’s a popular area for off-road activities. The terrain there makes navigation challenging, so good maps can make a huge difference.

Unfortunately, the shifting sand dunes in the area also make mapping difficult. And the BLM data is not very good. The BLM tracks wander off into places where there are no tracks on the ground. And the BLM tracks take some improbably dangerous routes over surface features, like crossing the sharp crest of a soft sand dune.

BLM official "track" on untouched land, crossing sand dunes

Reconciling the official BLM data with actual tracks on the ground is going to take some work.

[Edit] And then there are mysteries like this BLM 337 motorized route.

BLM 337 route imagery from Bing

There’s some dual track in one of the canyons for scale. I’ve been out there. There’s no way a wheeled vehicle could follow that route from the BLM data. And it’s not like the data is just offset or poorly aligned. BLM’s PDF map of route of travel clearly distinguishes this route from the nearby paved service road, which is the only other similar feature in the area.

BLM 337 route from BLM PDF

It’s not quite as bad as another BLM motorized route nearby that literally goes over the edge of a cliff. But I’m going to have to try to call the local field office about this. Sadly, they’re understaffed and I’ve never had any luck getting through to them.

Location: Imperial County, California, United States

Busy first day

Posted by Kai Johnson on 24 September 2021 in English.

I’m no stranger to GIS, so I jumped right in. Filled in BLM routes around Painted Gorge, Mica Gem, and Buck Canyon. Cleaned up some routes at Valley of the Moon and along Grapevine Canyon.

Still need to add a couple routes to Painted Gorge but I want GPS data first. There are discrepancies between BLM maps and aerial photos that can only be resolved by going there in person.

The Yuha Basin is also on my to do list, but I definitely want GPS data for that first. The BLM map isn’t that great and there are a lot of tracks on the ground that differ from the map.

Location: Kensington, San Diego, San Diego County, California, 92116, United States