
I’ve started getting into capturing on Mapillary and have found it to be incredibly helpful for mapping on OSM. I wanted to go through my setup in case it’s interesting for others.
- I prefer to capture 360 images
- I use the LG360 (R105)
- I bought two LG360 cameras off ebay, $125USD and $90USD. The LG360 is on the cheaper end of the scale compared to some of the others on the market.
- Though there is a flaw in one of the cameras I bought which is a shame as you can see the left half of the image (front camera) is blurry.

- I’m happy with the image resolution and quality. I wouldn’t want it any worse though. Most of the time street signs and parking signs aren’t readable, but speed limits and destination signs are.
- The LG360 is unreliable, sometimes it stops capturing, connecting to your phone can take several minutes and attempts before finally working, there can be gaps in the GPS tagging where it will use the last location for maybe 30 seconds (even though the GPS log might have data; in this case I end up using gpscorrelate, however I’ve found you have to play around with the time offset and even then you might get it right for the start of the trip but it will be out at the end).
- I think the battery should last for around 1hr 45min at a 2 second capture interval.
- I’m happy with the 2 second capture interval, but wouldn’t want anything not supporting at least 2 seconds.
-
I’m using a 64GB Micro SD card XC I U1. Photos are about 5MB so you should get around 10,000 photos or 6 hours give or take.
-
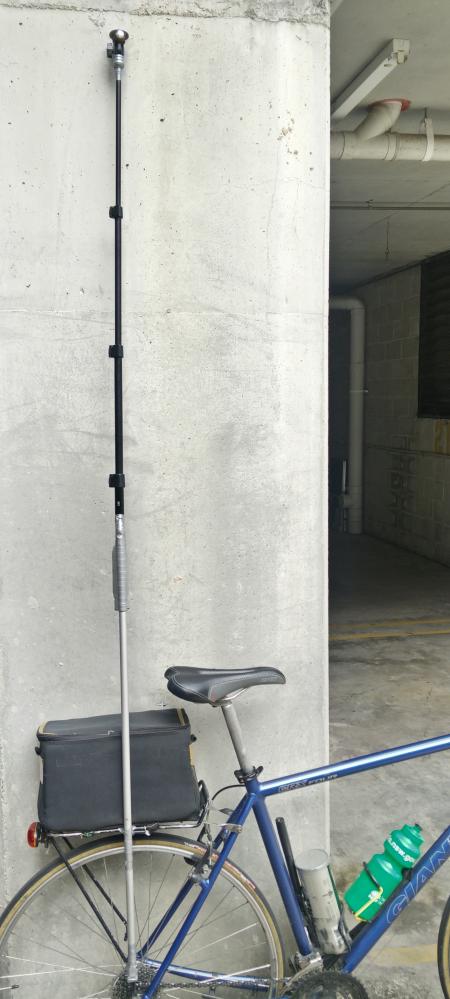
I capture on my bicycle. I have a rack mounted which I attached an old broom stick I found on the side of the road to, which I then attach the Monopod to. It’s all held together with Duct tape. The broom stick I’m using is light weight but does give some flex (if the camera had a built in gyro it could correct for it in software, I mean it’s a 360 camera after all!).
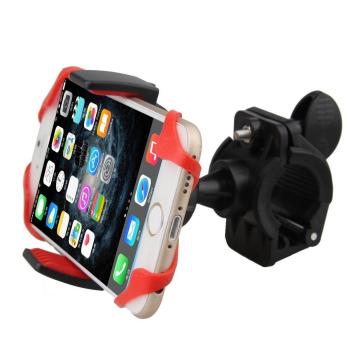
- I use this phone mount. It’s great. Very easy to attach/detach your phone, has a Silicone band to hold you phone in place (I’ve had my phone come out of the claw once going over a pothole, and the band ensured it didn’t come out). There is this ball joint which is stiff enough that you can just change the angle of your phone and it usually stays in place. I got mine for $2.10 USD.
-
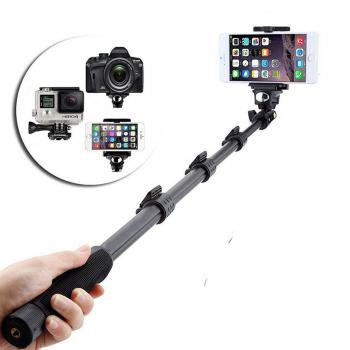
Originally I used a selfie stick like this http://www.ebay.com/itm/Extendable-Handheld-Monopod-Tripod-Mount-For-GoPro-Hero-4-3-3-2-1-Intriguing/282407340369, but you need to be careful as if used a while or if you run into tree branches it will come apart. I also found it would sometimes not stay extended. Lastly there are two kinds of this selfie stick, some don’t have a ridge so the camera will start turning around which means the orientation ends up being wrong.
-
I upgraded to this $12.60USD Yunteng YT-188 Self Picture Monopod. It’s much better it doesn’t feel flimsy and it’s rigid with no flex. The clamps prevent it from collapsing or rotating. The only flaw is I needed to tape up the top as it was loose.
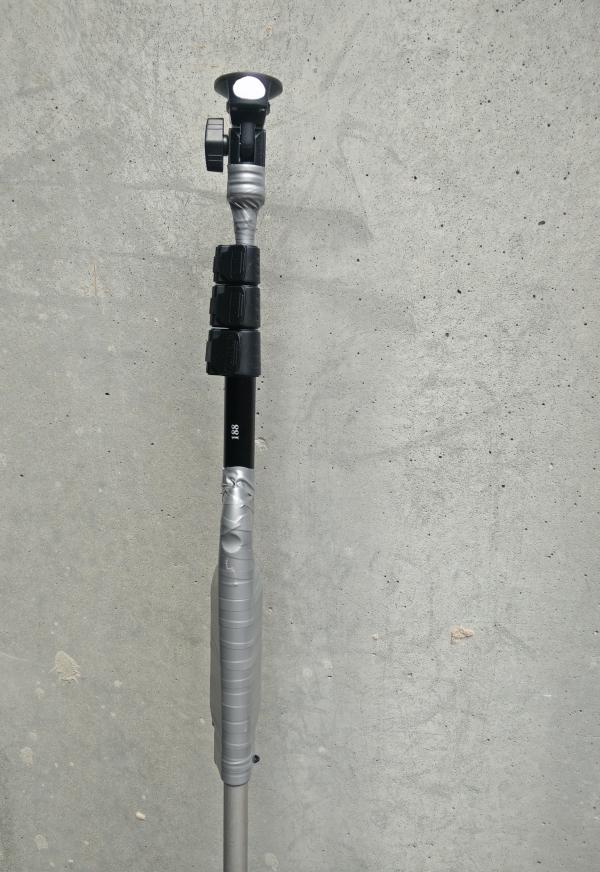
This pole is longer than the previous one. All the 360 photos on my Mapillary profile to date have been with the shorter pole. I’m still working out the best height to use. The higher the camera then the less I obstruct the view, but the more tree branches, signs etc I run into.
The main problem at the moment is it’s a real pain uploading to Mapillary when you have something like 10GB a day and can only do around 90KB/second. I end up using rsync to a remote server as rsync doesn’t mind being interrupted a hundred times and it’s easy to limit the bandwidth. I also use lepton to compress the JPEGs further. WebP would be even better! The scripts I use for this are at https://github.com/andrewharvey/lg360-mapillary-helpers
If you get lucky on ebay parts are around $105 USD + duck tape, a bike, a phone and a Micro SD card.
Discussion
Comment from SomeoneElse on 25 August 2017 at 09:27
I particularly like the “low bridge detector” :)
Comment from aharvey on 25 August 2017 at 09:46
The other thing I forgot is, the LG360 needs to be connected to your moblie device while in use, which means the camera is wasting power with wifi and bluetooth. You can’t just press a button to start capture and then again to stop.
There is no built in gyro so when it rotates your photos are rotate (so won’t work well mounted on a helmet).
Comment from ToniE on 25 August 2017 at 13:29
I have the same problems with my 1GBit/sec DSL upload speed.
I do the following:
works fine for me. But for 5,000 images it might take 2-3 days to upload all images.
Comment from utack on 2 September 2017 at 23:13
I like to capture using something with changeable battery.
 Imagemagick flips the result, fixes the extreme fisheye distortion, crops out (most of) the bicycle bags and the mapillary scripts sync it up with a gpx from my Garmin eTrex.
Right now it is the GoPro Hero3, with 8 third party batteries that cost under 3€ a piece and run about 2h in 2s interval mode.
The camera mount by Tacx seemed appropriate, it combines the advatages of being affordable, being sturdy, holding the camera mostly steady when steering and being permanently attached to the bike without disturbing.
It has a narrow angle compared to your setup, but the advantage that it can capture for 12h+ with many batteries and does not need a phone.
Comment from aharvey on 4 September 2017 at 01:52
@utack I’d like something standalone and reliable, but personally I find the benefits of 360 capture mean I’ll sacrifice image quality and reliability of capture which it’s easier to find in non 360 cameras.
I guess you’d need two, one for the front and one for the back?
Even without a swapable battery, something like http://www.ebay.com.au/itm/1-4-Expansion-Screw-Adapter-for-Ricoh-Theta-S-M15-LG-360-Cam-Samsung-Gear-360/262513821205 would raise the LG360 and let you run a USB cable to a power bank to keep it going for the whole day. You still need to power you phone though as unfortunately since the LG360 is so unreliable you need to keep the screen on as sometimes it just stops.
Comment from aharvey on 6 October 2017 at 03:56
The phone mount I used, eventually sheered off from too many bumps in the road, luckily I had it secured via zipties, but just be warned.
Comment from aharvey on 17 December 2017 at 12:31
I’ve been corrected at https://forum.mapillary.com/t/picture-s-of-your-bike-camera-setup/1351/6?u=andrewharvey the camera does correct for tilt. But it doesn’t expose this vector so that might explain why my masking of the area below the camera has issues when the camera is tilted going around bends.
Stay tuned for my next review the Sony HDR-AS300.
Comment from aharvey on 27 September 2019 at 14:33
An update since I posted this, I’ve also tested out mounting the 360 camera on a helmet, which I found works well too. Sample image https://www.mapillary.com/map/im/s4btF9pO_QKG-3WhuUulRw
Pros: * The camera is high enough to still capture a good view (not as high as a pole) * Your’ slightly more incognito compare to riding with a long pole. * Less worry about hitting tree branches
Cons: * Feels heavy on the head, but overall it’s okay.
I was originally worried about the tilt and head turning compared to on a pole, but to be honest most of the time you’re looking forward so I’m yet to see that as an issue.
Comment from aharvey on 27 June 2020 at 14:53
Some tips for the LG 360 (R105)