OpenStreetMap

Steven Vance's Diary

Recent diary entries

Originally posted on my blog Steven Can Plan.

It’s possible to use Overpass Turbo to extract any object from the OpenStreetMap “planet” and convert it from a GeoJSON or KML file to a shapefile for manipulation and analysis in GIS.

Say you want the subway lines for Mexico City, and you can’t find a GTFS file that you could convert to shapefile, and you can’t find the right files on Sistema de Transporte Colectivo’s website (I didn’t look for it).

Here’s how to extract the subway lines that are shown in OpenStreetMap and save them as a GIS shapefile.

This is my second tutorial to describe using Overpass Turbo. The first extracted places of worship in Cook County. I’ve also used Overpass Turbo to extract a map of campgrounds

Part 1: Extract free and open source data from OpenStreetMap

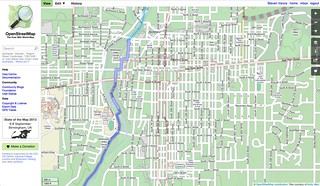
  1. Open the Overpass Turbo website and, on the map, search for the city from which you want to extract data. (The Overpass query will be generated in such a way that it’ll only search for data in the current map view.)
  2. Click the “Wizard” button in the top toolbar. (Alternatively you can copy the code below and paste it into the text area on the website and click the “Run” button.)
  3. In the Wizard dialog box, type in “railway=subway” in order to find metro, subway, or rapid transit lines. (If you want to download interstate highways, or what they call motorways in the UK, use “highway=motorway“.) Then click the “build and run query” button.
  4. In a few seconds you’ll see lines and dots (representing the metro or subway stations) on the map, and a new query in the text area. Notice that the query has looked for three kinds of objects: node (points/stations), way (the subway tracks), relation (the subway routes).
  5. If you don’t want a particular kind of object, then delete its line from the query and click the “Run” button. (You probably don’t want relation if you’re just needing GIS data for mapping purposes, and because routes are not always well-defined by OpenStreetMap contributors.)
  6. Download the data by clicking the “Export” button. Choose from one of the first three options (GeoJSON, GPX, KML). If you’re going to use a desktop GIS software, or place this data in a web map (like Leaflet), then choose GeoJSON. Now, depending on what browser you’re using, a couple things could happen after you click on GeoJSON. If you’re using Chrome then clicking it will download a file. If you’re using Safari then clicking it will open a new tab and put the GeoJSON text in there. Copy and paste this text into TextEdit and save the file as “mexico_city_subway.geojson”. Done.

Overpass Turbo screenshot 1 of 2

Screenshot 1: After searching for the city for which you want to extract data (Mexico City in this case), click the “Wizard” button and type “railway=subway” and click run.

Overpass Turbo screenshot 2

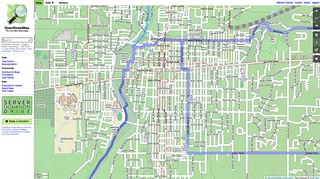
Screenshot 2: After building and running the query from the Wizard you’ll see subway lines and stations.

Overpass Turbo screenshot 3

Screenshot 3: Click the Export button and click GeoJSON. In Chrome, a file will download. In Safari, a new tab with the GeoJSON text will open (copy and paste this into TextEdit and save it as “mexico_city_subway.geojson”).

Part 2: Convert the free and open source data into a shapefile

  1. After you’ve downloaded (via Chrome) or re-saved (Safari) a GeoJSON file of subway data from OpenStreetMap, open QGIS, the free and open source GIS desktop application for Linux, Windows, and Mac.
  2. In QGIS, add the GeoJSON file to the table of contents by either dragging the file in from the Finder (Mac) or Explorer (Windows), or by clicking File>Open and browsing and selecting the file.
  3. Convert it to GeoJSON by right-clicking on the layer in the table of contents and clicking “Save As…”
  4. In the “Save As…” dialog box choose “ESRI Shapefile” from the dropdown menu. Then click “Browse” to find a place to save this file, check “Add saved file to map”, and click the “OK” button.
  5. A new layer will appear in your table of contents. In the map this new layer will be layered directly above your GeoJSON data. Done.

Overpass Turbo screenshot 4

Screenshot 4: The GeoJSON file exported from Overpass Turbo has now been loaded into the QGIS table of contents.

Overpass Turbo screenshot 5

Screenshot 5: In QGIS, right-click the layer, select “Save As…” and set the dialog box to have these settings before clicking OK.

Query for finding subways in your current Overpass Turbo map view

/*  
 This has been generated by the overpass-turbo wizard.  
 The original search was:  
“railway=subway”  
*/  
[out:json][timeout:25];  
// gather results  
(  
// query part for: “railway=subway”  
 node["railway"="subway"]({{bbox}});  
 way["railway"="subway"]({{bbox}});  
 relation["railway"="subway"]({{bbox}});  
 ``/*relation is for "routes", which are not always  
 well-defined, so I would ignore it*/  
);  
// print results  
 out body;  
 >;  
 out skel qt;

Note that I wrote this in Chicago, not Mexico City, but it’s about Mexico City because my friend was trying to create a map of the Mexico City Metro (subway) and he couldn’t find a free data source.

Location: 06720, Cuauhtémoc, Mexico City, Mexico

ALSINA bus from Seville to Cádiz uses OpenStreetMap

Posted by Steven Vance on 10 May 2014 in English. Last updated on 11 May 2014.

OSM on bus to Cadiz

I took a day trip on a coach bus from Seville to Cádiz on Wednesday to visit the beach while staying for a week in Seville. I was surprised near the end of the trip when the bus’s LCD screen started showing its current location using OpenStreetMap.

This bus has free wifi so it obviously has a cellular network connection and can determine its location as well as download the map tiles to display its current location.

It makes sense for the bus company to use OpenStreetMap: it is detailed and free, so the bus company doesn’t have to license the map from Google, Navteq, TomTom, Nokia, Bing, etc.

I think airlines should switch to using OpenStreetMap for their base layer when they show the plane’s position.

Photo originally posted on my Flickr.

It will be a couple days before the OpenCycleMap tiles are updated to reflect the new information. Campbell had previously been tagged but I tagged Clybourn (the diagonal street) yesterday.

The Chicago Bike Guide depends on directions from MapQuest Open Directions, a free service MapQuest offers that uses the OpenStreetMap database of streets. The service looks at how the streets are “tagged” to determine the relative bike-ability of a route between your current location and your inputted destination.

MapQuest Open Directions looks for the “cycleway” tag to see if the street has a bike lane that would increase a route’s bike-ability. If that tag doesn’t exist then it looks for the “bicycle” tag which has a value of “yes” (bicycles are allowed), “no” (bicycles are not allowed), or “designated” (bicycles are allowed and encouraged here).

The City of Chicago has added a lot of new bike lanes since May 2011, at a faster rate than the previous years. Yesterday I verified that all of the new buffered and protected bike lanes (called “cycle tracks” in OpenStreetMap parlance) were noted in OpenStreetMap’s database to ensure that MapQuest Open Directions had the correct information to route Chicago Bike Guide users.

I used Active Transportation Alliance’s bikeways tracker to know which streets to look at. I used my personal knowledge of that bike lane installation to note specifically in OpenStreetMap when it changed types – for example, when a protected bike lane has a buffered bike lane for a block.

Adding the Berteau Avenue neighborhood greenway was a little tricky. “Neighborhood greenway” isn’t a type of infrastructure, but a concept involving a variety of infrastructure modifications. I tagged some parts as having a shared lane on one side of the street (sharrow) and a bike lane in the opposite direction of the main travel flow (a so-called contraflow bike lane). I also added a tag to denote the new speed limit of 20 MPH.

Cross-posted to my blog.

Here’s the list of bike lane additions I made to OpenStreetMap (see changesets one, two, three):

  • Vincennes, 84th to 103rd, track
  • South Chicago, Baltimore to 79th, buffered
  • South Shore Drive, 71st to 79th, buffered
  • Halsted, 69th to 75th, buffered
  • Halsted, Pershing to Garfield, buffered
  • King, 51st to 26th, buffered
  • Ellsworth, Garfield to 51st, buffered
  • Halsted, 26th to Lumber, buffered
  • Archer, State to Cermak, buffered
  • State, 18th St. to 26th St., buffered
  • Wabash, Roosevelt to 18th, buffered
  • Wabash, 18th to Cermak, buffered
  • Wabash, Harrison to Roosevelt, buffered
  • Desplaines, Harrison to Roosevelt, buffered
  • Desplaines, Randolph to Harrison, track
  • Halsted, Roosevelt to Van Buren, buffered
  • Jackson, Oakley to Ogden, track
  • Lake, Central Park to Damen, track
  • Jackson, Hamlin to Central Park, track
  • Hamlin/Independence, Douglas to Madison, buffered
  • Douglas, Independence to Sacramento, buffered
  • Sacramento, 19th to Douglas, track
  • Marshall, 24th to 19th, track
  • Madison, Central to Pulaski, buffered
  • Franklink, Central Park to Sacramento, buffered
  • Kedzie, North to Palmer, buffered
  • Division, Western to California, buffered
  • Milwaukee, Elston to Kinzie, lane, buffered, track
  • Elston, Milwaukee to LeMoyne, buffered, track
  • Halsted, Division to North, buffered
  • Halsted, Fullerton to Wellington, buffered (except for next to Home Depot)
  • Clark, Diversey to Addison, buffered
  • Clybourn, North to Belmont, shared and buffered
  • Berteau, Lincoln to Clark, greenway, 20 mph
  • Roscoe/Campbell, Damen to Western to Belmont, lane, buffered
  • Franklin, Harrison to Wacker, buffered
  • Wells, Chicago to Wacker, buffered
  • Clark, Walton to North, buffered and shared lane
Location: North Center, Chicago, Lake View Township, Cook County, Illinois, United States

I’m adding Chicago-area campgrounds to the Chicago Bike Guide to entice new users and to espouse the enjoyment of medium-distance bike camping. The Chicago Bike Guide is available for Android and iOS.

I’m taking a systematic approach to finding all the publicly-owned campgrounds in the area by looking at primary sources.

First, though, I’ve used Overpass Turbo to create a list of all existing campgrounds in OpenStreetMap. You can see a gist of these places.

camp sites at Greene Valley forest preserve

The next method is to find out which campgrounds are operated by the county forest preserves, which are usually well-documented on their respective websites. Then I will look at state parks, operated by states’ respective Departments of Natural Resources (DNR). Next I will look at national parks and finally commercial campgrounds.

I’ve so far mapped the campgrounds in two ways, as nodes and as areas. At the Greene Valley forest preserve in DuPage County, for example, I’ve mapped the 11 individual camp sites (see map), but at Blackwell forest preserve in the same county, I’ve mapped the area as a single camp site (see map).

Blackwell has over 50 sites in a discrete area and it’s more efficient to map them as a single node, while Greene Valley had far fewer sites but scattered over a couple areas.

Cross-posted to my blog.

Location: DuPage County, Illinois, United States

Richmond, Indiana on OpenCycleMap (before)

I visited Richmond, Indiana, in early August with my friend who grew up there. There isn’t much to do there, but there are a lot of neat places to bike to. Richmond had more features mapped than I expected, but I was happy to contribute via Pushpin and JOSM. With Pushpin OSM, an app for iOS, I added a couple of venues I visited, including Firehouse BBQ & Blues.

With JOSM, though, I wanted to add the city’s bike routes so they would appear in OpenCycleMap and could then be immediately embedded as a (somewhat) interactive map on the Bike Richmond website. I asked a city planner for a bike map and he gave me a GIS printout that showed the “recommended routes” (which are unsigned) and then he drew on the signed route that augment the recommended routes. The signed route essentially creates a loop.

I tagged all of the recommended routes as “bicycle=designated”. After the tiles in OpenCycleMap updated to include my work in Richmond I realized that OCM doesn’t symbolize “bicycle=designated” unless they’re in a relation. I created a relation, calling it the “City of Richmond Signed Bike Route”.

Richmond, Indiana on OpenCycleMap (after)

This was cross-posted to my urban planning blog, Steven Can Plan.

Location: Richmond, Wayne County, Indiana, 47374, United States